
Set up Repair Questions and Repair Process
Circuly’s superpower is its digital return handling and repair process. circuly automates the product return and repair process and helps you to collect important information about your product.
To process returns and repair in the circuly operations backend, you need to set up the repair questions first.
After a product is returned by the customer and before it can be rented out again, the product goes through the repair process. The repair process exists to make sure that the product meets the necessary quality standards before it is sent to another rental cycle.
Since the repair process varies from one business to another, you can set-up your own custom repair process in the circuly operations backend. You can track the status of the product as well as the time and money needed to repair the product. This will help you to track your products’ lifetime value and keep the transparency about your products high.
Before we begin with the set up of the Repair Questions, read the summary below to understand the various elements of the Repair Questions Section.
Structure of the Repair Question Section
- Components Column
- Middle Column
- Properties Column
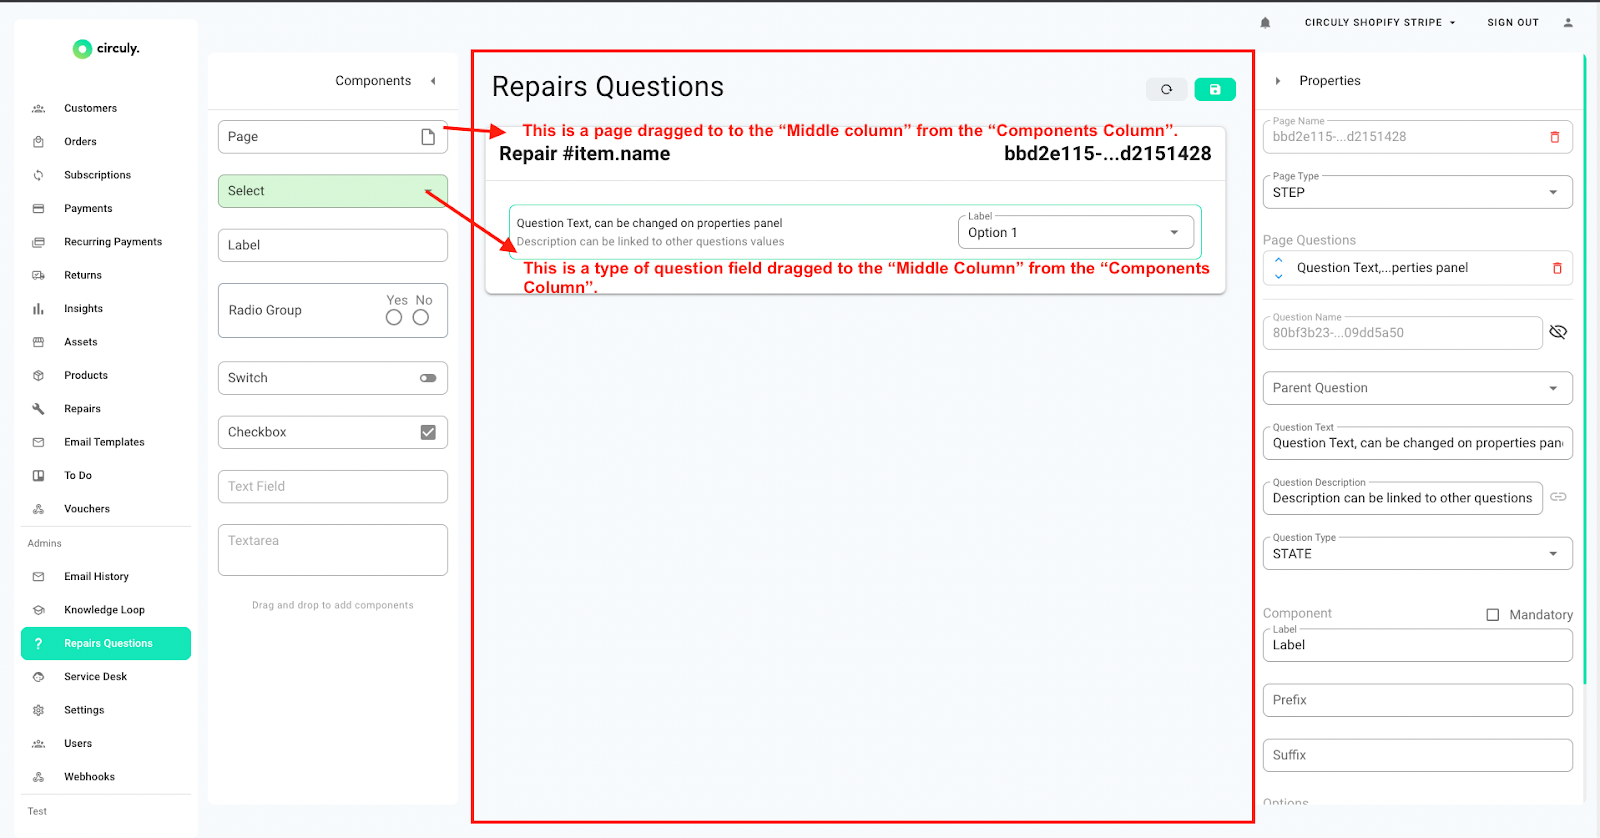
The three sections of the Repair Question Section are showcased below.

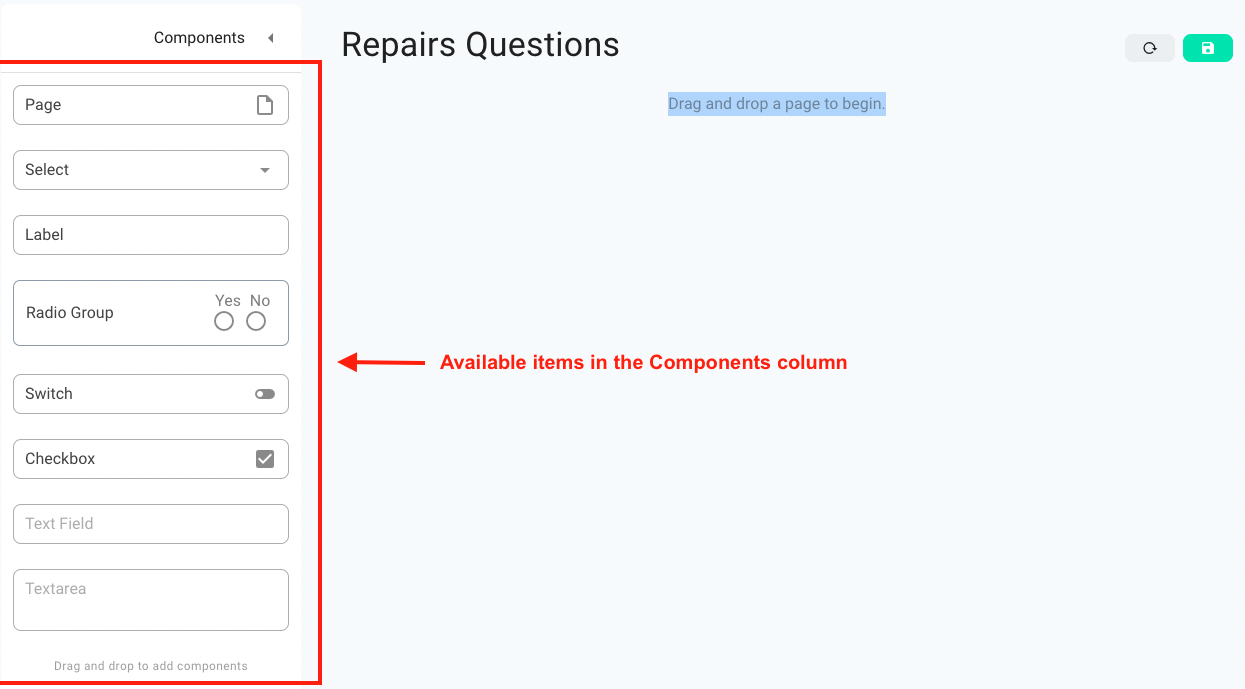
1. Components Column
The Components Column is used to create the repair process page(s) and to fill the page(s) with repair questions. Each page is one step of qualifying your product. The pages are connected to each other by a “next”/”back” button or “submit” button. See examples below of an existing Repair Workflow.
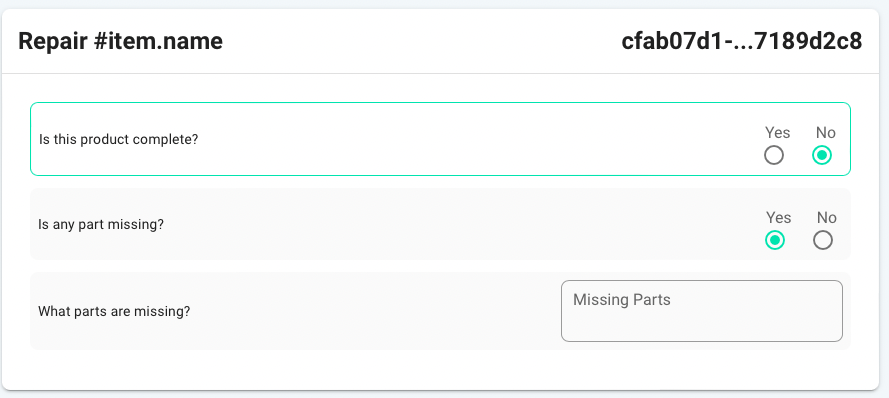
Page 1 with three repair questions. The Repair Question type is Radio group (available in the Components Column and explained later in detail).

More fields can show up based on the response to the question. See example below.
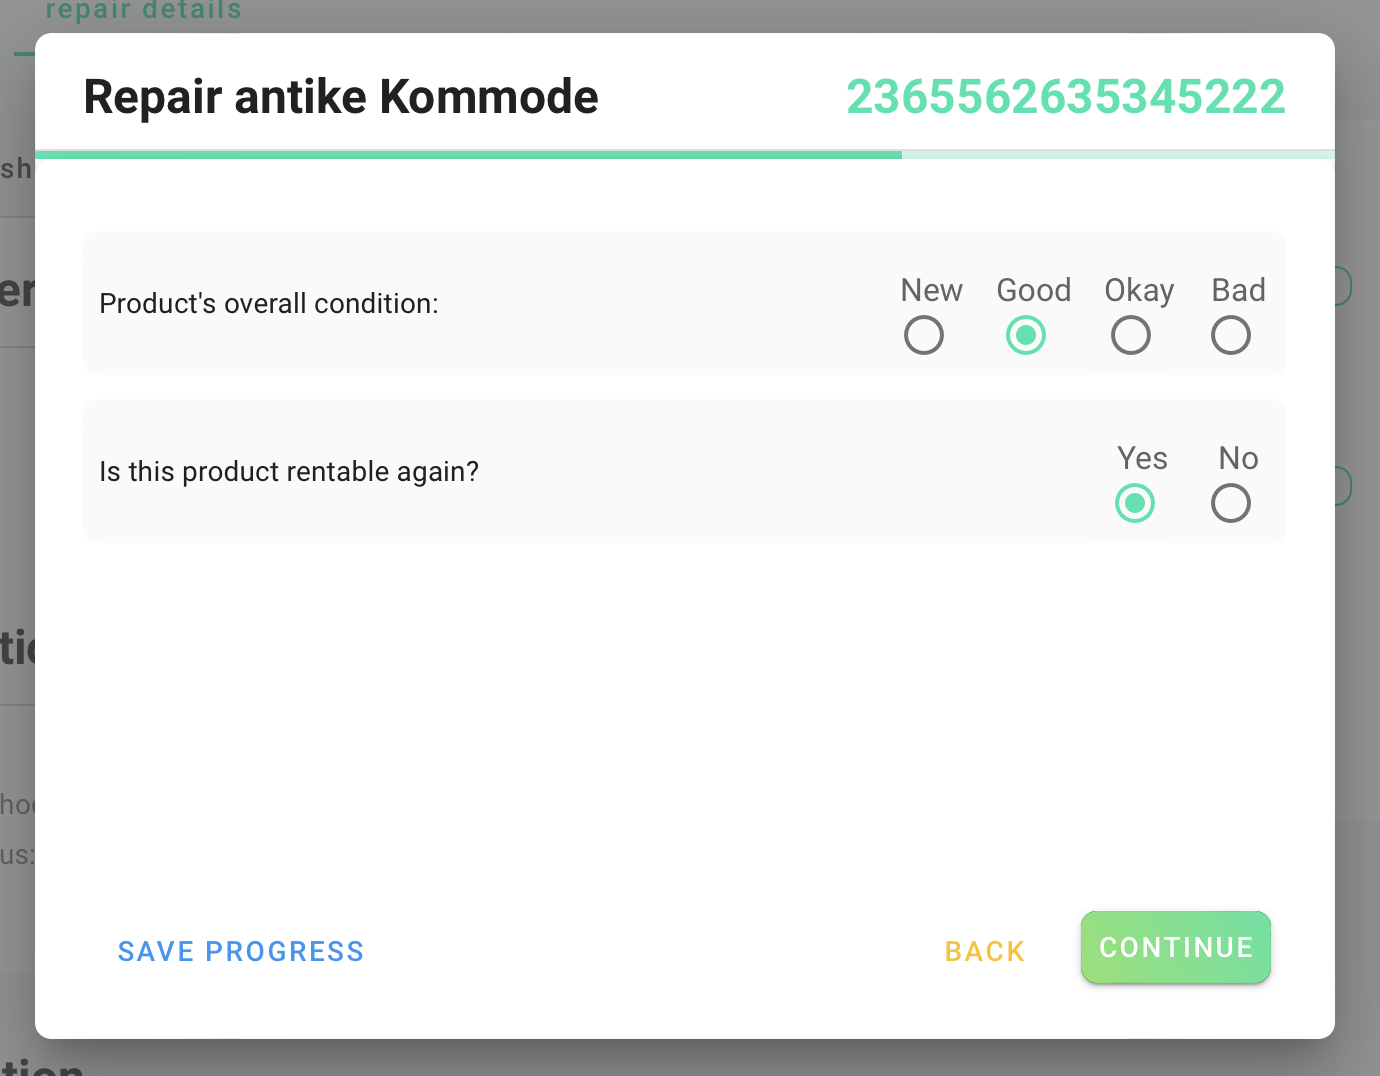
Page 2 with two repair questions. The Repair Question type is Radio group (available in the Components Column and explained later in detail).
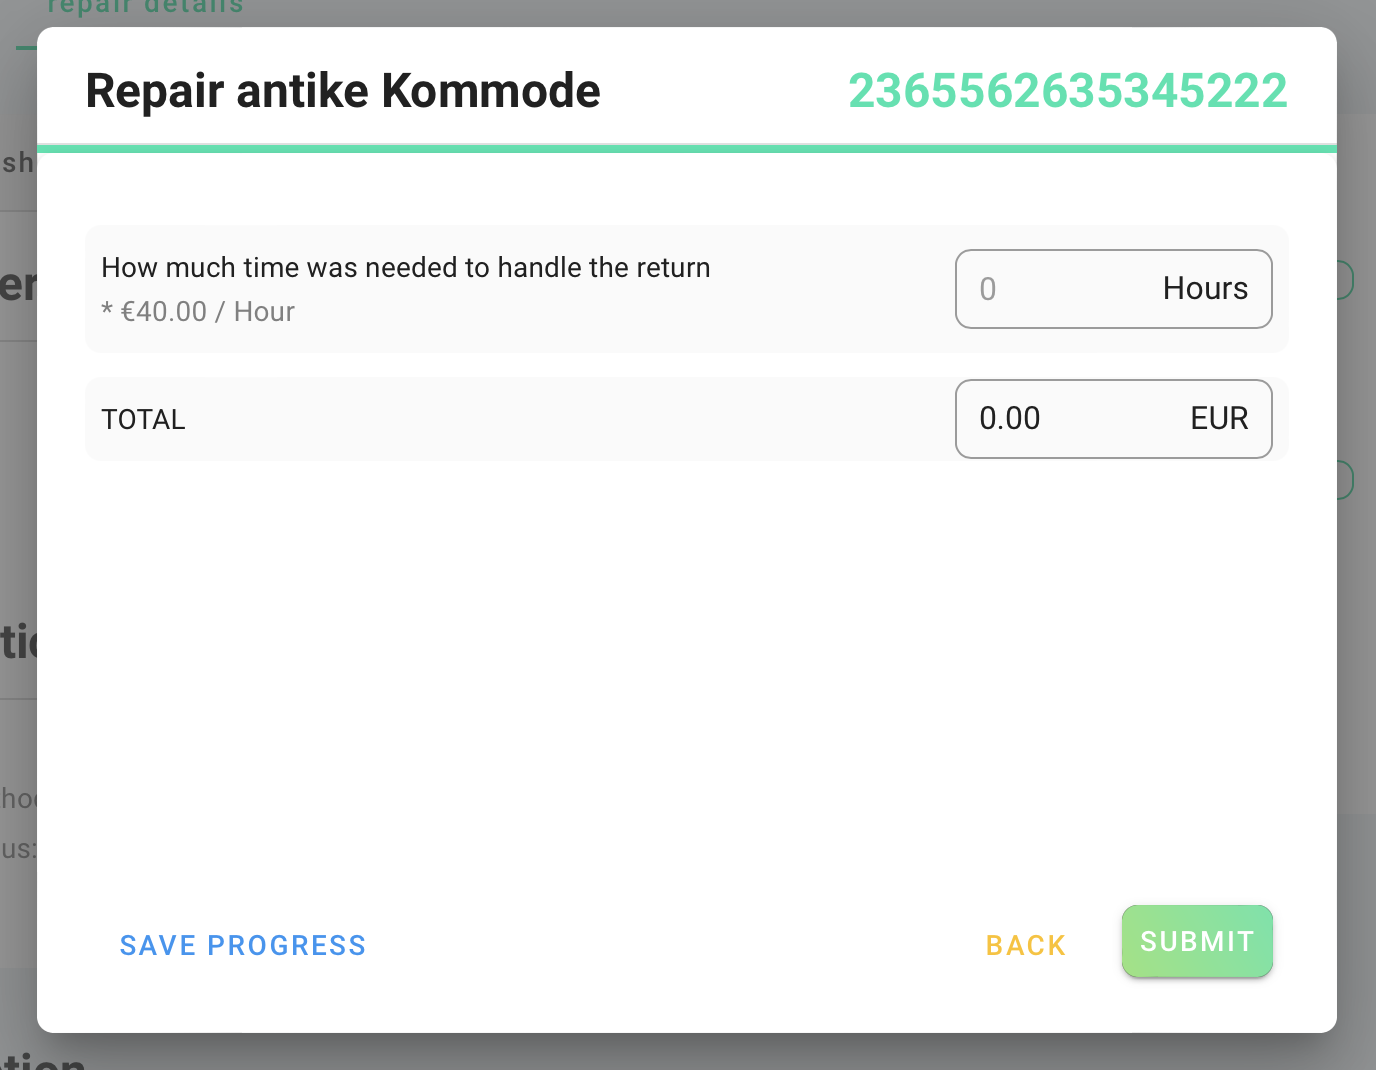
Page 3 with one repair questions. The Repair Question type is Text Field (available in the Components Column and explained later in detail).
1.1 Explanation of items available in the Components Column:
Items in the Component Column showcased in the image below.
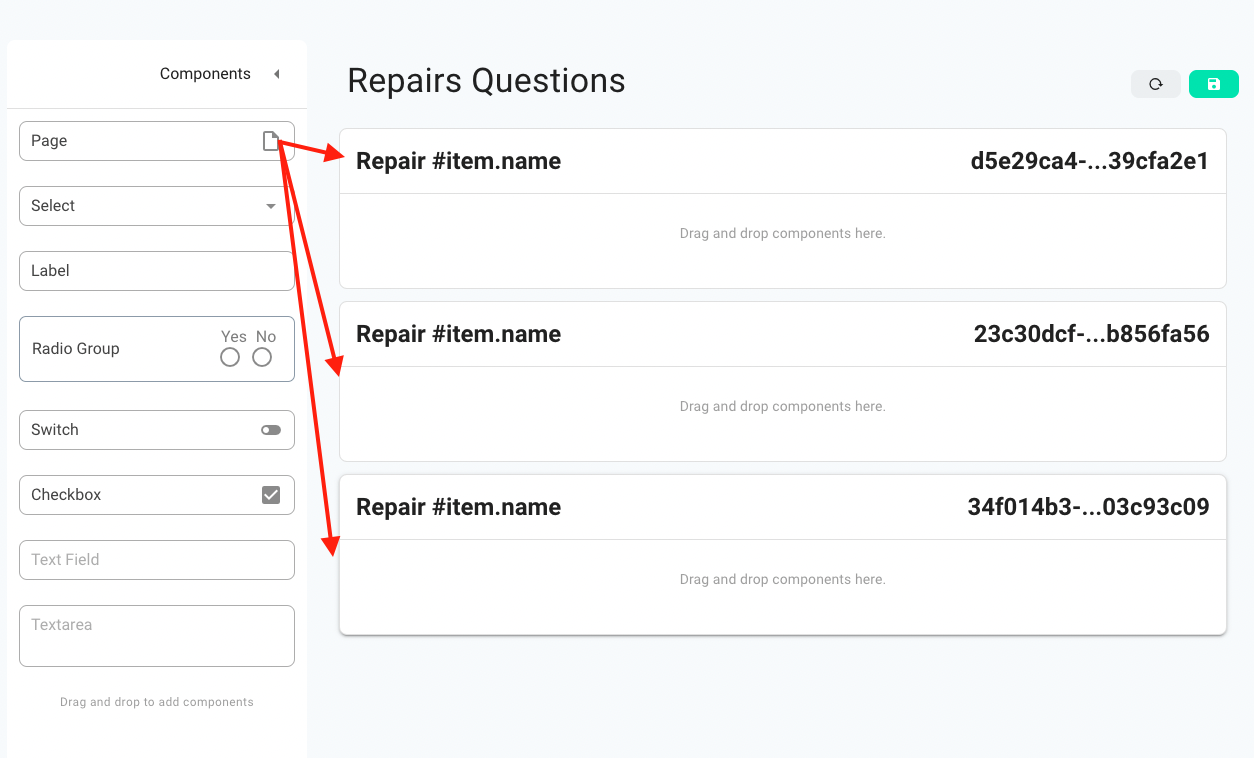
Page: you always start by dragging a Page Item from the Components Column to the Middle Column. You CANNOT add any items from the Components Column to the Middle Column without adding a Page Item first. The items go into the page therefore adding a Page Item is the first step. You can drag multiple Page Items to the Middle Column. Each page represents one step in the repair process as shown in the example above with the different pages.
The image below shows Pages in the Middle Column added from the Components Column.
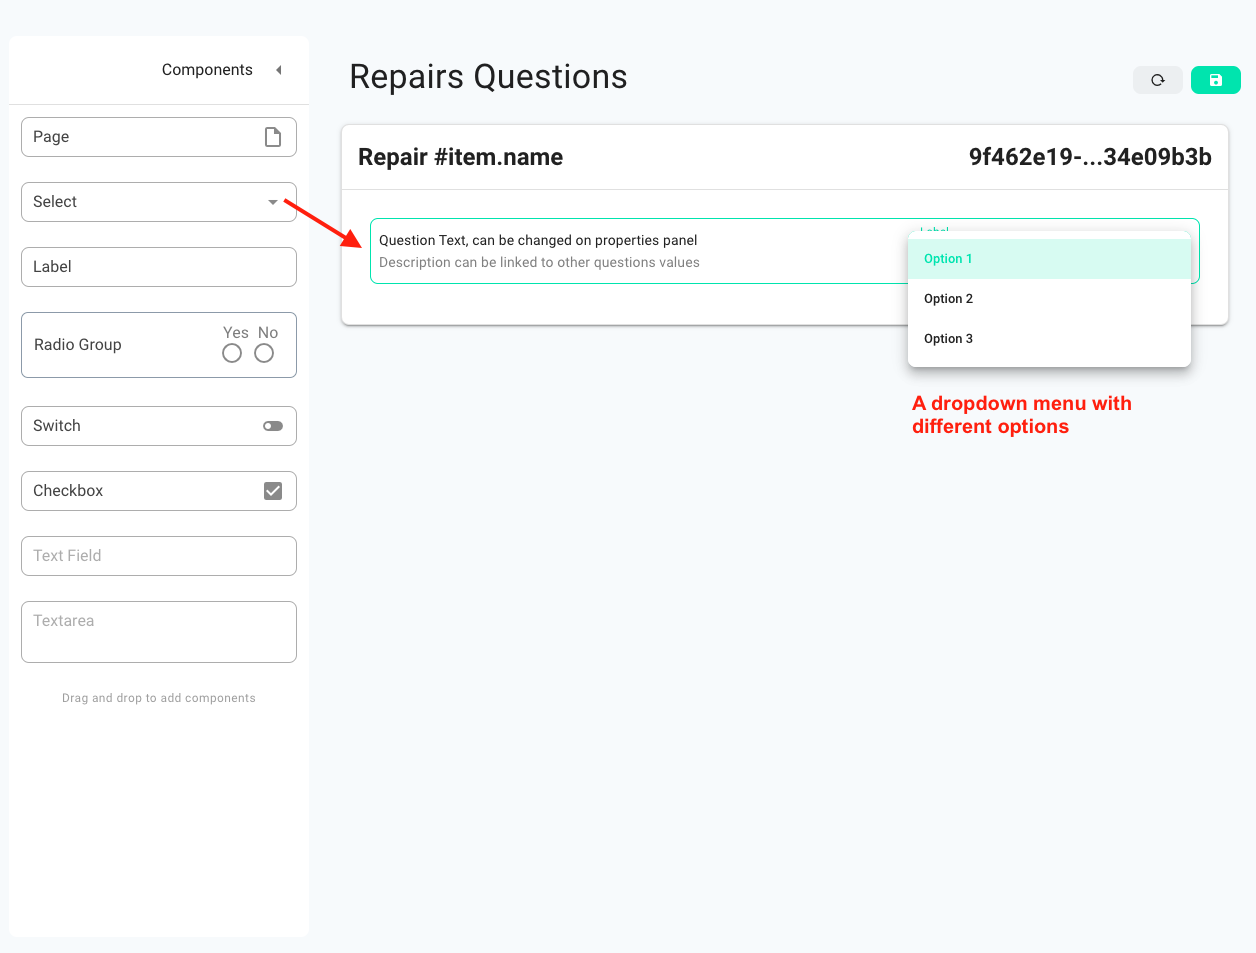
Select: the Select Item is a type of Question Item that you can use if you want a dropdown menu as the answer to the question. See image below for example.
The image below shows the Select Item.
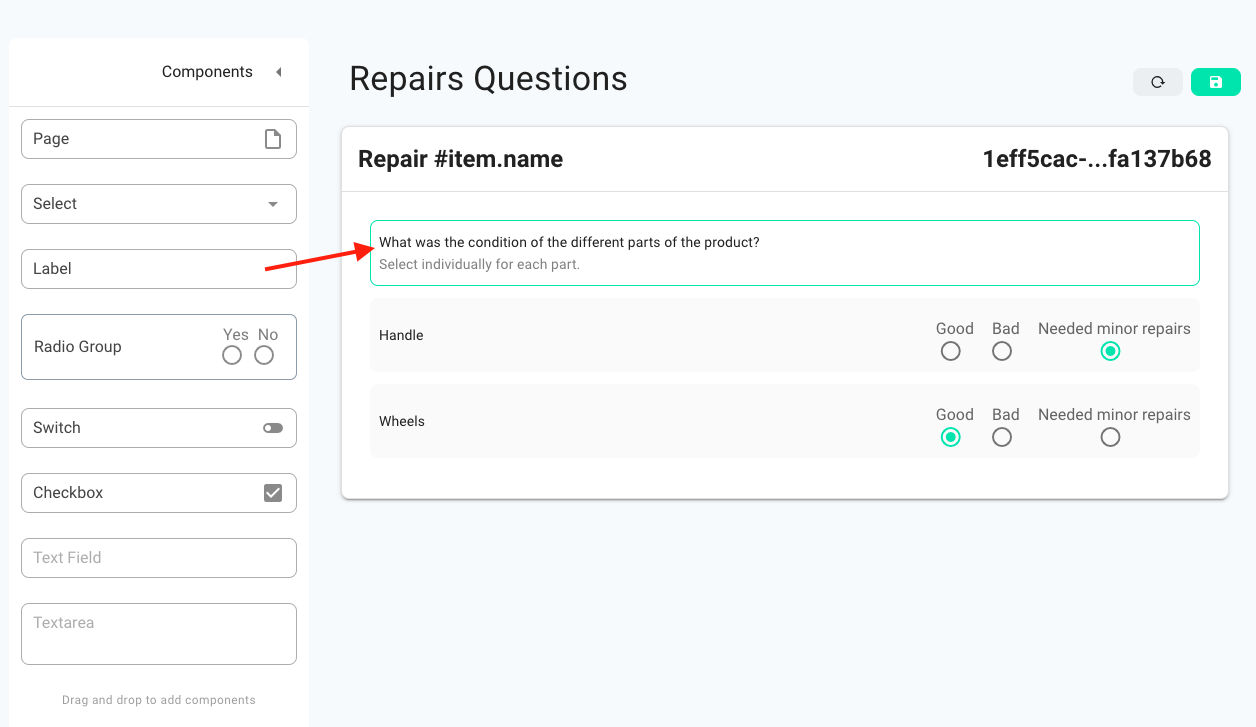
Label: the Label Item contains a question and a description field. The Label Item can be used to group different items if they have the same main heading or belong to the same category. See example below.
The image below shows the Label Item.
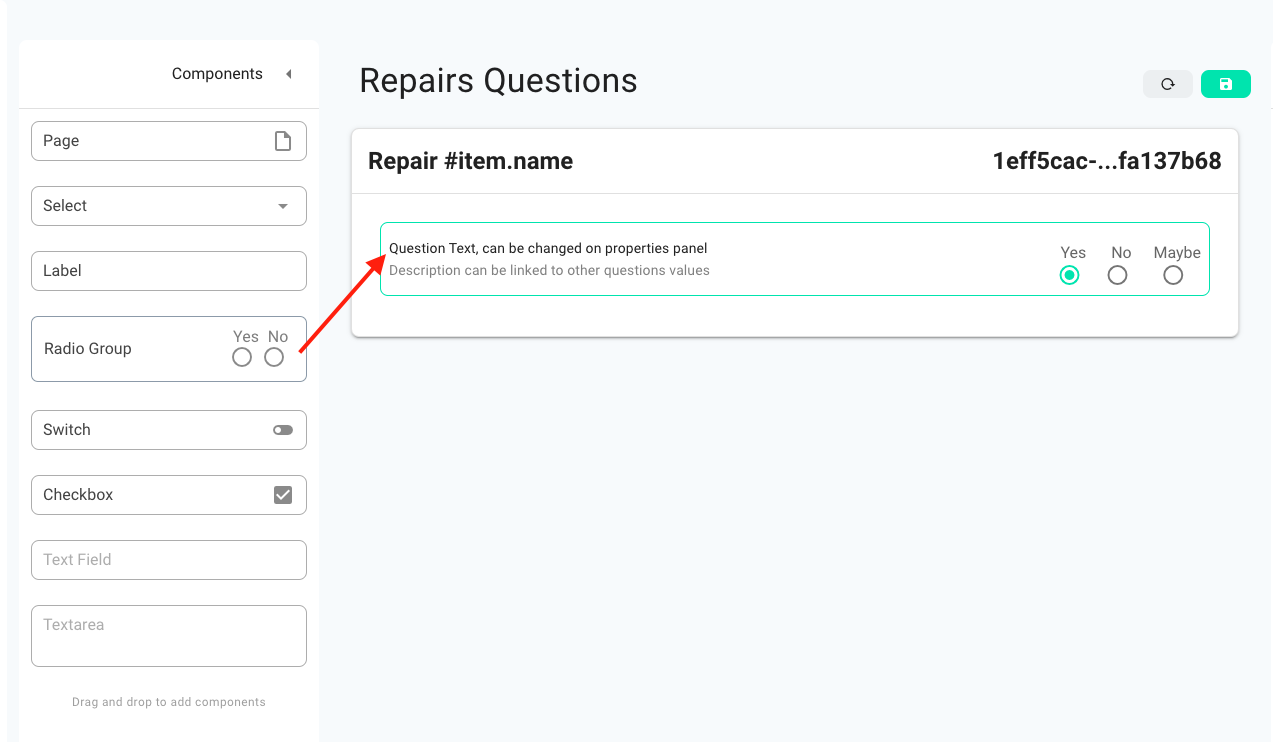
Radio Group: a Radio Group Item is a type of Question Item from which one can select a value from a defined list. See example below.
The image below shows the Radio Group Item.
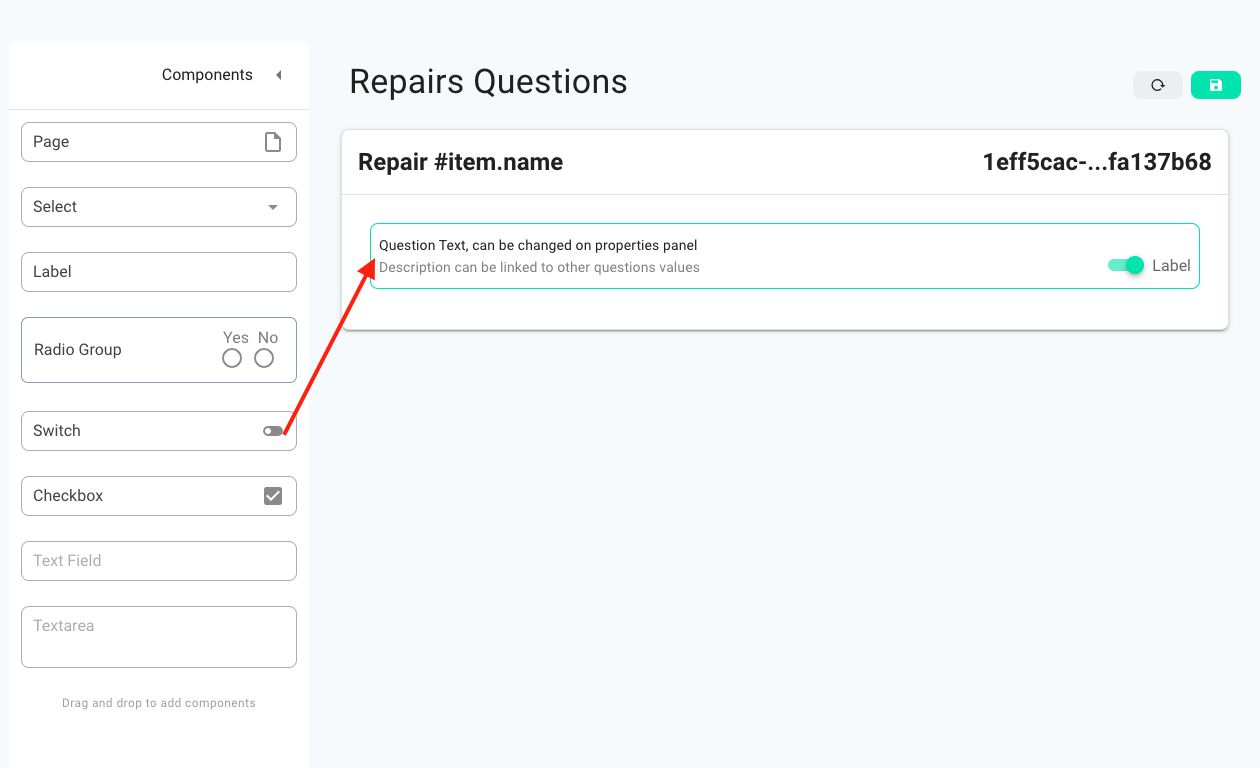
Switch: the Switch Item lets you toggle on/off your selection. See example below.
The image below shows the Switch Item.
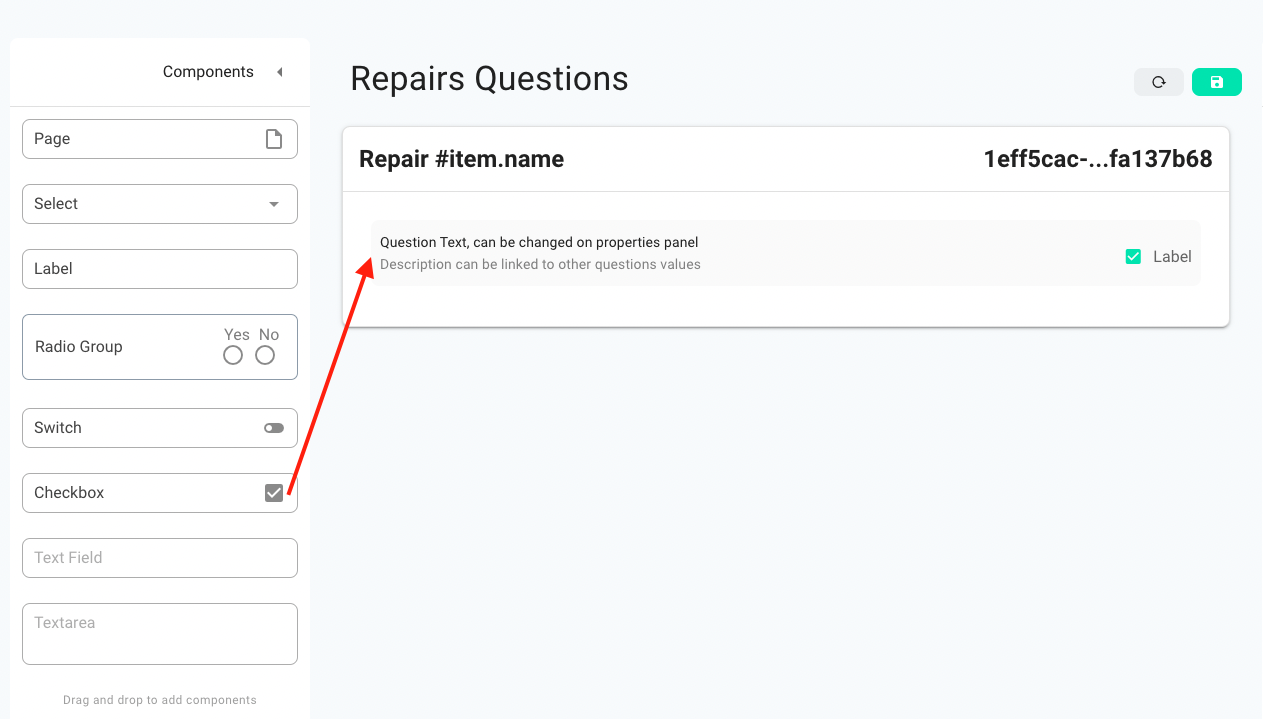
Checkbox: the Checkbox item, as the name suggests, let’s you check/uncheck your selection. See example below.
The image below shows the Checkbox Item.
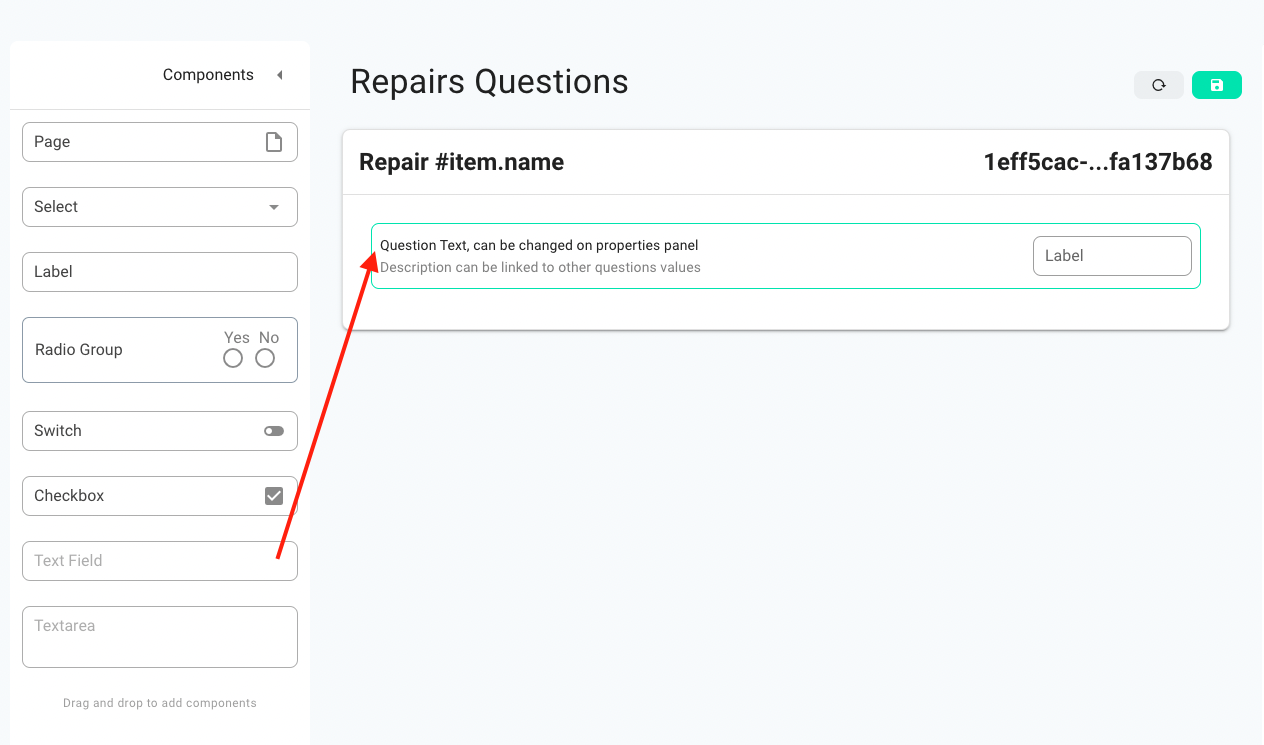
Text Field: the Text Field Item allows you to add a short text as a response to the question/state/description. See example below.
The image below shows the Text Field Item.
Text Area: a Text Area Item also allows you to add a text bit in contrast to Text Field Item where you can only add a short text, you can add a larger text in the Text Area Item.
The image below shows the Text Area Item.
2. Middle Column
This is where you drag items from the Components Column to create pages and questions. The questions can be edited in the Properties Column. The middle column renders the selected item from the Components Column. Once you’ve set up a few pages you can switch between them.
The image below highlights the Middle Column.
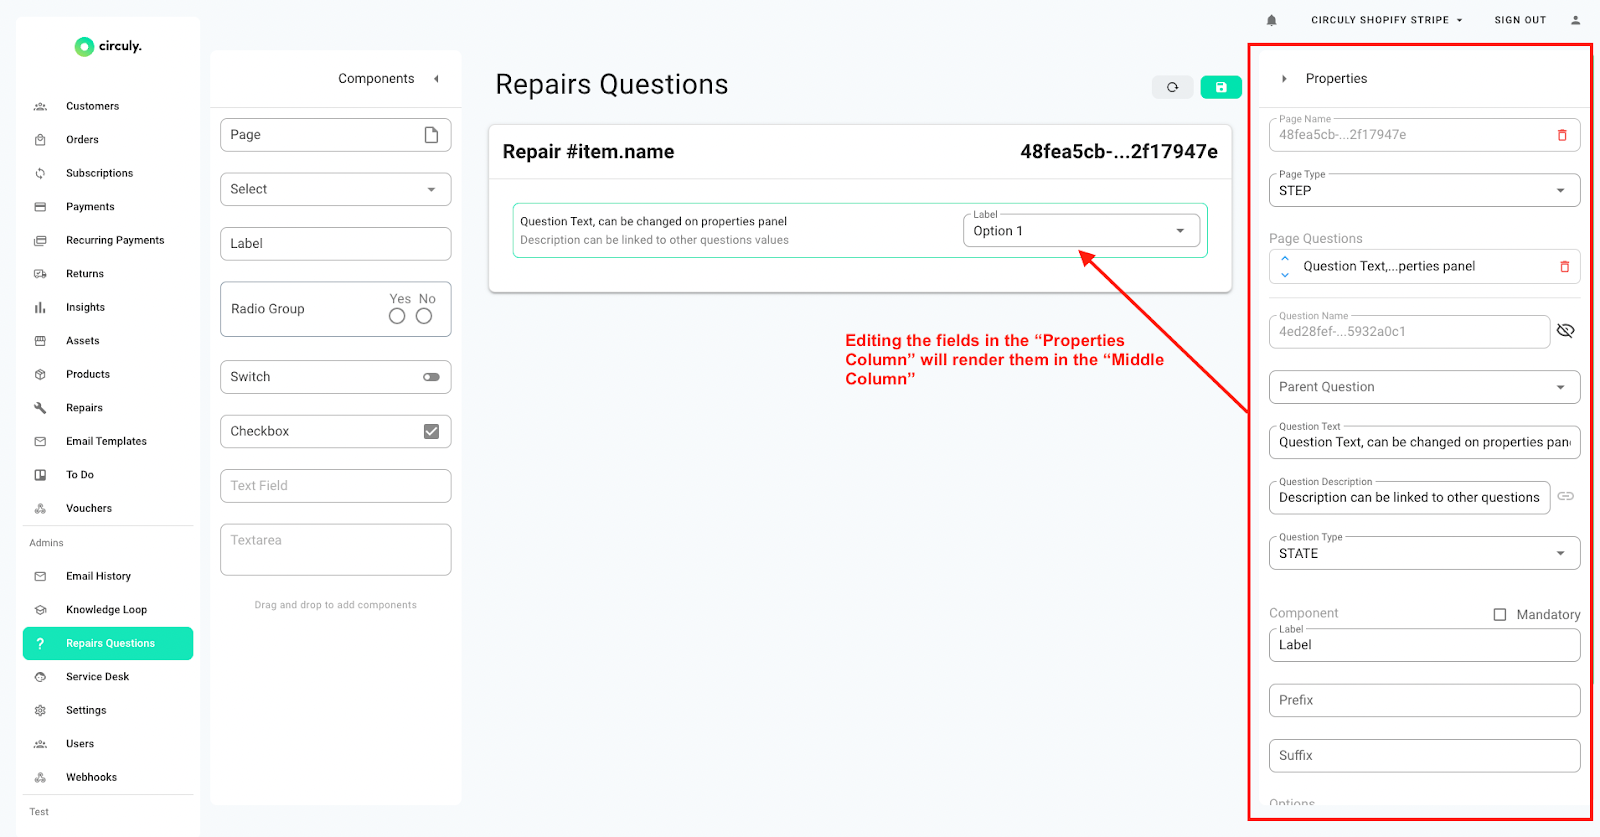
In the Middle column you can only see the items and cannot edit them. To edit them you need to use the Properties Column. When you edit an item in the Properties Column, it is rendered in the Middle Column and gives you an idea of how the questions would be displayed.
3. Properties Column
The Properties Column lets you edit the items that you select and drag to the Middle Column from the Component Column.
3.1 Explanation of items available in the Properties Column:
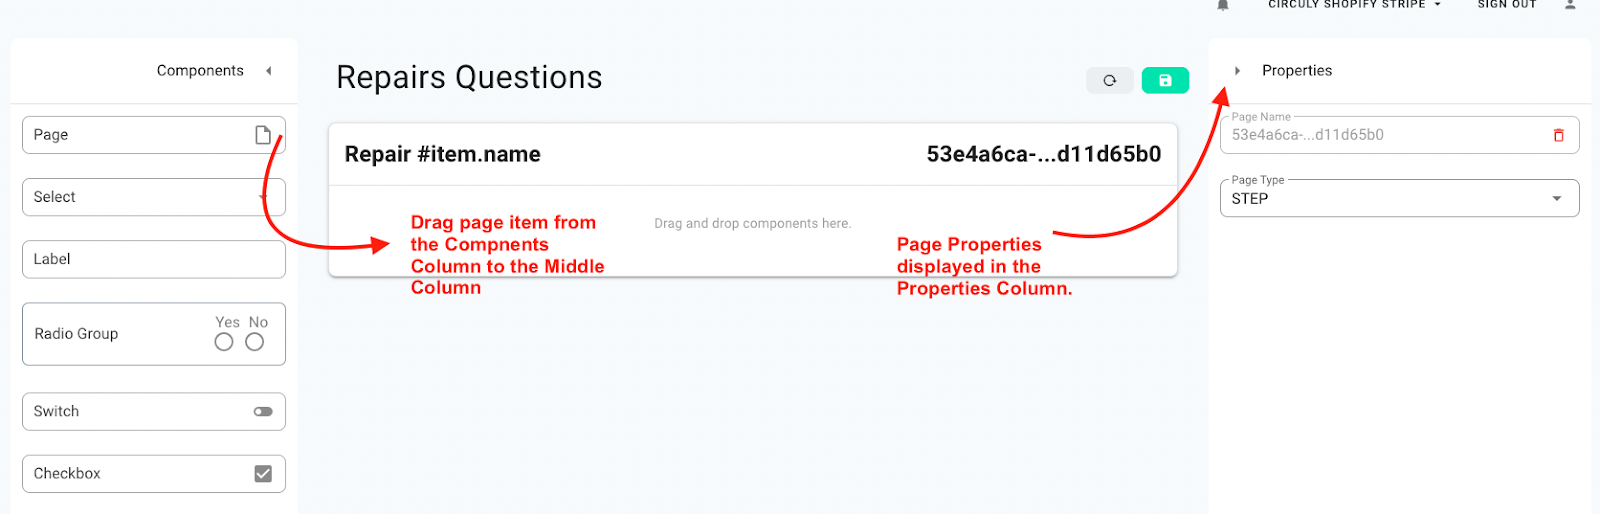
3.1.1 Page Properties
When you add a Page Item to the middle Column from the Components Column, the Page Properties are displayed in the Properties Column.
Page Name: a unique text followed by a delete button. Clicking on the delete button will delete the page together with the questions in it. The page name is not editable and is randomly generated.

Page Type: you can choose between Step or Summary as the Page Type. If you select Step, then this means that the current page is just one page out of x pages and will be followed by the next page when the user goes through the repair process. If you select Summary then the summary page is meant to be the last page before submitting the repair process.
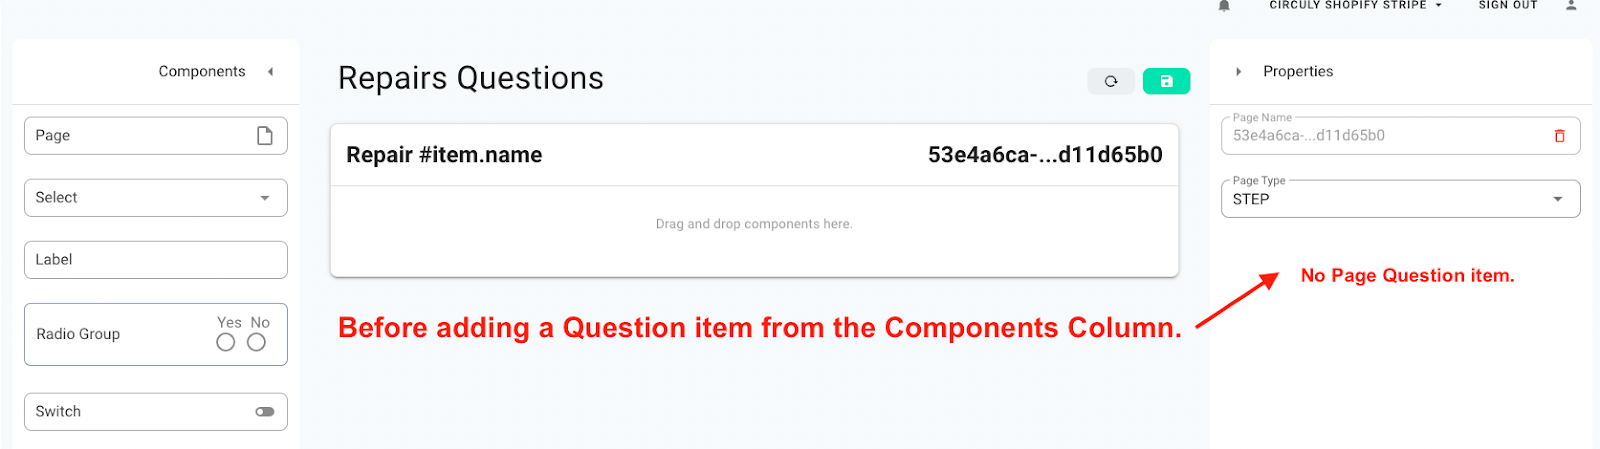
Page Question: in the Page Question section you can edit the questions and its components. The Page Question section is displayed only when there is a Question Item in the Page Item. See the image below:
No Question item on the page.
With Question Item on the page.

3.1.2 Question Properties
When you add a Question Item to the Middle Column from the Components Column, the Page Question Properties are displayed in the Properties Column. The Question Properties may change according to the Question Item selected from the Components Column.

Page Questions: this section shows all the questions that are on a particular page. To edit a question field, select the question from the Page Questions list. You can use the up and down arrow icons displayed next to the question to change the order of the questions in which they are displayed on the Page Item.

Question Name: the question name is randomly generated and cannot be edited.
Parent Question: a parent question as the name suggests is a question upon which other questions are dependent. Basically a question from which the selected question can retrieve the following:
- Description: the question will use the value of the parent question as a description. (eg: the parent question asks for damaged items and this question will retrieve those and ask for a price or repair duration)
- Visibility: also defined as conditional value field, one can define a value the parent must have in order for the selected question to be visible (e.g.: the parent question asks if the item is rentable and the selected question(may be: delete from stock?) is visible when the parent’s value is "No").
Let’s look at examples to understand how parent questions and non-parent questions interact together.
Background
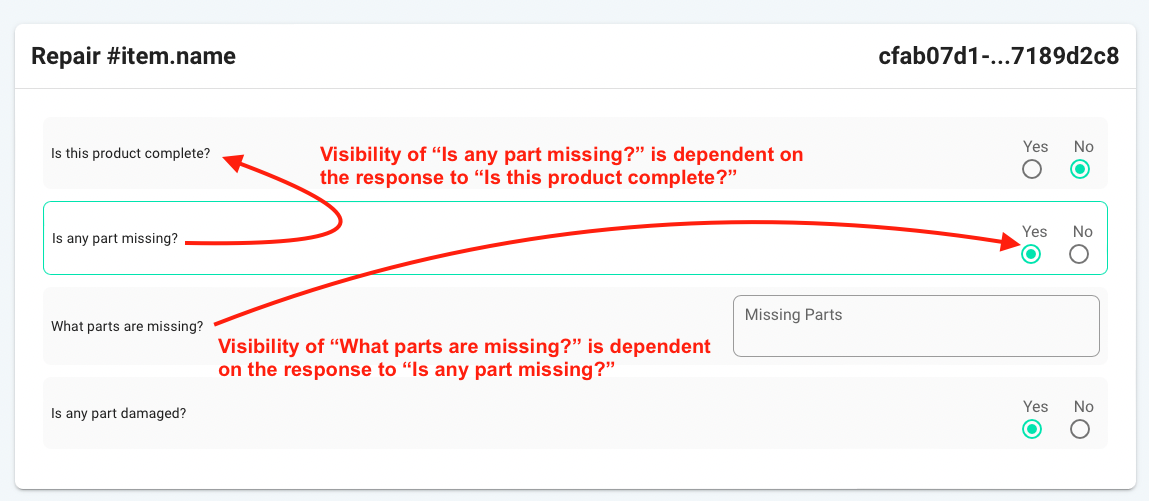
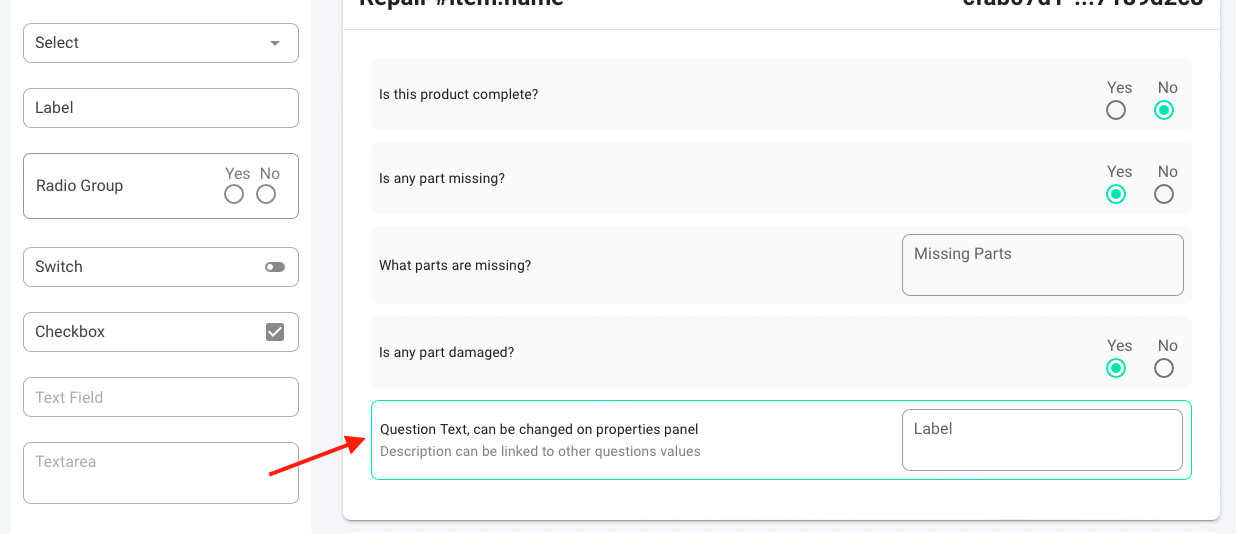
The first Page Item in the Middle Column has 4 questions. Question 1 “Is the product complete?” is an independent question and is not dependent on any other question.

If the user selects “Yes” in response to “Is this product complete” question, then the dependent questions will disappear because logically according to the question, it doesn't make sense to display the other questions, if the product is complete. See example below:
Response to “Is this product complete?” is “No”, the other questions stay on the page.
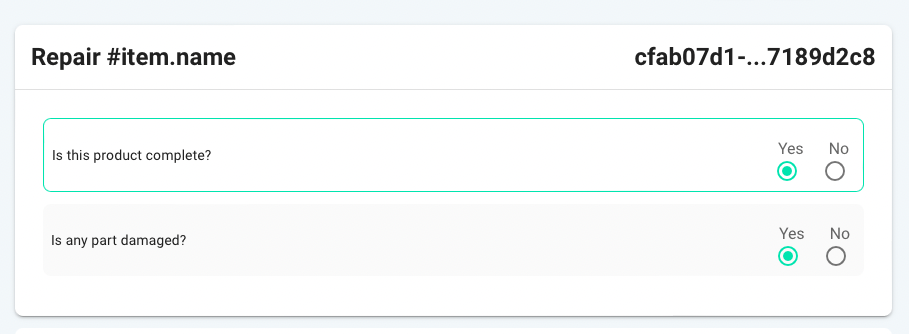
Response to “Is this product complete?” is “Yes”, the remaining questions disappear.
How this process is set up is explained below:
If the visibility of a question is dependent on the response/selection of some other question, then a few things need to be done in the Properties Column to make that interaction happen.
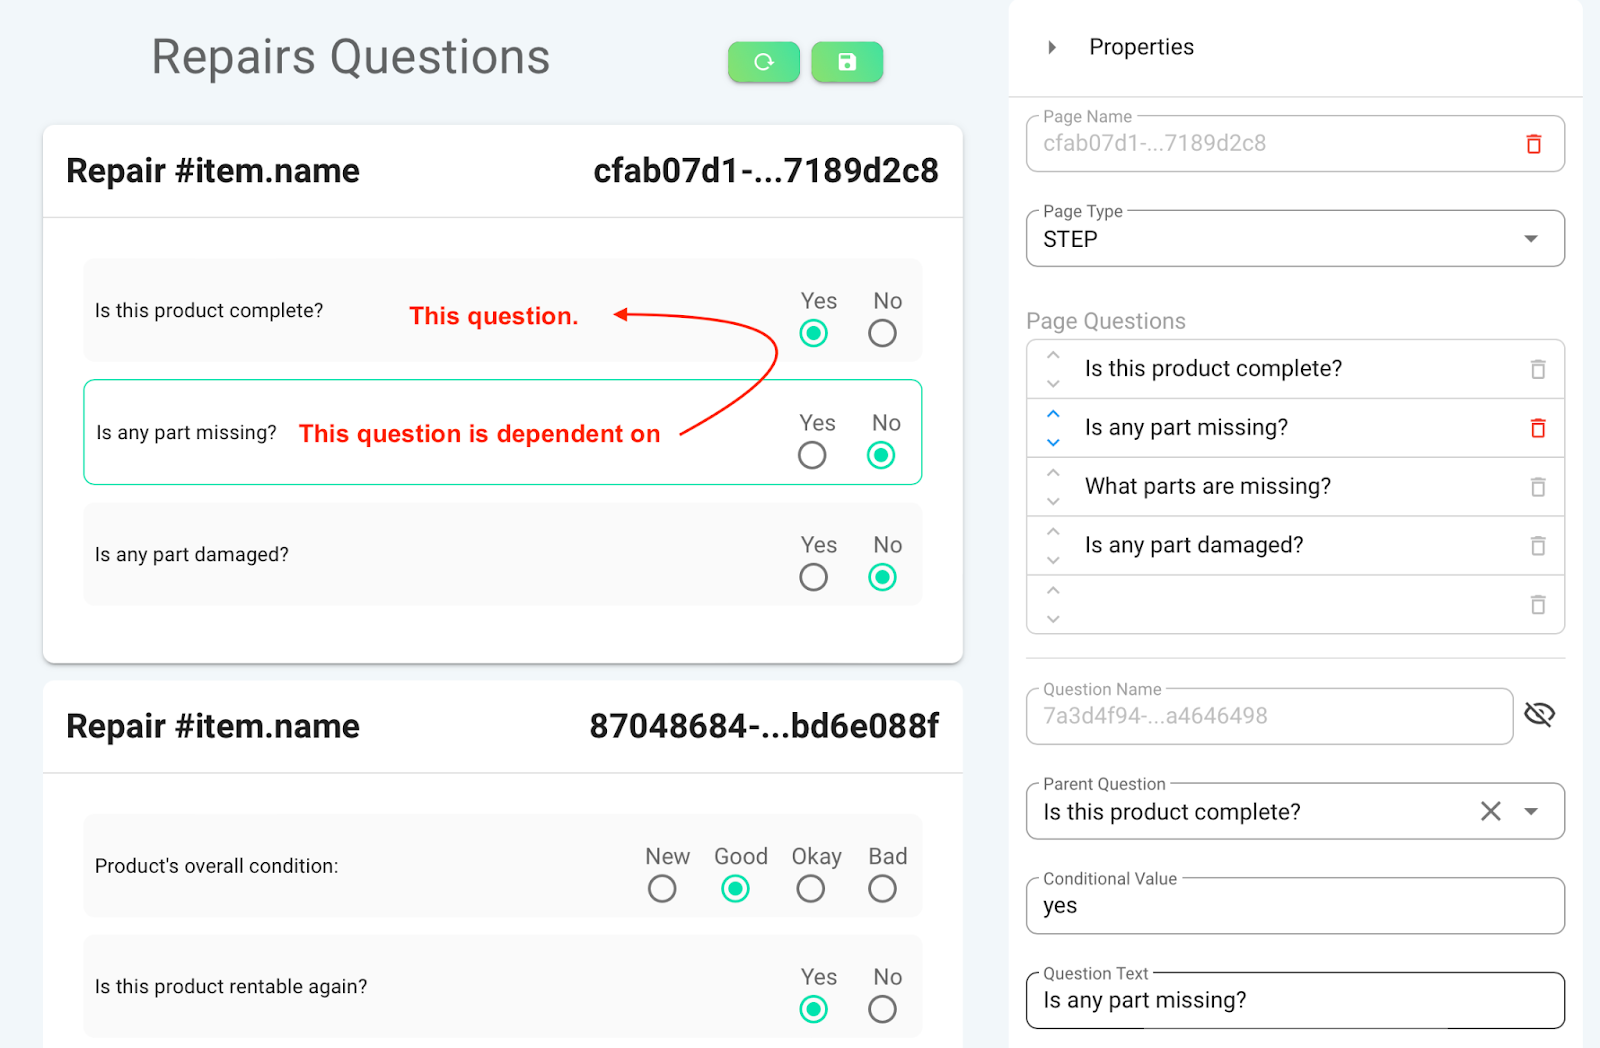
In the image below you can see that the visibility of "Is any part missing" is dependent on the response of "Is this product complete?".
- When you are editing the details of a non-parent question or a dependent question in the Properties Column, then in the Parent Question field, select the question on which your current question is dependent.
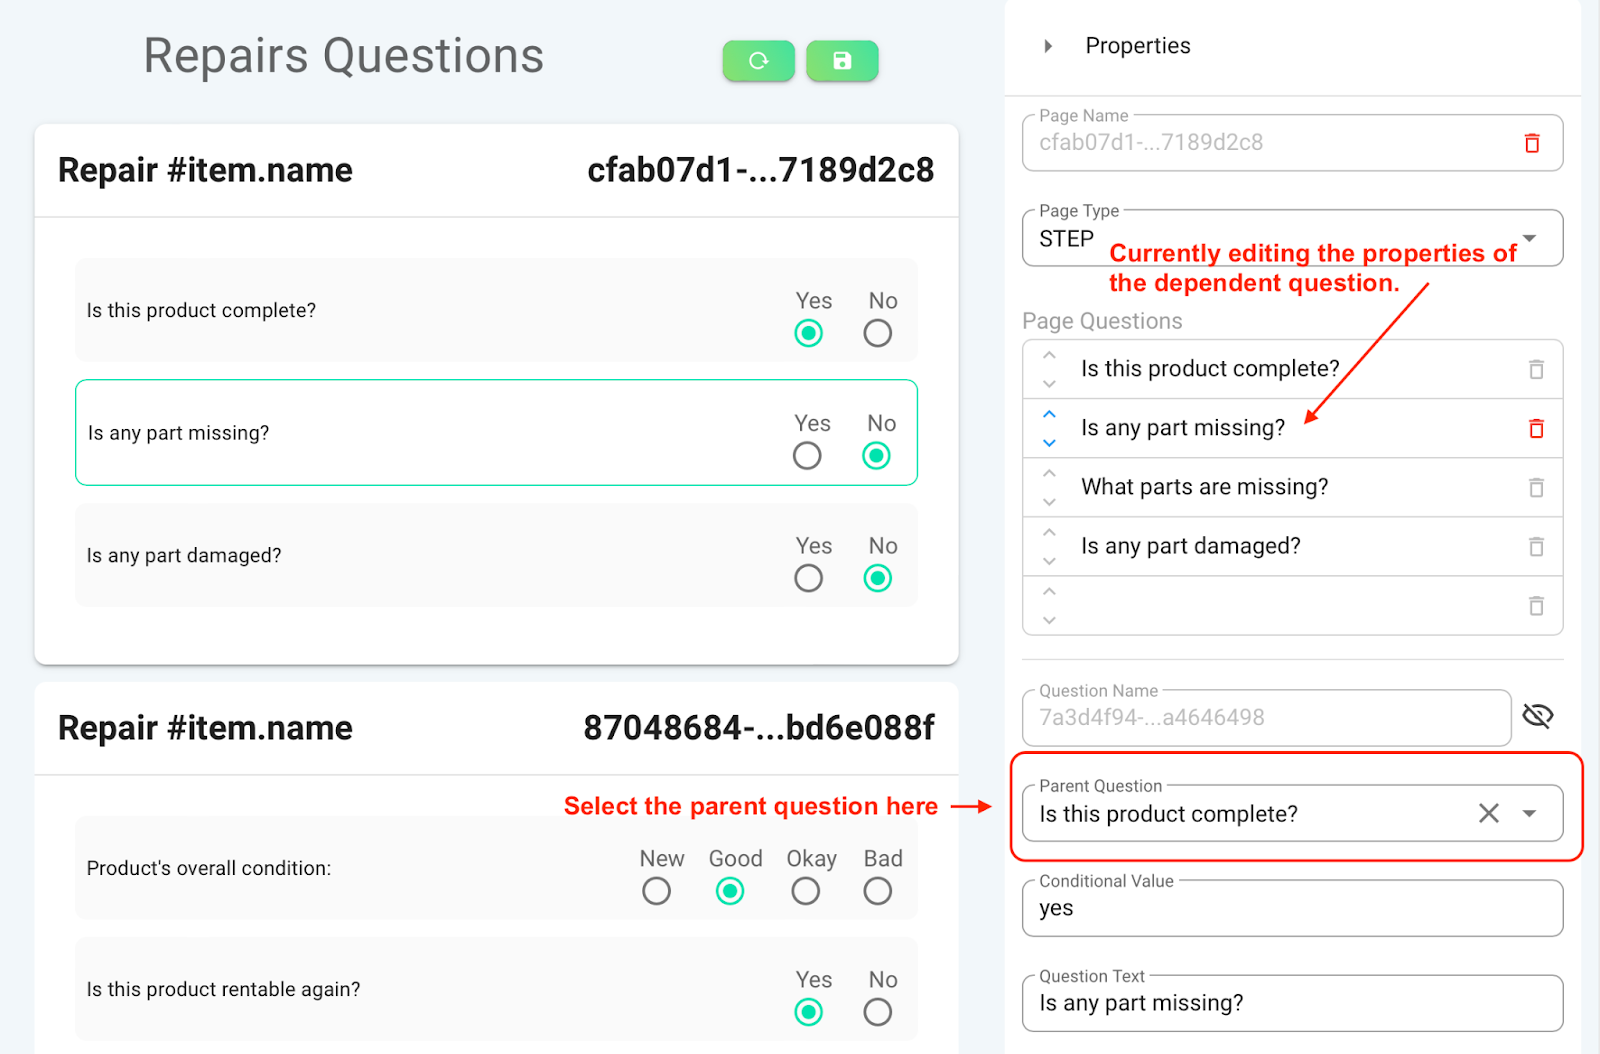
“Is any part missing” is dependent on “Is this product complete” therefore while editing the properties of the “Is any part missing” question, select “Is the product complete” as the parent question in the Parent Question field. The Parent Question field displays a dropdown list of questions that are available and previously created. Therefore it is advisable to have the parent question first and then work your way down to the dependent questions.
If you assign a conditional value, (see image below) then that means that white editing the properties of the next question, you define this question as the parent question and if the conditional value matches the value of the parent question then the next question will be displayed.
Important: the Contitional Value field in the Properties Column is case sensetive.
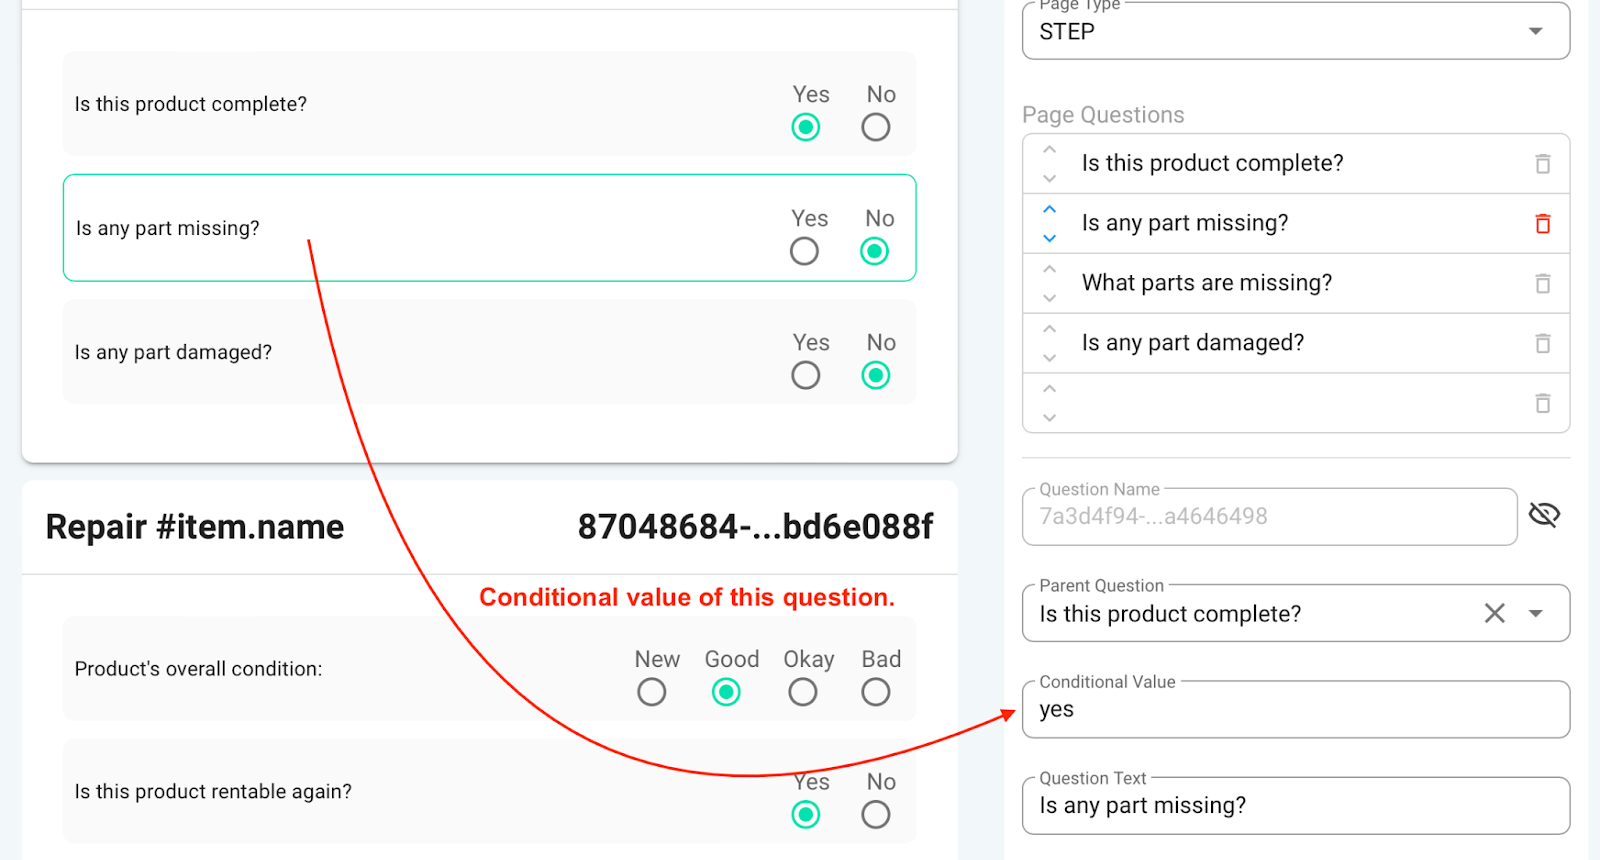
The conditional value of “Is any part missing” is “Yes”, which means that if the user selects “Yes” as a response to this question, then another action will happen, that is another question will become visible that is dependent on this question. (see image)
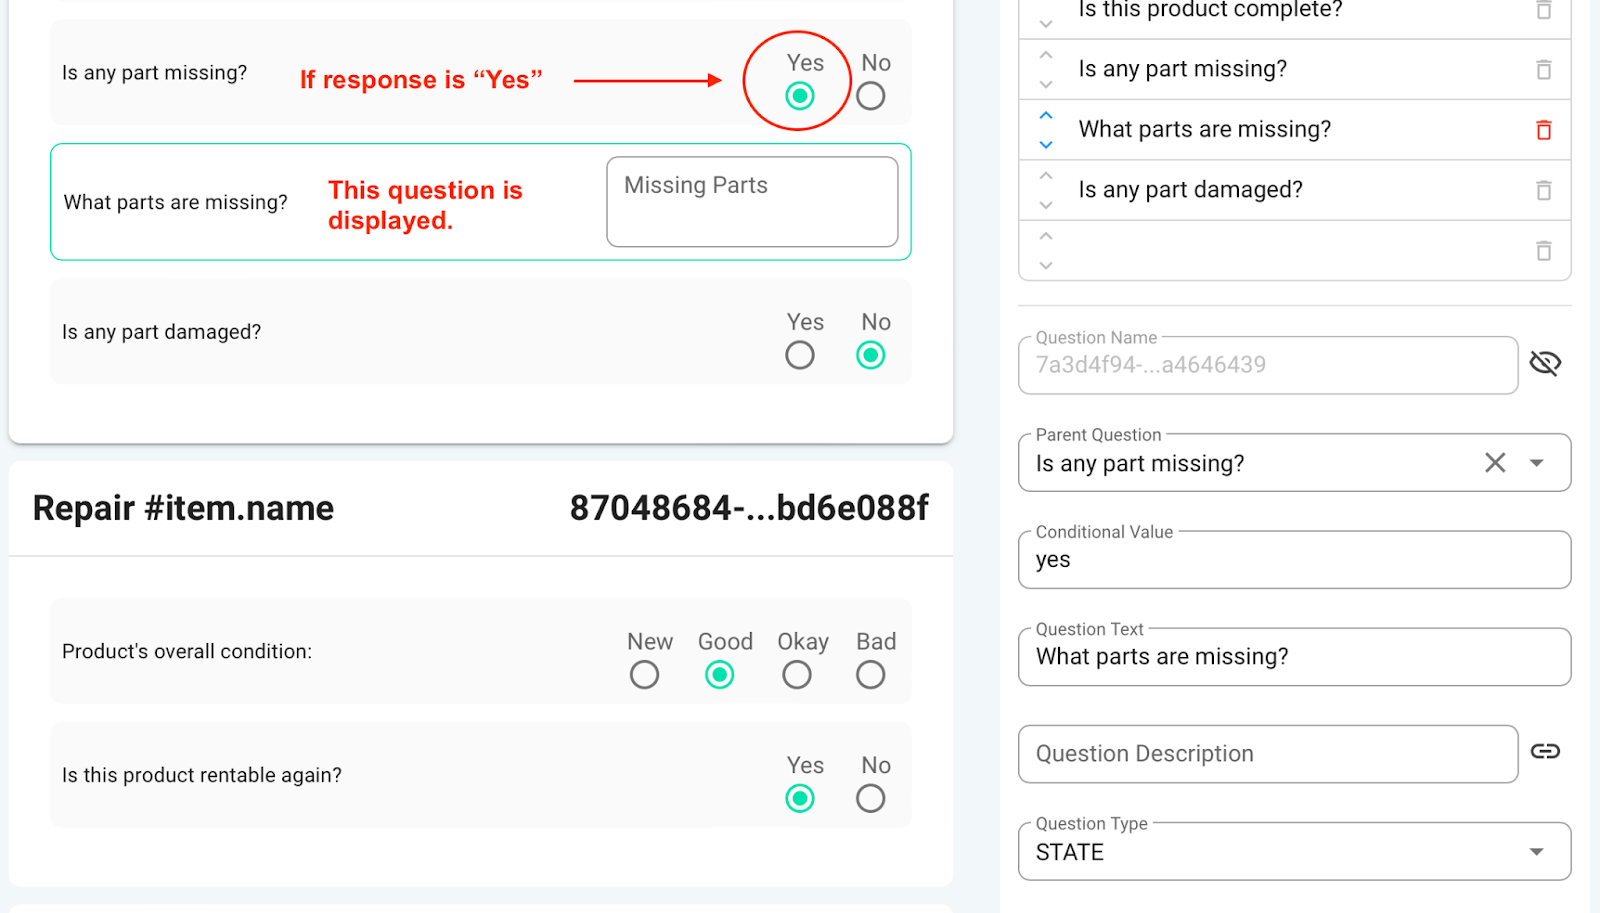
This interaction happens when the parent question is defined as “Is any part missing” while editing the properties of the “What parts are missing” question and the Conditional Value input field contains “Yes”.

Question Text: the main text displayed in the question field. See image below.
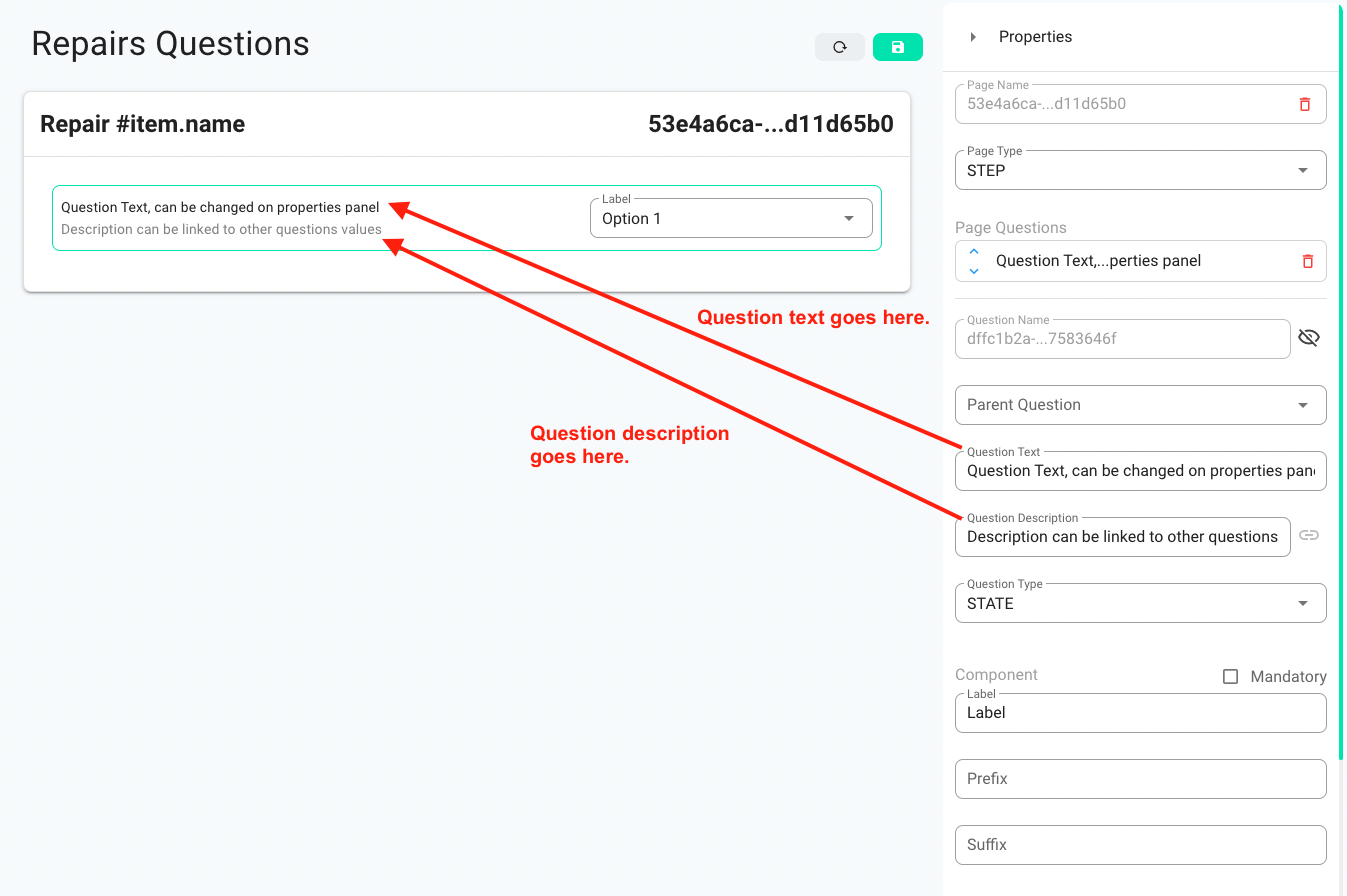
Question Description: the description field that goes under the question. Can be left blank if you don’t want to have a description for the question. See image below:
Question Type: question type has four possible options. They are explained below:

- State: information indicating state. For example the state of the product (good, bad, needs repair, not rentable etc.)
- Cost: information indicating cost. If the question is in the Summary Page Type then a checkbox will appear indicating if this is a total cost question, which will sum all the other cost questions if selected. Also the total cost question is only one and will be saved in the server as item repair cost.
- Duration: information indicating duration. Comes with a “Duration to cost” checkbox that when selected will allow the user to specify a cost rate that will be multiplied by the duration and then included into total cost(if there is any). See example below:
Important: Please note that Action as a Question Type is still in development and therefore cannot be used at the moment.
Mandatory Checkbox: decide if you want to make the questions mandatory. If you make a question mandatory then you cannot proceed without selecting an option for the question.
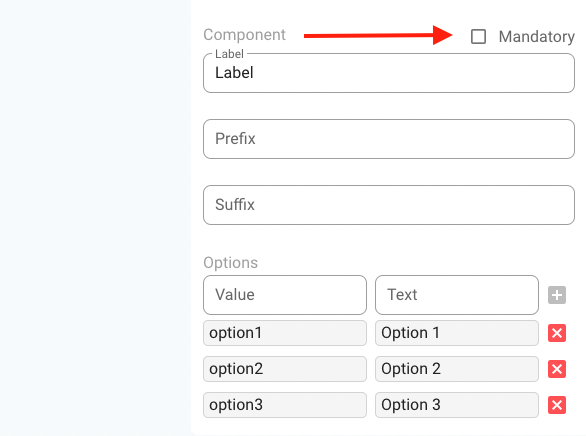
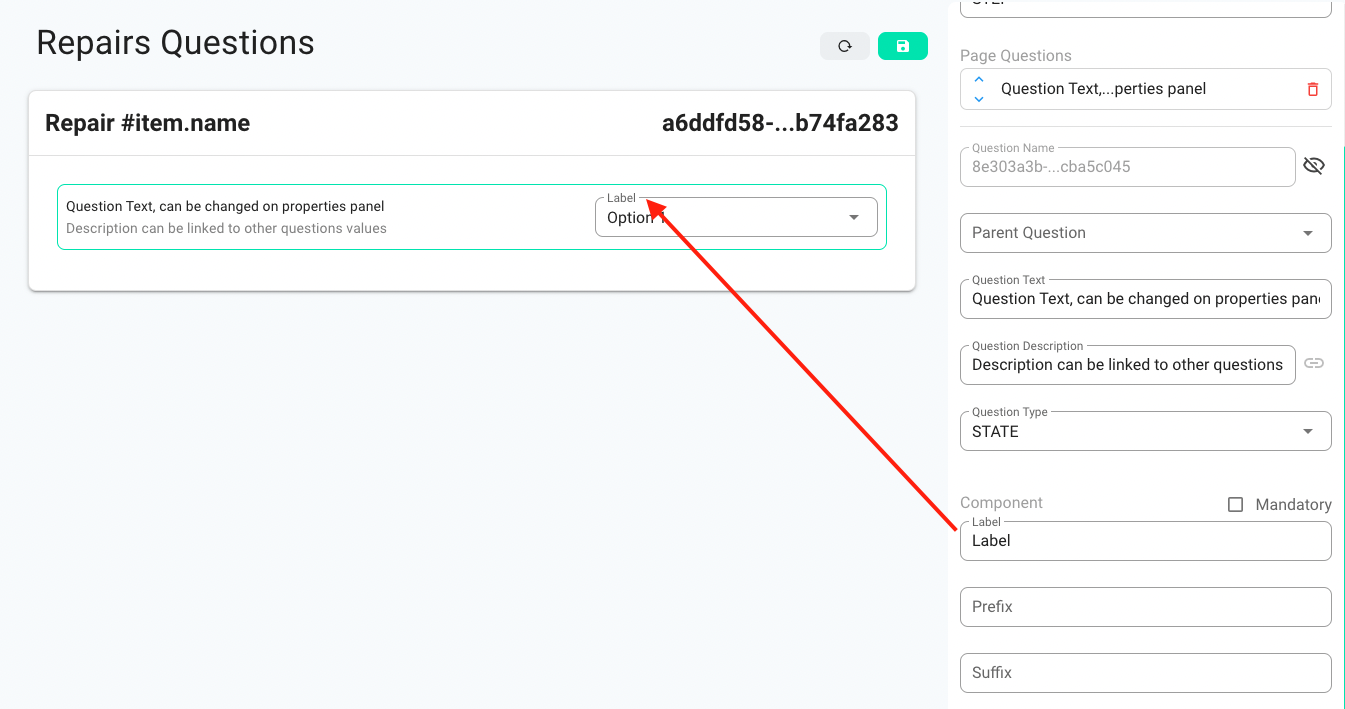
Label: you can add a label to Question Items that support it (e.g. checkbox, Select etc Question Items). See image below:
Prefix: you can add a prefix to Question Items that support it. See image below:
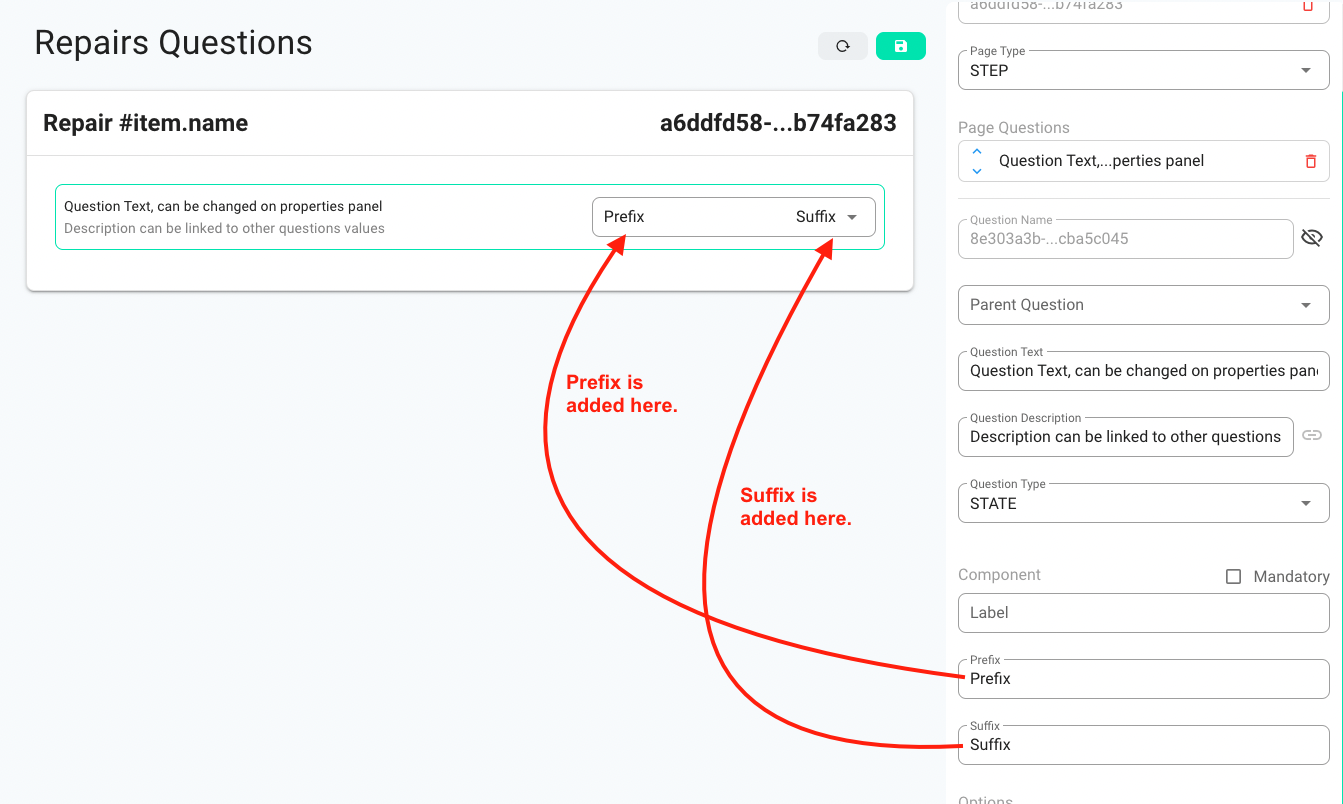
Suffix: you can add a suffix to Question Items that support it. See image below:
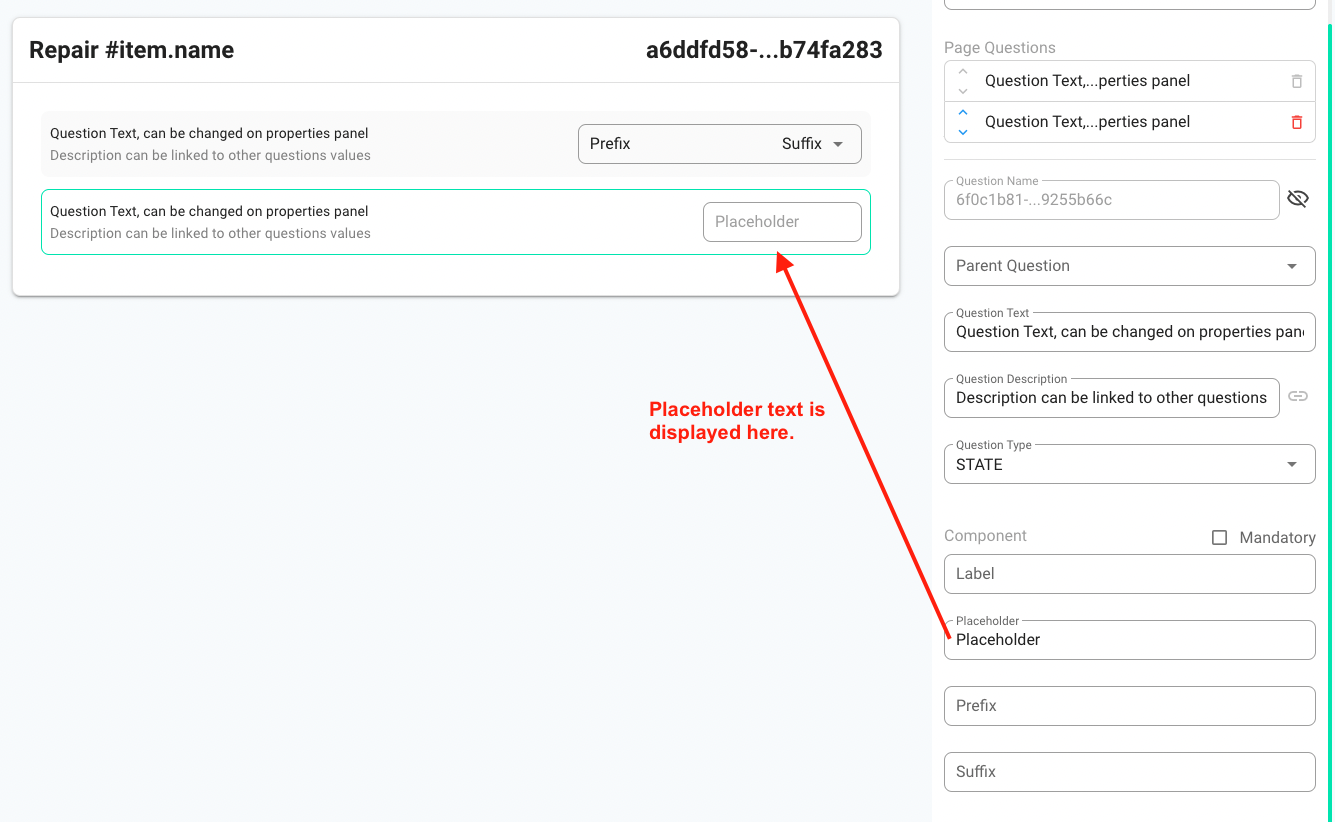
Placeholder: you can add a placeholder text in Question Items that support it. The placeholder text will disappear when the user starts typing in the field.
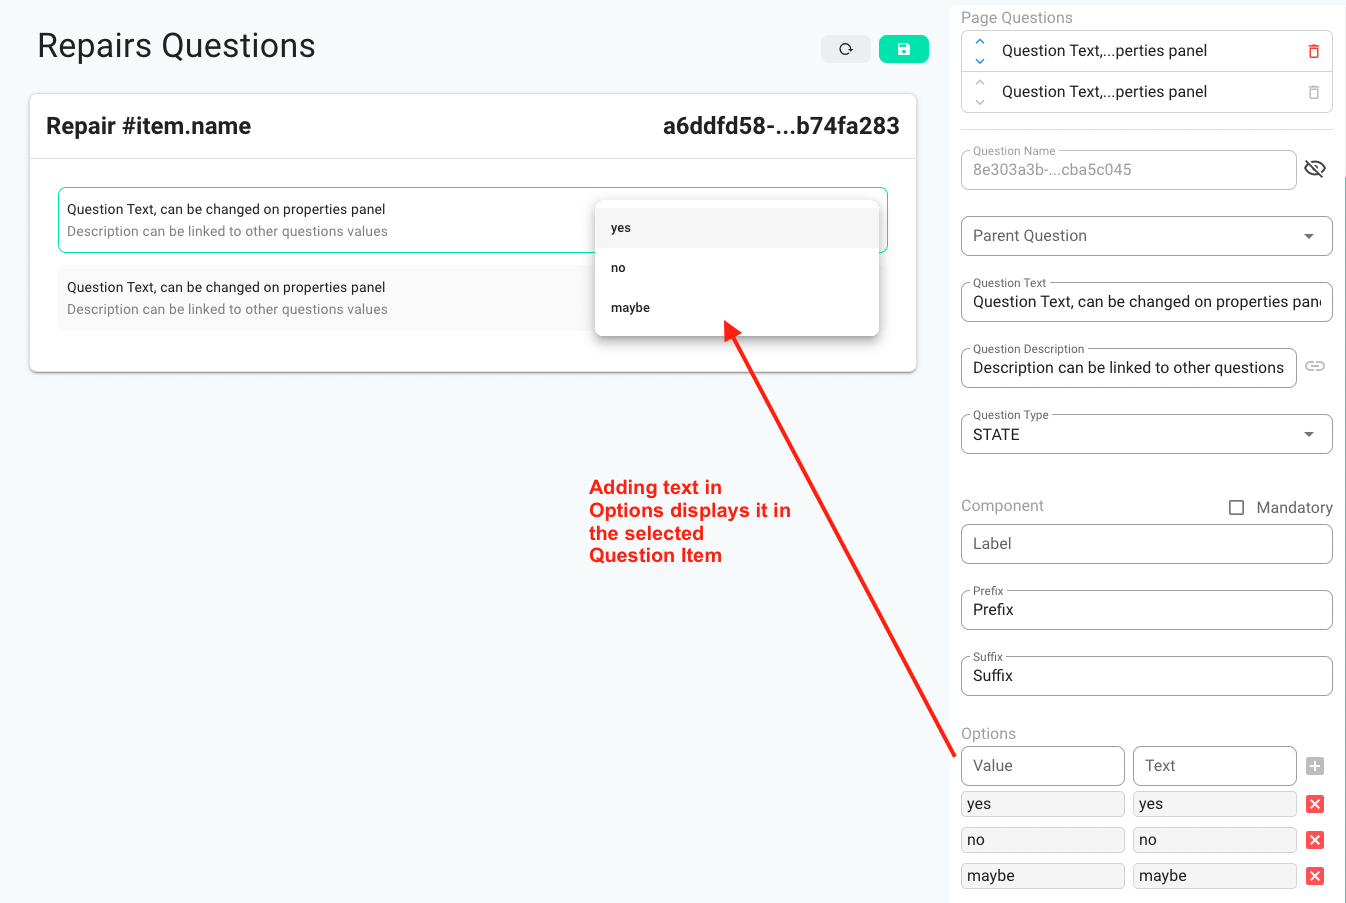
Options: adds/removes options to/from Question Items that support it (eg: radio group). See example below:
How to set up repair questions:
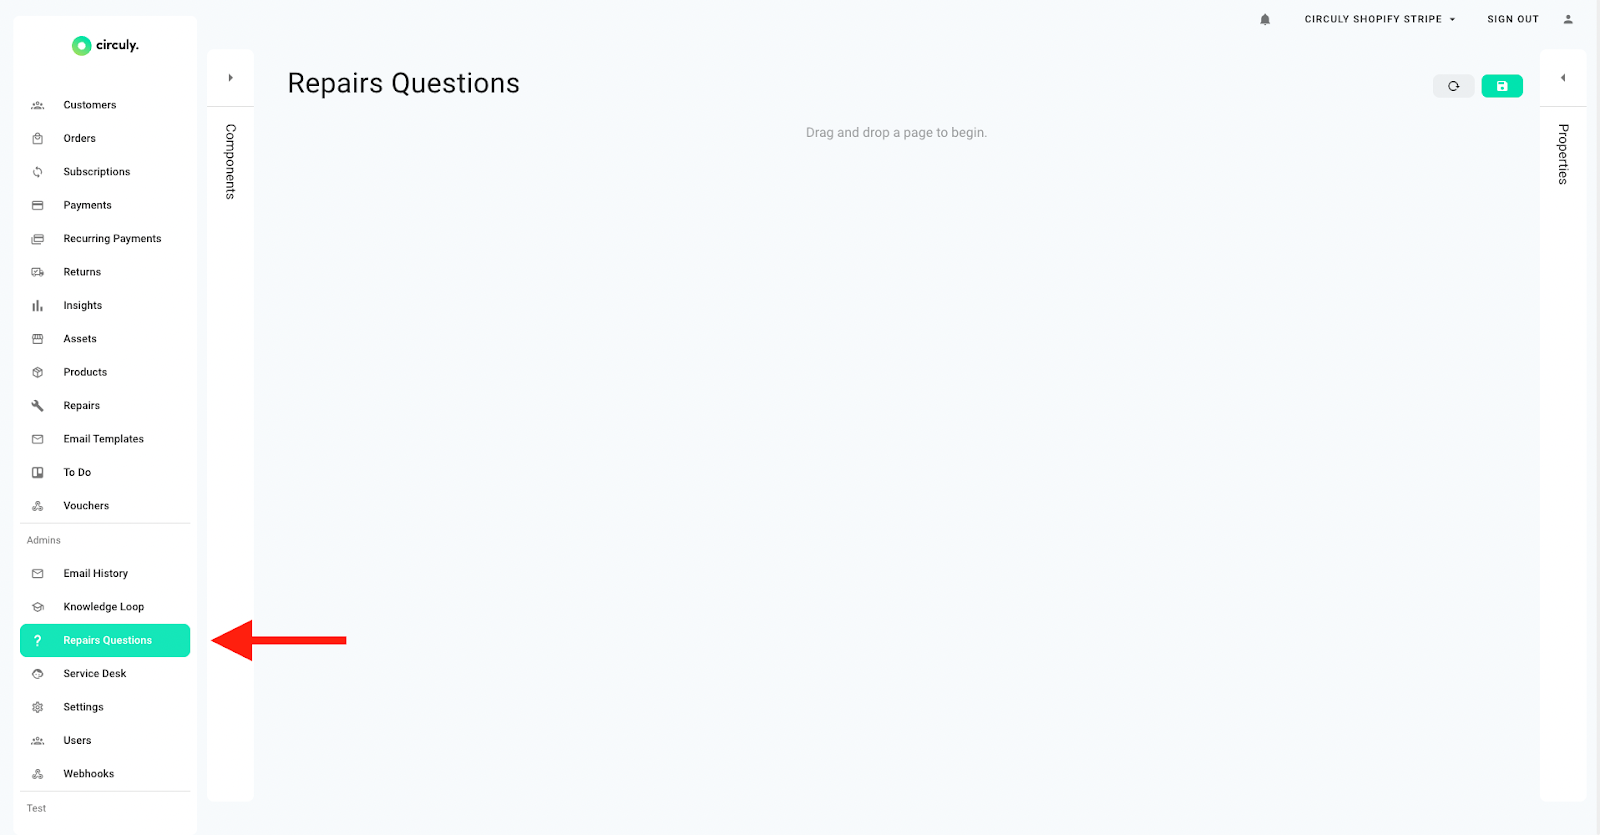
- Login to your circuly operations backend.
- In the left navigation bar, scroll down to Admins and click on Repair Questions.
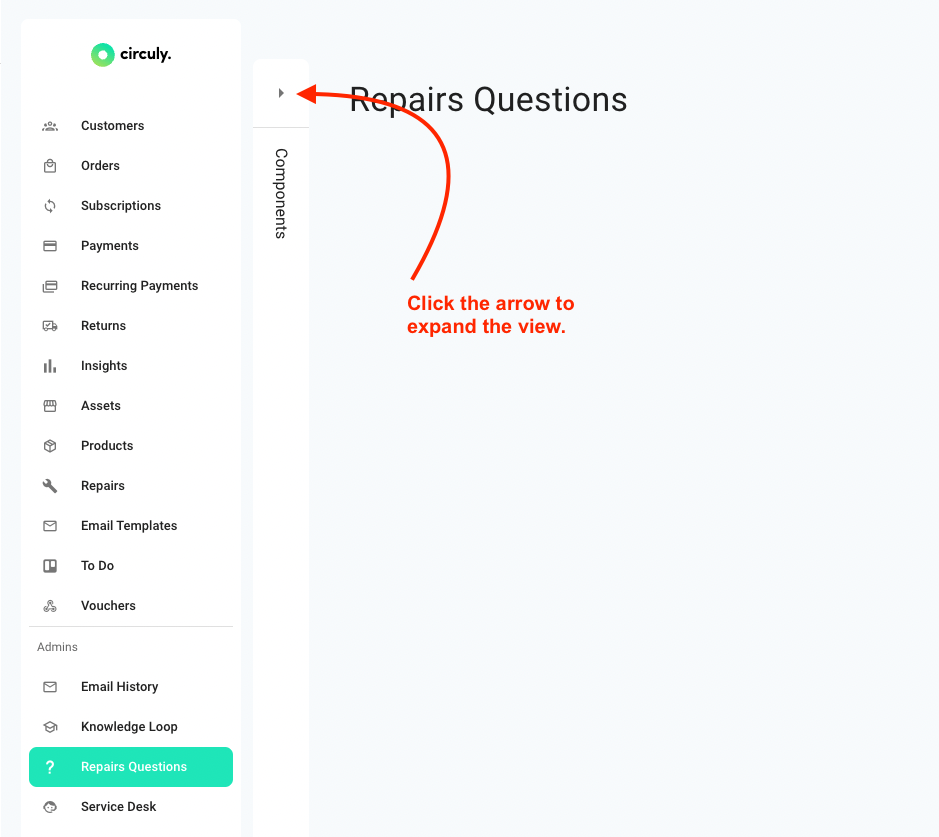
- Click on the arrow head to expand the Components Column and the Properties column. (if it’s not automatically visible)
- Drag the Page item from the Components Column to the Middle Column.
- In the Properties Column add the Page Name and select the Page Type.
- Then drag a Question Item (available Question Items: Select, Label, Radio Group, Switch, Checkbox, Text Field, Text Area) to the Middle Column.
- In the Properties Column edit the Page Question section.
- Click on the save icon to save your progress and to publish your repair process.
What statuses can my repairs have in the repair list?
Your repairs can either be new (when a new return is added to the repair section and you haven’t worked on it yet) or blocked (when you have started with the repair process, but you haven’t finished yet). If you finish your repair it will be automatically deleted out of the repair list.
You can save your progress when working on your repair at any time and continue working on it at a later point.