
Set Up Your White Label Customer Self-Service Portal
With the circuly Customer Self-Service, you can fulfil the promise of transparency and flexibility and build a solid customer relationship. Enable your customers to be in control of their subscriptions. With the customer Self-Service Portal, your customers can request cancellation, product swaps, repair and update their personal information.
Let’s setup your Customer Self-Service Portal
Checklist
- Decide on a URL for your Self-Service Portal page
- Add URL to Settings
- Style your Self Service Portal
- Additional Self-Service PORTAL settings options for more flexibility and power
1. Decide on a URL for your Self-Service Portal page
The circuly Self-Service Portal runs on our subdomain. Decide on the preferred customer login URL. We recommend using: login.yourdomain.com
Examples from other circuly customers:
- my.mylo.de
- accounts.paceheads.com
- login.stokkestart.com
- portal.strollme.de
2. Add URL to Settings
Once you’ve decided upon a Self-Service Portal URL, let your customer success team know. Your URL will be added to the circuly Operations Backend and you will receive a DNS record that you need to add to your hosting provider to complete the customer login setup.
Here are instructions on how to set it up:
- Provide the URL to your customer success team.
- You will be given a CNAME DNS entry that you need to add to your hosting provider or domain hosting provider.
- Copy the text > Go to your hosting provider or domain hosting provider > Follow their instructions on how to add a new DNS record.
- Done.
If you need support with the set up, get in touch with your customer success team (send an email to laura@circuly.io).
3. Style your Self-Service page
Your white-label Customer Self-Service Portal needs some branding and styling before you set it live for the world to see. Styling your customer login means how your customer login is displayed to your customers, the links they are taken to when they click on your logo and so on.
Styling Instructions
To style your Self-Service page > Login to your circuly Operations Backend > Go to Settings > Customer login > Fill in the details in the dedicated input fields.
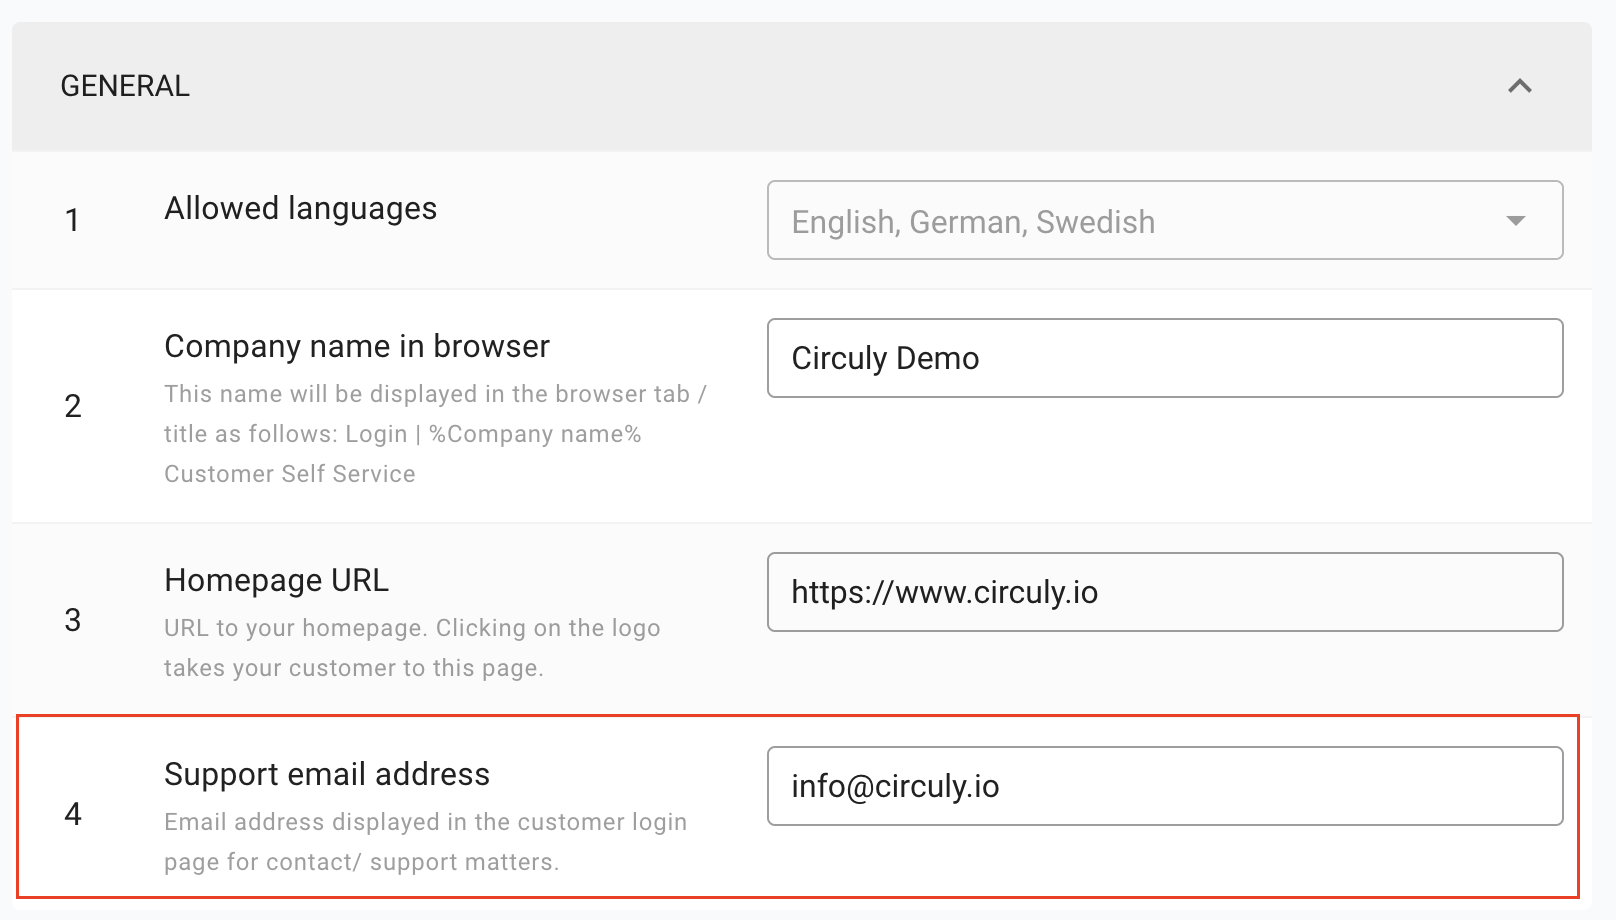
3.1 Support Email Address
Email address for contact/support matters that your customers will use to get in touch with you.
Setup instructions: Login to your circuly Operations Backend > Go to Settings > Customer login > GENERAL > Support Email Address > insert an email address in the Support Email Address input field.
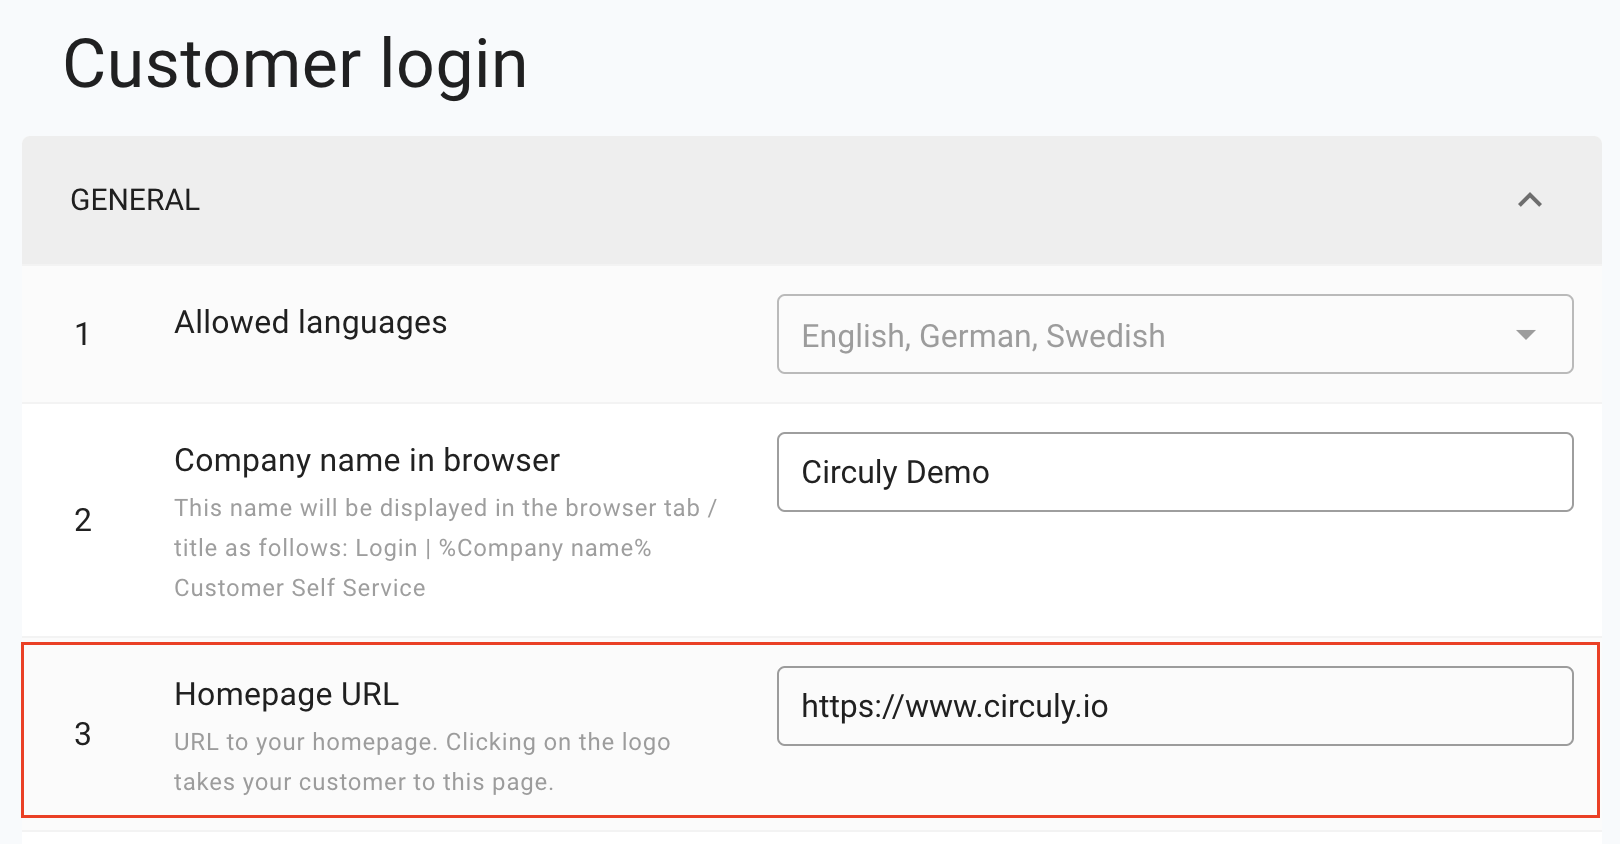
3.2 Homepage URL
The URL your customers are taken to when they click on the logo on the Self-Service page.

Setup instructions: Login to your circuly Operations Backend > Go to Settings > Customer login > > GENERAL > Homepage URL > Add a URL that your customers will be taken to when they click on the logo.
3.3 Logo URL
Your logo is displayed on the Self-Service page and can be used by the customer to go to a URL that you specify in the Homepage URL field.
Setup instructions: Login to your circuly Operations Backend > Go to Settings > Setup & design > CUSTOMER LOGIN STYLING > Logo URL > Add a logo that your customers can click on.

3.4 Cover Image URL
Cover image URL for the Self-Service page.
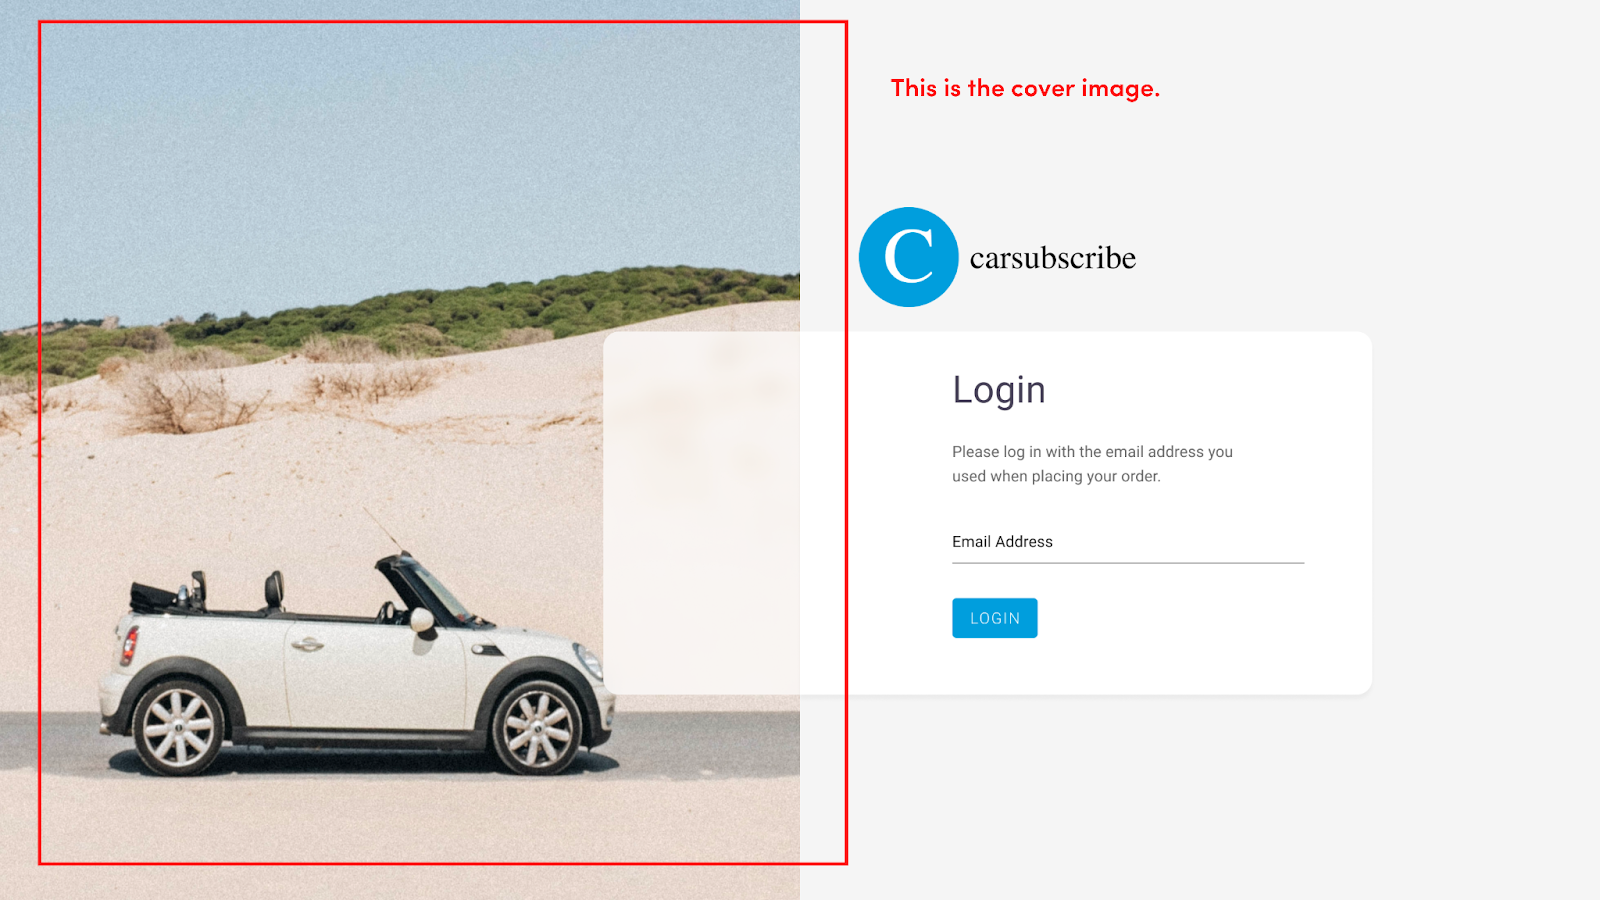
Setup instructions: Login to your circuly Operations Backend > Go to Settings > Setup & design > CUSTOMER LOGIN STYLING > Cover Image URL > Add a URL of an image that will be displayed on your customer login page.

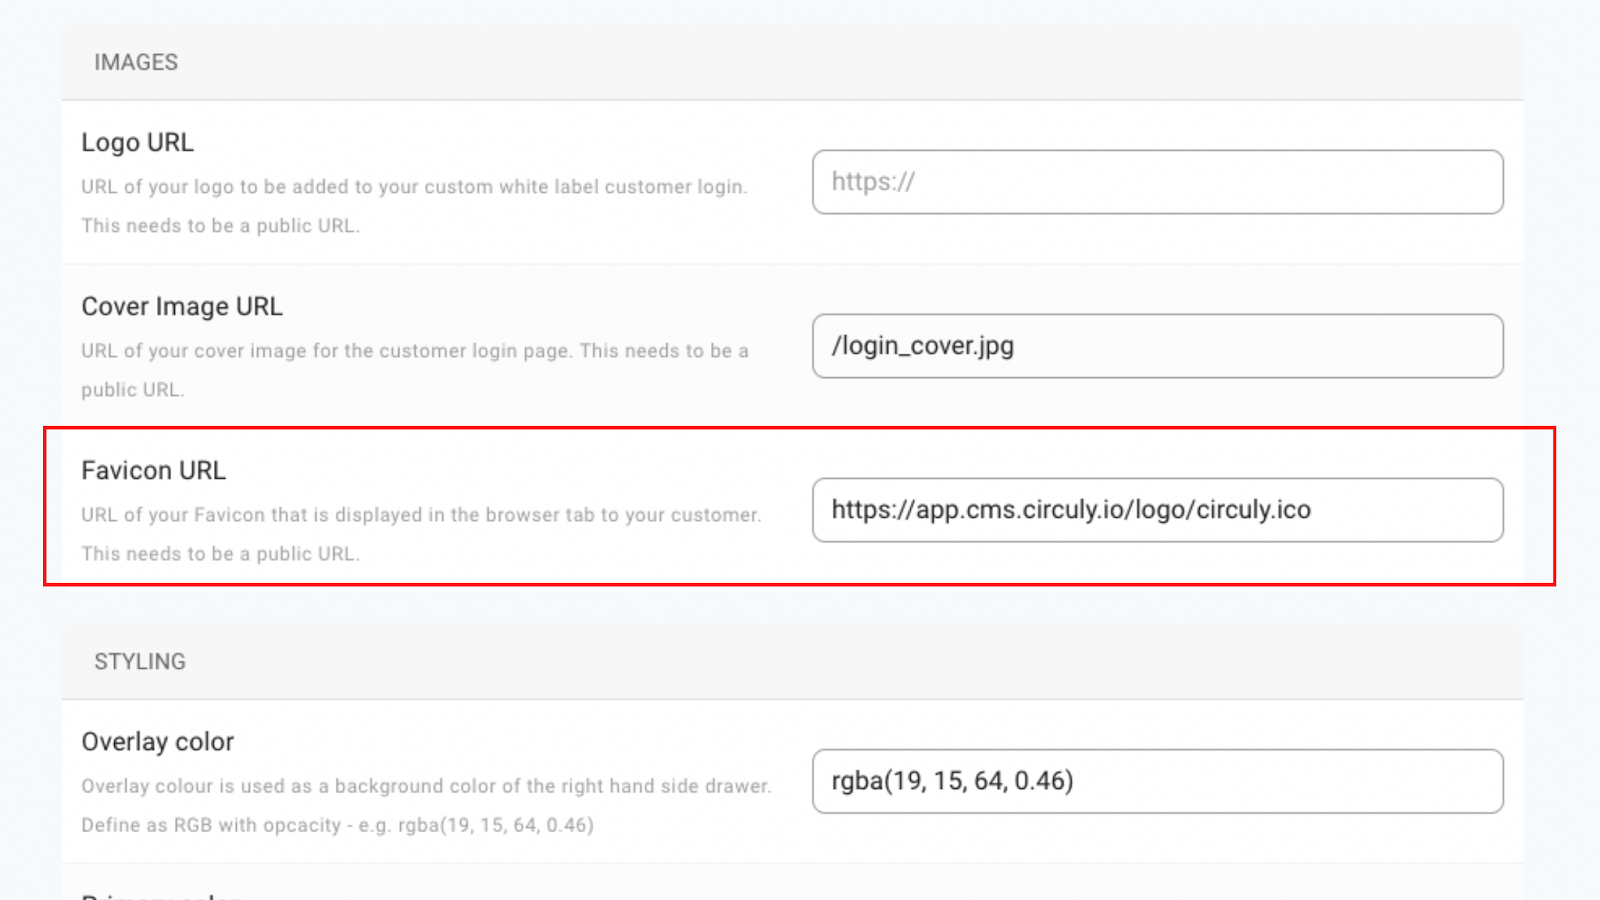
3.5 Favicon URL
The favicon is displayed in the browser tab.
Setup instructions: Login to your circuly Operations Backend > Go to Settings > Setup & design > CUSTOMER LOGIN STYLING > Favicon URL > Add a URL of a Favicon that will be displayed in the browser tab.
3.6 Overlay Color
Your overlay colour (in #123456 format) for the background color on the right-hand side drawer.
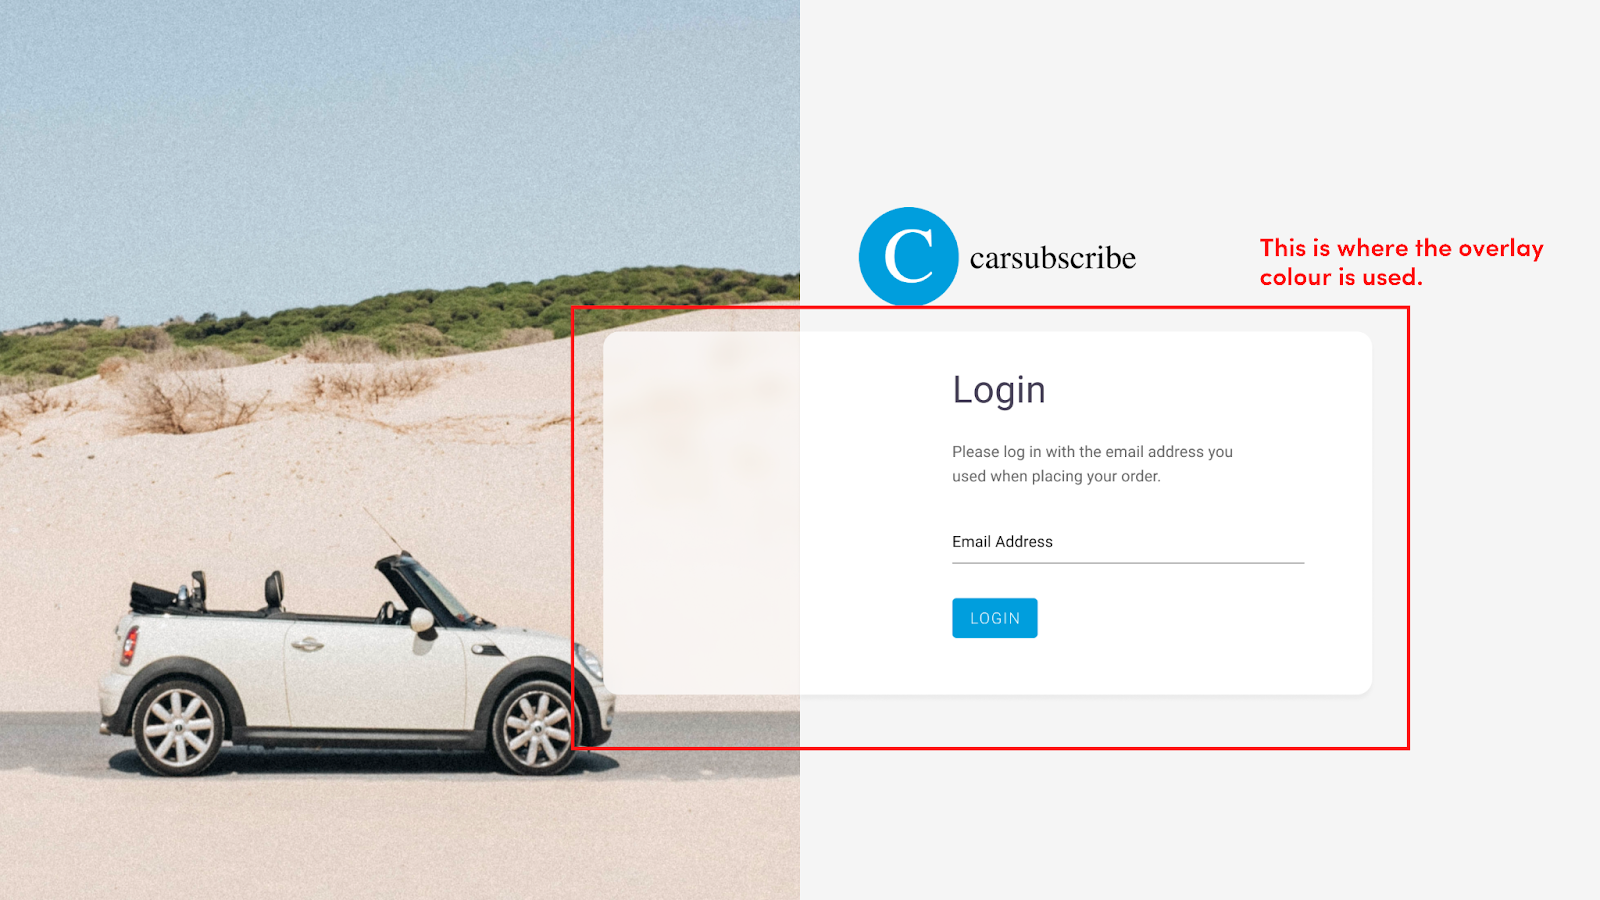

Setup instructions: Login to your circuly Operations Backend > Go to Settings > Setup & design > CUSTOMER LOGIN STYLING > Overlay colour > Add your Overlay colour (in RGB format with opacity).
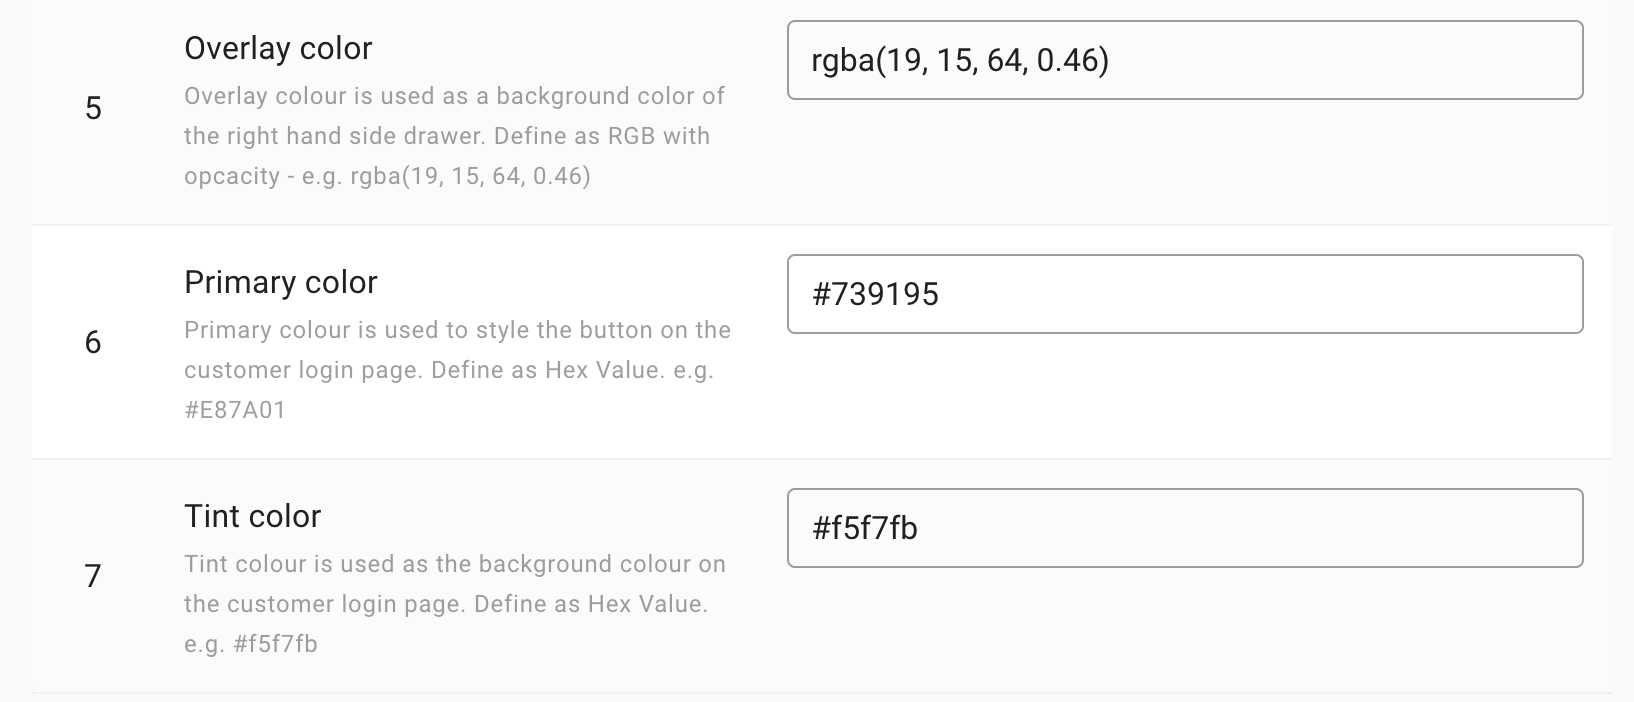
3.7 Primary color
Your primary colour code (in #123456 format) for the button.
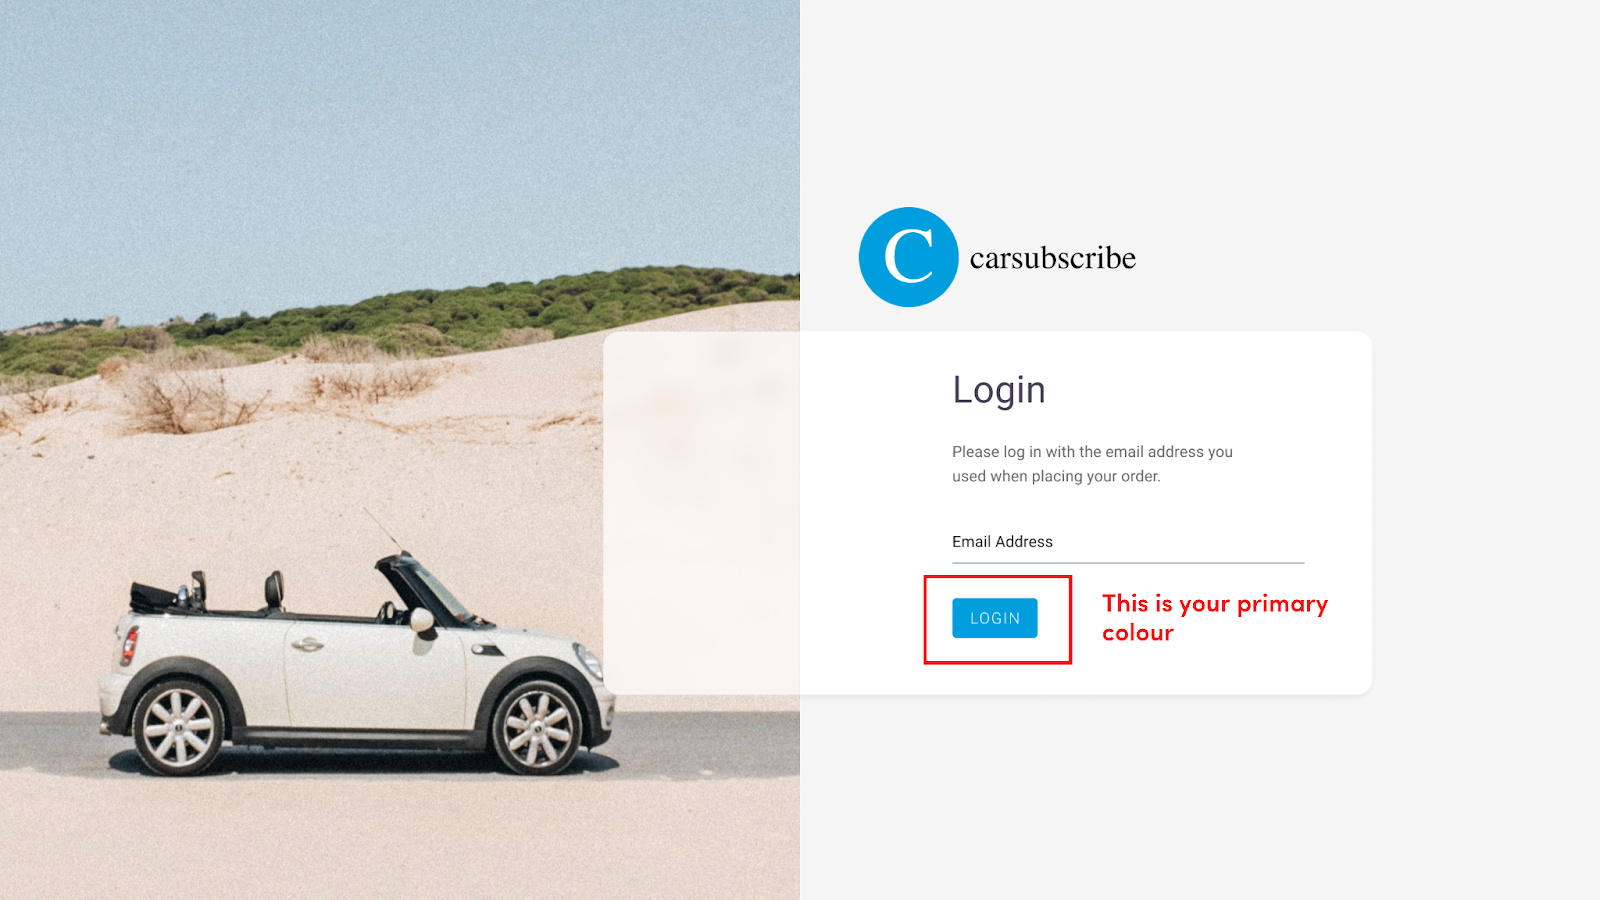
Setup instructions: Login to your circuly Operations Backend > Go to Settings > Setup & design > CUSTOMER LOGIN STYLING > Primary colour > Add your Primary color in the input field in Hex value.
3.8 Tint color
Your tint colour code (in #123456 format) for the background of the right side of the login page.
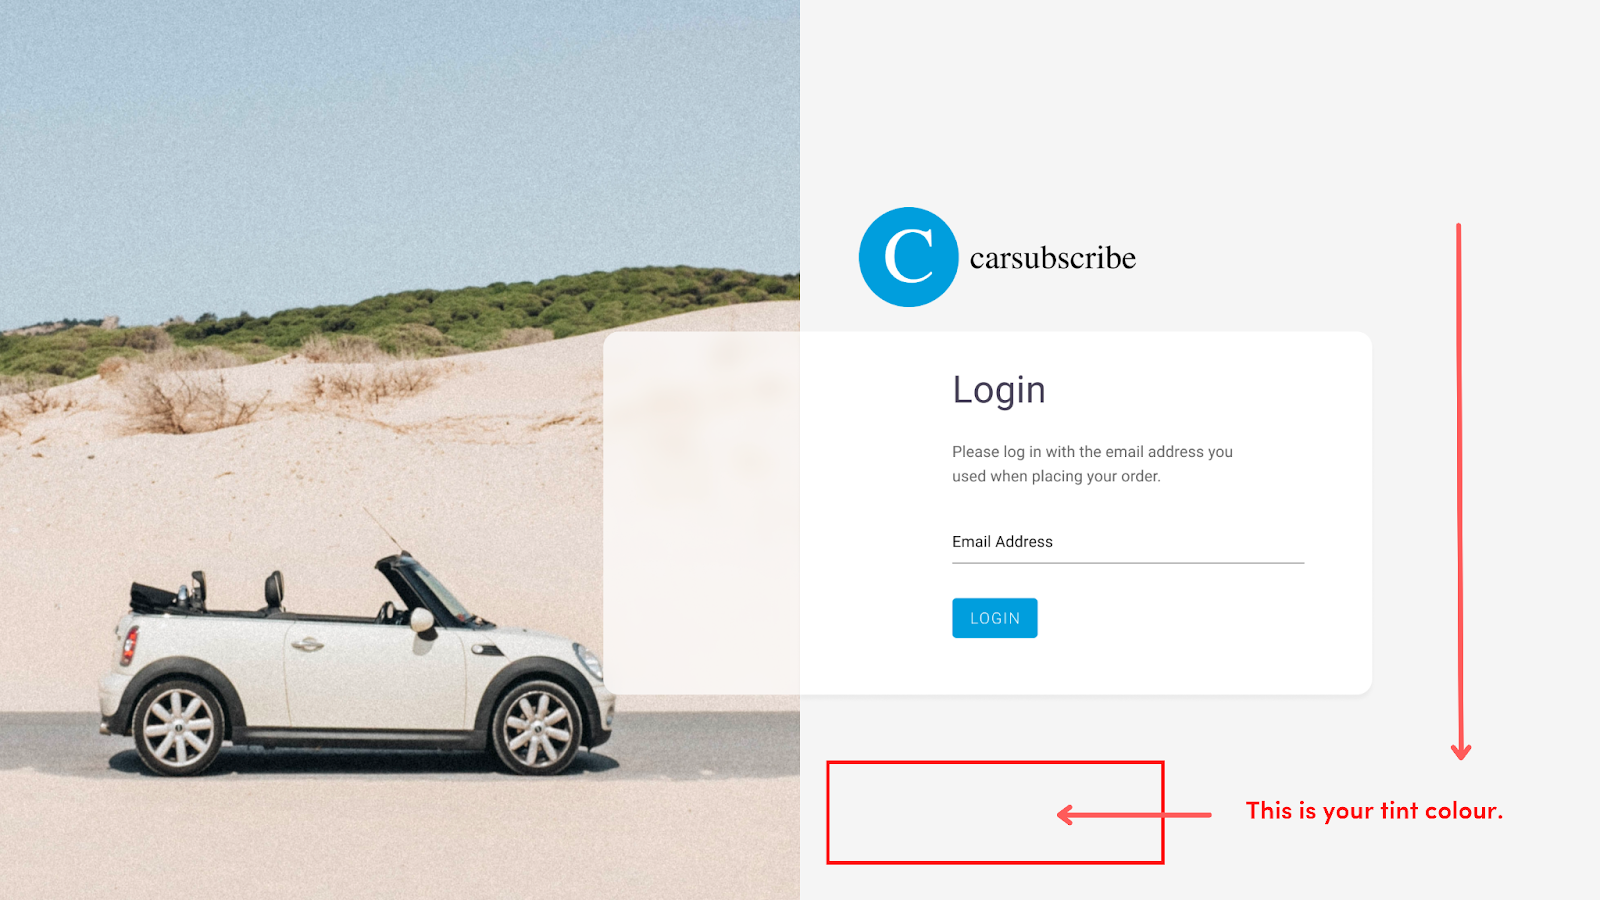
Setup instructions: Login to your circuly Operations Backend> Go to Settings > Setup & design > CUSTOMER LOGIN STYLING > Tint color > Add your Tint color in the input field in Hex value.
3.9 Company name
The name that is displayed in the browser tab. Go to Settings > Setup & design > CHECKOUT SETUP > Company name > Add your company name in the given input field.

4. Additional Customer Self-Service Portal settings options for more flexibility and power
There are additional settings options available in the Self-Service Portal settings that you can set based on your business needs. Decide which settings you want to enable/disable for the customer login after going through the explanation given below.
To set up the additional customer login settings > Log in to your circuly Operations Backend > Go to Settings > Customer login > Set up the settings you want > Click on SUBMIT CHANGES when you are finished.
- Allowed languages: allowed languages for your customer login page. When the customer changes their language in their customer login space the language in which they receive transactional communication emails from the Email Templates will also change and they will receive emails in the language selected by them, provided the Email Template in that language has been set up.
- Auto cancel subscriptions: your customers can cancel their subscriptions from their customer login space. When they do so, the subscription is automatically set to pending return in your circuly Operations Backend. Enabling this setting means that the subscription is automatically set to pending return in your circuly Operations Backend.
- Invoice download: Enable this setting if you dont want your customers to download the invoices.
- Currency: This is the currency displayed to the customer in the customer login. This should be the same as your default currency. If it is not the same as your default currency, kindly go to General Settings to change/update it.
- Payments: in the customer login, your customers can see their payments. If you don’t want your customers to have access to their payments, you can enable this setting.
- Pick up date: if you offer your customers the option to pick up their cancelled/swap orders, you can enable this setting to let your customers choose a pick-up date from the date picker and disable it if you do not want to show a date picker to your customers when they make a cancellation request from their customer login.
- Shopify order name: enabling this setting will use the order name instead of the Order ID in the customer login.