Setup Shipping Methods and Shipping Logics

Published on
October 15, 2022
Written by
written by Garima Singh
TABLE OF CONTENT

In today's highly competitive online marketplace, shipping is one of the key factors that can set a business apart and drive sales, making it a critical component of any successful ecommerce strategy.

With circuly you can do multiple things when it comes to providing shipping options to your customers in the checkout. 

Here’s what’s possible

  • Making shipping cost dependant on cart value thresholds.
  • Making shipping options dependent on the country selected in the checkout. 
  • Making shipping options dependent on the postal code selected in the checkout. 
  • Making shipping costs dependent on the type of product in the cart. 
See how the Shipping options are displayed on the checkout page

Video Guide

Things to-do before the setup

  • Make a plan: Before setting up the shipping methods, make sure that you make a plan about all the countries you want to deliver to, the shipping methods you wish to provide under each country and the translations of the shipping method information for each country.
  • Configure the checkout settings to display the shipping logics: a shipping method will be displayed on the checkout page as soon as you’ve set up a shipping method. However if you multiple shipping methods you need to turn the toggle for the Shipping method setting in the Settings tab. To display the Shipping logics in the checkout, you need to first go to Settings > Checkout > Scroll down to CHECKOUT SHIPPING > And enable the switch for Shipping methods

Set up Overview

Step 1: Locate the Shipping settings

Step 2: Set up the Shipping Methods

Step 3: Set up the Shipping countries

Step 4: Connect the Shipping method to the Shipping countries

Step 1: Locate the Shipping settings

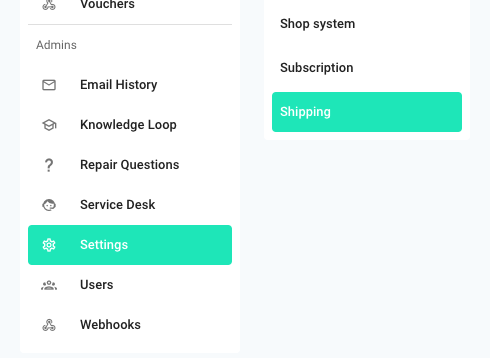
To access the Shipping method feature > In your circuly Operations Backend go to the Settings tab > navigate to Shipping in the settings menu. 
Step 2: Set up the Shipping Methods

Shipping Methods

Define the different shipping options (such as DHL, DPD, Postal Service, International Delivery etc.) and customise them based on the various shipping logics (such as free delivery, postal code restrictions, product collection validation etc.)

In the Shipping Methods section you can define the following:

  • The different shipping options that you plan on offering such as DHL, DPD, Local post, Pick up etc. 
  • The price associated with each shipping option such as DHL 5,99€, pick-up 0,00€, International Shipping 89,99€ etc. 
  • The free shipping cart value (if you want to offer free shipping). 
  • Postal code and product collection restrictions. 
  • The shipping options for different countries such as DHL Netherlands, DHL Germany and the cost associated with them such as DHL Netherlands 6,99€ and DHL Germany 5,99€. 
  • The translations of each shipping method such as Postdienst for German language and Postal Service for the English option. 

To begin the setup process > Under Shipping Methods > Click on the plus “+” icon to display the setup options. 

  • In the Create shipping method setup window fill in the necessary information in the given input fields. Given below is an explanation of the available field options.

1. Title and tag - the title and tag input field are only for internal use to differentiate between the different shipping methods. 

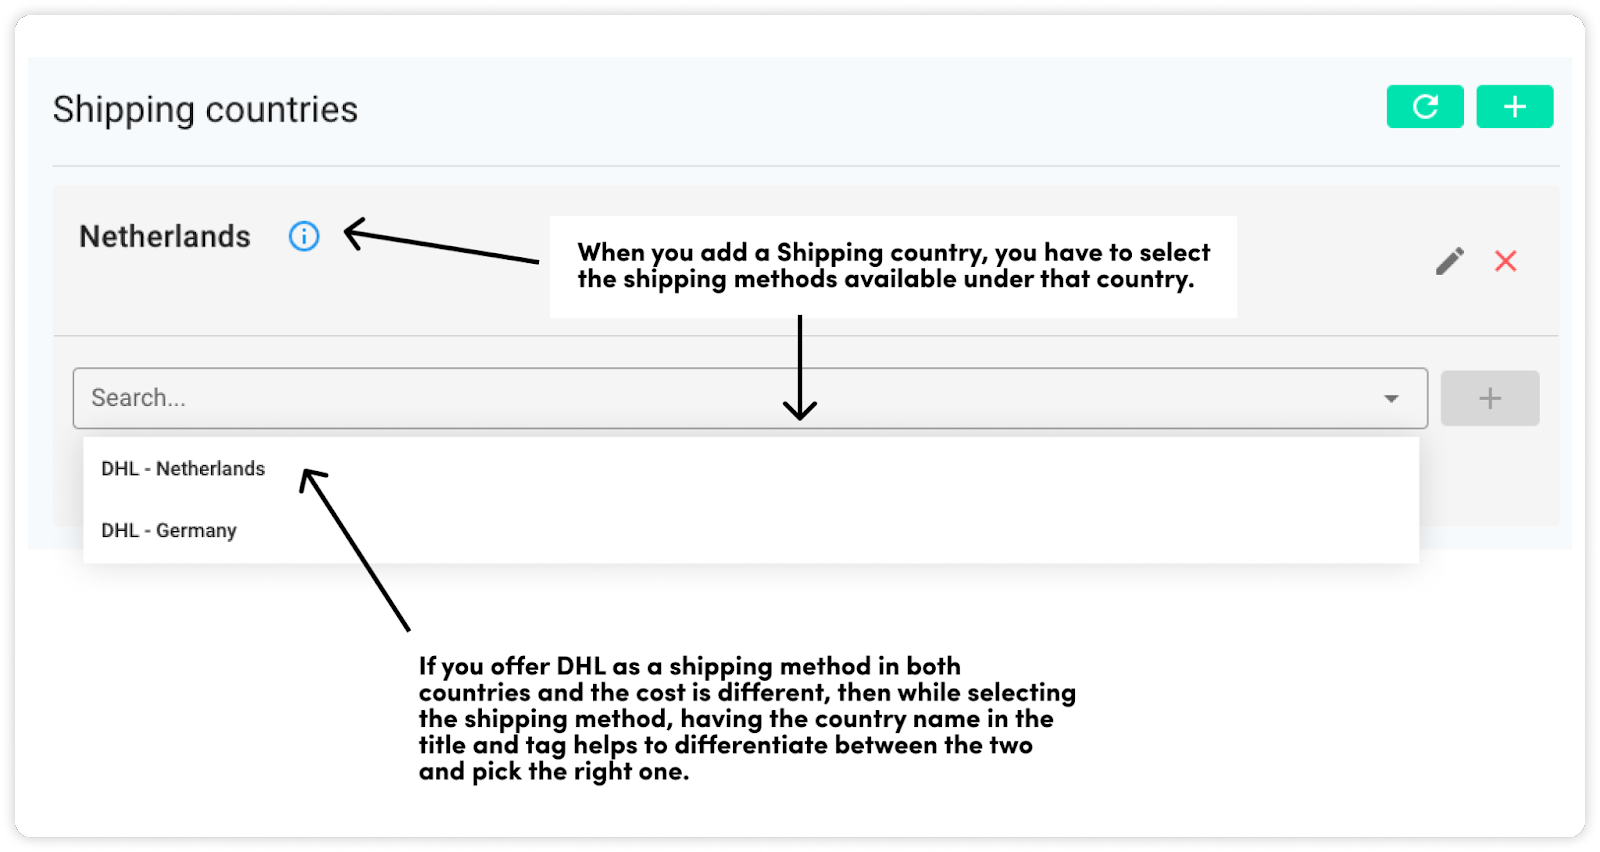
Use case: You offer shipping in Netherlands and Germany via DHL and the associated costs are 7,99€ and 4,99€ respectively. 

Create two separate shipping methods and add the title and tag as DHL Germany and DHL Netherlands to differentiate between the two when selecting the shipping method under shipping country. 

When you are adding the shipping countries and connecting them to the shipping methods, having the name of the country makes it easier to pick the right shipping method. 
From here on we’ll explain the remaining options in the Create Shipping Window by highlighting some of the most popular use cases for shipping.

Use case 1: Free shipping for subscription-based products

If you offer both subscription-based and one-off purchase based products, one of the most common shipping option is to offer free shipping if their is even one subscription-based product in the cart.  

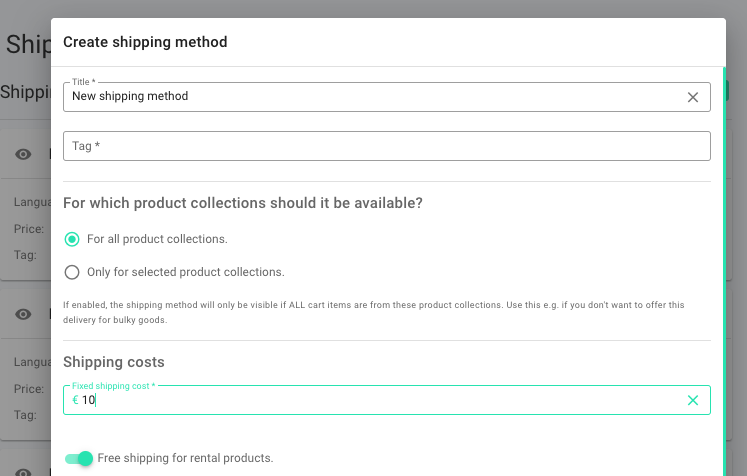
Example: If there are rental products in the cart, shipping cost is 0€. If there are one-off purchase products in the cart, shipping cost is 10€

To make this available in the checkout > Add 10€ in the Fixed shipping cost input field and toggle on the switch for Free Shipping for rental products

When you toggle the switch for free shipping for rental products and add a value in the Fixed shipping cost input field, the circuly system will do the following:

Only rental products in the cart = no shipping cost

Rental + Purchase products in the cart = no shipping cost

Only purchase products in the cart = charge shipping cost as per value in the Fixed shipping cart input field.

Use case 2: Shipping cost based on cart value

Another popular use case is to make the shipping cost dependant on the total cart value. You can define a range that qualifies for free shipping and a range that does not qualify for free shipping.


Example: Free shipping if the cart value is over 50€. And charge shipping costs of 5.99€ if the cart value is below 50€. 

To make this available in the checkout > Toggle on the switch for Shipping costs based on cart value > Type 0 in the Cart value start range input field and type 49.99 in the Cart value end range input field > Type the cost, that is 5.99 in the Shipping price for cart value range input field > And click on the plus icon. 

Next, Add the free cart range by typing 50 in the Cart value start range input field and typing a random high number (10000002) in the Cart value end range input field > Type the cost as 0 > And click on the plus icon. 

If none of the above two options are met then the system will use the value under Shipping costs

Note: You can define upto 5 price ranges. 

Use case 3: Shipping cost based on products in the cart

The third common shipping option is to make the shipping costs dependent on the products in the cart. This option is useful specially when you have products that cost extra for shipping and products that can be delivered with your standard delivery options. 

Prerequisite: Create the required product collections. Learn more about creating a product collection.

Example: You offer free shipping for products that are under 15kg and charge 89€ for shipping products that are over 15kg and are considered bulky. 

Here’s what you need to do to display the right shipping method in the checkout depending on what products are in the cart. 

One: Create a shipping method for ALL product collections including bulky goods. The checkout page will display this shipping method if there is even 1 bulky product in the cart and therefore a higher shipping price will be charged. This shipping option will also be displayed in combination with the standard shipping option of there are ONLY non-bulky products in the cart. In that case the customer can simply select the cheaper option.

Two: Create a shipping method for all product collections and EXCLUDE bulky goods from it .The checkout page will display this shipping method if there are no bulky items in the cart.

Creating two shipping methods is important for a scenario in which there are BOTH bulky and normal goods in the cart. In this scenario the shipping method for bulky goods will be available on the checkout since there is a bulky good in the cart. 

Here are the steps: 

Step 1: create the required product collection

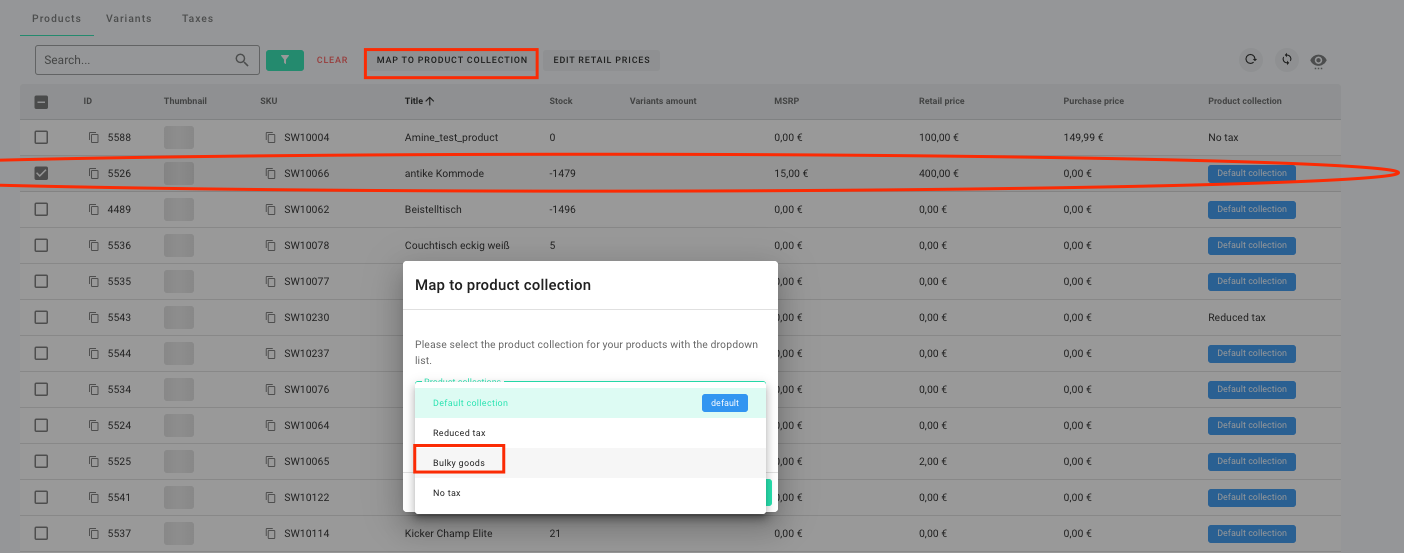
Create a separate product collection for bulky goods.


Step 2: Assign products to these product collections


Step 3a: create a shipping method for all product collection including bulky goods. Simply check the box for all product collections while creating the shipping method.
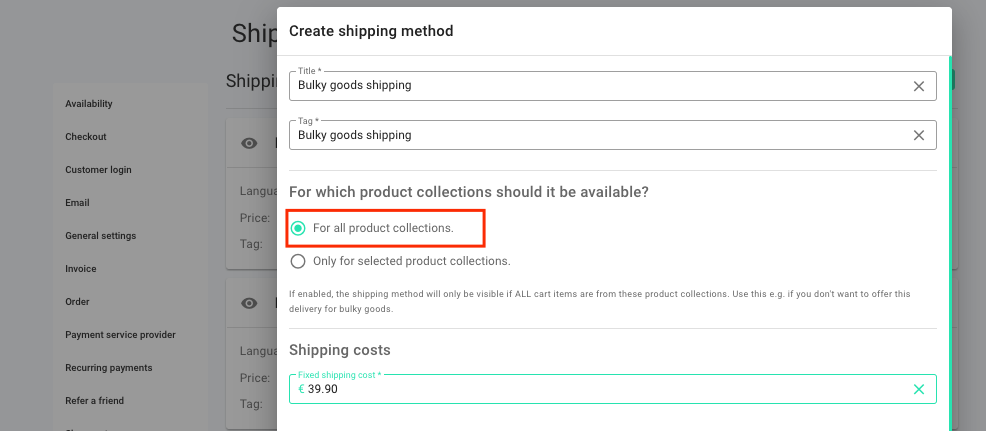
Type 89 (the desired value of the shipping costs) in the Fixed shipping cost input field. 

Step 3b: create a shipping method for all product collections and EXCLUDE bulky goods from that shipping method. 

Note: You can exclude a product collection by selecting the “only for selected product collection” option and not including the Bulky goods from the product collection options. 
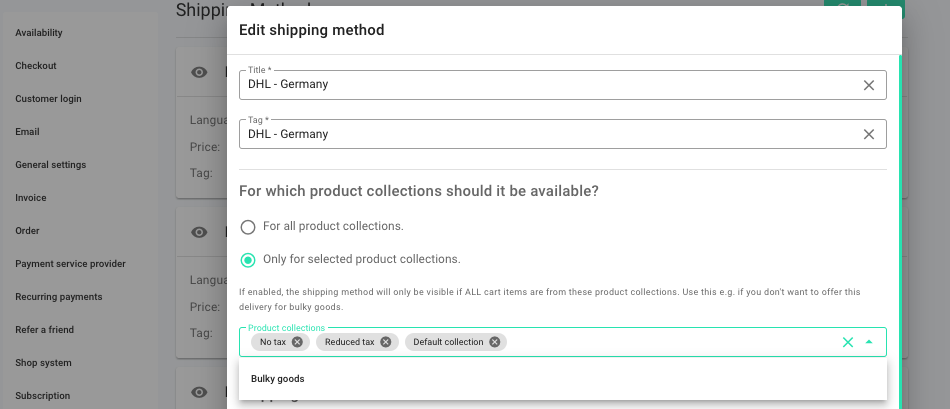
Here’s how the shipping methods will be displayed on the checkout:

Normal goods + Bulky goods > Bulky goods shipping

Normal goods > Standard shipping and Bulky goods Shipping (the customer can then choose the standard or more cheaper shipping option)

Bulky goods > Bulky goods shipping. 

Case 4: Shipping costs based on postal codes. 

Another possibility it to make the shipping costs dependent on postal codes. 

Example: Higher shipping costs for difficult to reach locations such as islands or postal codes outside the city. 

Step 1: create a shipping method of the difficult to reach locations, for example Island. 

Step 2: Toggle on the switch for Enable postal code restrictions

Select a country under the Country dropdown menu, the postal code that should be more expensive in the Postal code input field and click on the INCLUDE button. 

Step 3: Restricting the other shipping method(s)

Exclude the same postal code (the one you included in the Island shipping method) from the other shipping methods so that the shipping costs are rightly calculated on the checkout page. 

Language & translations - Under language and translation you have the following options:

Language - add a language clicking on the plus icon. 

Title and Description - Write a title and Description (optional) for the shipping method in the translated version. The text that you write here will be displayed to your customer on the checkout. 
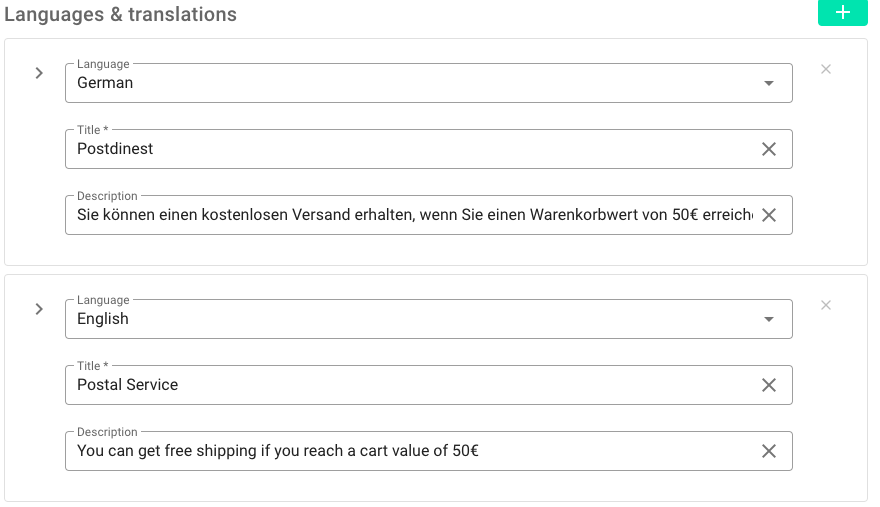
Tip: You can use the description to inform your customers about how much more they need in their cart to qualify for free shipping.  

Step 3: Set up the Shipping countries and connect them to the shipping methods

Shipping countries

Connect the shipping method to a particular country to make it available when the country is selected in the checkout. 

You have to create both, Shipping Methods and Shipping Countries, and connect the Shipping Methods to the Shipping Countries. 

Connecting the Shipping Method to the Shipping Countries is important because you may or may not offer a particular shipping method for a specific country. Therefore, the option to select a said shipping method for the said country should or should not be available on the checkout

Once you’ve set up the Shipping Methods you can assign and link the Shipping Methods to the different countries where you are operational.

Note: When you are setting up the Shipping Methods and Shipping countries you can add as many shipping countries as you want but they will be available on your checkout only when you add them to your list of Delivery countries in the Checkout settings.


Here’s how you can access the Delivery countries setting > In Settings > Go to Checkout > Scroll down to DELIVERY > Click on the arrow icon to expand the settings > Enable the switch for Limit delivery countries > Select all the countries you want to make available on your checkout from the Delivery countries dropdown menu.

  • To add a country for Shipping Countries >  Go back to the Shipping settings if you are continuing from the point above > Click on the plus icon “+” after clicking on the down arrow to expand the options > In the Create shipping country setup window > Assign a name to the country under Name and select the country from the Country dropdown menu > Then click on SUBMIT.
  • Once the country is added the country will be greyed out because there is no shipping method attached to this country yet. To attach a shipping method to this country > Click on the dropdown menu to see a available list of Shipping Methods > Select the shipping methods that you would like to make available for this country > And then click on the plus "+" icon to add the shipping method to the list.
  • You can add only one shipping method at a time. To add another > Click on the dropdown menu again > select the shipping method > And finally click on the plus icon “+”.
  • Continue until you have all the desired shipping method selected under the desired country.
  • Additionally you can choose to make a shipping method default by clicking on the button that says DEFAULT once you’ve set up the countries and the shipping methods.
  • Once you’re finished, the set up should look like this (see image below). 
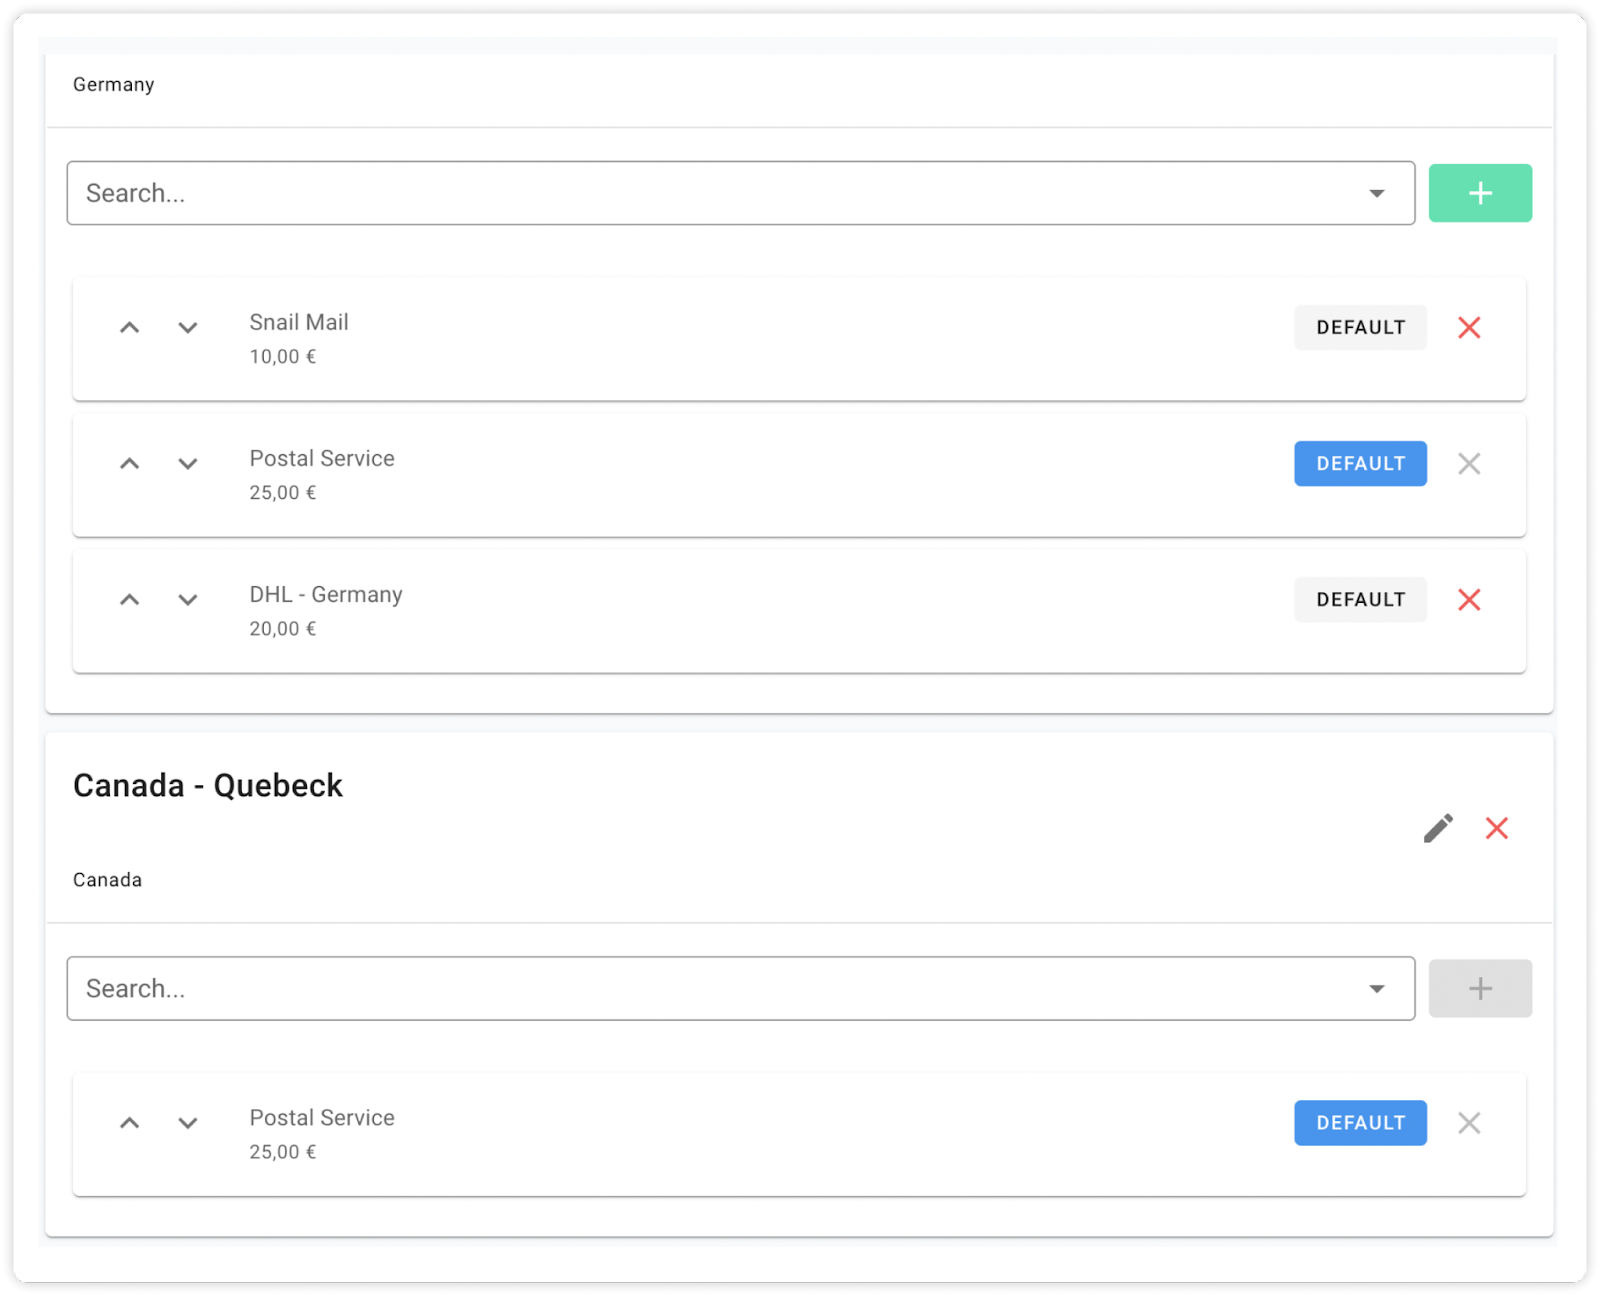
Screenshot of circuly settings to show the shipping method feature

Learn more about how the shipping methods are displayed on the checkout page.

missing the answer to your question?

Fields marked with an asterisk (*) are required.
Thank you! Your submission has been received!

We are now hitting the keys to produce the content you are looking for. We will inform you once we are finished.  
Oops! Something went wrong while submitting the form.

Setup Shipping Methods and Shipping Logics

In today's highly competitive online marketplace, shipping is one of the key factors that can set a business apart and drive sales, making it a critical component of any successful ecommerce strategy.

With circuly you can do multiple things when it comes to providing shipping options to your customers in the checkout. 

Here’s what’s possible

  • Making shipping cost dependant on cart value thresholds.
  • Making shipping options dependent on the country selected in the checkout. 
  • Making shipping options dependent on the postal code selected in the checkout. 
  • Making shipping costs dependent on the type of product in the cart. 
See how the Shipping options are displayed on the checkout page

Video Guide

Things to-do before the setup

  • Make a plan: Before setting up the shipping methods, make sure that you make a plan about all the countries you want to deliver to, the shipping methods you wish to provide under each country and the translations of the shipping method information for each country.
  • Configure the checkout settings to display the shipping logics: a shipping method will be displayed on the checkout page as soon as you’ve set up a shipping method. However if you multiple shipping methods you need to turn the toggle for the Shipping method setting in the Settings tab. To display the Shipping logics in the checkout, you need to first go to Settings > Checkout > Scroll down to CHECKOUT SHIPPING > And enable the switch for Shipping methods

Set up Overview

Step 1: Locate the Shipping settings

Step 2: Set up the Shipping Methods

Step 3: Set up the Shipping countries

Step 4: Connect the Shipping method to the Shipping countries

Step 1: Locate the Shipping settings

To access the Shipping method feature > In your circuly Operations Backend go to the Settings tab > navigate to Shipping in the settings menu. 

Step 2: Set up the Shipping Methods

Shipping Methods

Define the different shipping options (such as DHL, DPD, Postal Service, International Delivery etc.) and customise them based on the various shipping logics (such as free delivery, postal code restrictions, product collection validation etc.)

In the Shipping Methods section you can define the following:

  • The different shipping options that you plan on offering such as DHL, DPD, Local post, Pick up etc. 
  • The price associated with each shipping option such as DHL 5,99€, pick-up 0,00€, International Shipping 89,99€ etc. 
  • The free shipping cart value (if you want to offer free shipping). 
  • Postal code and product collection restrictions. 
  • The shipping options for different countries such as DHL Netherlands, DHL Germany and the cost associated with them such as DHL Netherlands 6,99€ and DHL Germany 5,99€. 
  • The translations of each shipping method such as Postdienst for German language and Postal Service for the English option. 

To begin the setup process > Under Shipping Methods > Click on the plus “+” icon to display the setup options. 

  • In the Create shipping method setup window fill in the necessary information in the given input fields. Given below is an explanation of the available field options.

1. Title and tag - the title and tag input field are only for internal use to differentiate between the different shipping methods. 

Use case: You offer shipping in Netherlands and Germany via DHL and the associated costs are 7,99€ and 4,99€ respectively. 

Create two separate shipping methods and add the title and tag as DHL Germany and DHL Netherlands to differentiate between the two when selecting the shipping method under shipping country. 

When you are adding the shipping countries and connecting them to the shipping methods, having the name of the country makes it easier to pick the right shipping method. 

From here on we’ll explain the remaining options in the Create Shipping Window by highlighting some of the most popular use cases for shipping.

Use case 1: Free shipping for subscription-based products

If you offer both subscription-based and one-off purchase based products, one of the most common shipping option is to offer free shipping if their is even one subscription-based product in the cart.  

Example: If there are rental products in the cart, shipping cost is 0€. If there are one-off purchase products in the cart, shipping cost is 10€

To make this available in the checkout > Add 10€ in the Fixed shipping cost input field and toggle on the switch for Free Shipping for rental products

When you toggle the switch for free shipping for rental products and add a value in the Fixed shipping cost input field, the circuly system will do the following:

Only rental products in the cart = no shipping cost

Rental + Purchase products in the cart = no shipping cost

Only purchase products in the cart = charge shipping cost as per value in the Fixed shipping cart input field.

Use case 2: Shipping cost based on cart value

Another popular use case is to make the shipping cost dependant on the total cart value. You can define a range that qualifies for free shipping and a range that does not qualify for free shipping.


Example: Free shipping if the cart value is over 50€. And charge shipping costs of 5.99€ if the cart value is below 50€. 

To make this available in the checkout > Toggle on the switch for Shipping costs based on cart value > Type 0 in the Cart value start range input field and type 49.99 in the Cart value end range input field > Type the cost, that is 5.99 in the Shipping price for cart value range input field > And click on the plus icon. 

Next, Add the free cart range by typing 50 in the Cart value start range input field and typing a random high number (10000002) in the Cart value end range input field > Type the cost as 0 > And click on the plus icon. 

If none of the above two options are met then the system will use the value under Shipping costs

Note: You can define upto 5 price ranges. 

Use case 3: Shipping cost based on products in the cart

The third common shipping option is to make the shipping costs dependent on the products in the cart. This option is useful specially when you have products that cost extra for shipping and products that can be delivered with your standard delivery options. 

Prerequisite: Create the required product collections. Learn more about creating a product collection.

Example: You offer free shipping for products that are under 15kg and charge 89€ for shipping products that are over 15kg and are considered bulky. 

Here’s what you need to do to display the right shipping method in the checkout depending on what products are in the cart. 

One: Create a shipping method for ALL product collections including bulky goods. The checkout page will display this shipping method if there is even 1 bulky product in the cart and therefore a higher shipping price will be charged. This shipping option will also be displayed in combination with the standard shipping option of there are ONLY non-bulky products in the cart. In that case the customer can simply select the cheaper option.

Two: Create a shipping method for all product collections and EXCLUDE bulky goods from it .The checkout page will display this shipping method if there are no bulky items in the cart.

Creating two shipping methods is important for a scenario in which there are BOTH bulky and normal goods in the cart. In this scenario the shipping method for bulky goods will be available on the checkout since there is a bulky good in the cart. 

Here are the steps: 

Step 1: create the required product collection

Create a separate product collection for bulky goods.


Step 2: Assign products to these product collections


Step 3a: create a shipping method for all product collection including bulky goods. Simply check the box for all product collections while creating the shipping method.

Type 89 (the desired value of the shipping costs) in the Fixed shipping cost input field. 

Step 3b: create a shipping method for all product collections and EXCLUDE bulky goods from that shipping method. 

Note: You can exclude a product collection by selecting the “only for selected product collection” option and not including the Bulky goods from the product collection options. 

Here’s how the shipping methods will be displayed on the checkout:

Normal goods + Bulky goods > Bulky goods shipping

Normal goods > Standard shipping and Bulky goods Shipping (the customer can then choose the standard or more cheaper shipping option)

Bulky goods > Bulky goods shipping. 

Case 4: Shipping costs based on postal codes. 

Another possibility it to make the shipping costs dependent on postal codes. 

Example: Higher shipping costs for difficult to reach locations such as islands or postal codes outside the city. 

Step 1: create a shipping method of the difficult to reach locations, for example Island. 

Step 2: Toggle on the switch for Enable postal code restrictions

Select a country under the Country dropdown menu, the postal code that should be more expensive in the Postal code input field and click on the INCLUDE button. 

Step 3: Restricting the other shipping method(s)

Exclude the same postal code (the one you included in the Island shipping method) from the other shipping methods so that the shipping costs are rightly calculated on the checkout page. 

Language & translations - Under language and translation you have the following options:

Language - add a language clicking on the plus icon. 

Title and Description - Write a title and Description (optional) for the shipping method in the translated version. The text that you write here will be displayed to your customer on the checkout. 

Tip: You can use the description to inform your customers about how much more they need in their cart to qualify for free shipping.  

Step 3: Set up the Shipping countries and connect them to the shipping methods

Shipping countries

Connect the shipping method to a particular country to make it available when the country is selected in the checkout. 

You have to create both, Shipping Methods and Shipping Countries, and connect the Shipping Methods to the Shipping Countries. 

Connecting the Shipping Method to the Shipping Countries is important because you may or may not offer a particular shipping method for a specific country. Therefore, the option to select a said shipping method for the said country should or should not be available on the checkout

Once you’ve set up the Shipping Methods you can assign and link the Shipping Methods to the different countries where you are operational.

Note: When you are setting up the Shipping Methods and Shipping countries you can add as many shipping countries as you want but they will be available on your checkout only when you add them to your list of Delivery countries in the Checkout settings.


Here’s how you can access the Delivery countries setting > In Settings > Go to Checkout > Scroll down to DELIVERY > Click on the arrow icon to expand the settings > Enable the switch for Limit delivery countries > Select all the countries you want to make available on your checkout from the Delivery countries dropdown menu.

  • To add a country for Shipping Countries >  Go back to the Shipping settings if you are continuing from the point above > Click on the plus icon “+” after clicking on the down arrow to expand the options > In the Create shipping country setup window > Assign a name to the country under Name and select the country from the Country dropdown menu > Then click on SUBMIT.
  • Once the country is added the country will be greyed out because there is no shipping method attached to this country yet. To attach a shipping method to this country > Click on the dropdown menu to see a available list of Shipping Methods > Select the shipping methods that you would like to make available for this country > And then click on the plus "+" icon to add the shipping method to the list.
  • You can add only one shipping method at a time. To add another > Click on the dropdown menu again > select the shipping method > And finally click on the plus icon “+”.
  • Continue until you have all the desired shipping method selected under the desired country.
  • Additionally you can choose to make a shipping method default by clicking on the button that says DEFAULT once you’ve set up the countries and the shipping methods.
  • Once you’re finished, the set up should look like this (see image below). 
Screenshot of circuly settings to show the shipping method feature

Learn more about how the shipping methods are displayed on the checkout page.