
Set Up an Email Template
Introduction
circuly helps you automate important customer communication through transactional emails. These emails are directly tied to certain events in your rental business — for example, when an order is placed, a payment is processed, a subscription renews, or a return is initiated. Once the event occurs, circuly automatically sends out the appropriate email to your customer.
Important:
- circuly only supports transactional emails, not promotional or marketing emails. For newsletters or promotions, please use a dedicated marketing automation tool.
- Email templates in circuly can be set up in multiple languages based on your allowed language settings. If a template in the customer’s preferred language is missing, circuly will use the default language template. instead. However, if a template is missing in both, the email won’t be sent.
Review this article to gain a deeper understanding of what default, allowed and preferred language is and how they are used by circuly.
Setup Overview
Here’s how circuly’s email templates work and what you can do with them:
Types of Emails
Most of the transactional email templates in the circuly Hub fall under four key categories:
- Orders
- Payments
- Subscriptions
(Some templates also exist outside these categories, which you can configure similarly.)
Customisation Options
- Edit the subject line and body: Include placeholders (variables) to dynamically pull customer or order data. Note: not all variables are available for every template.
- Custom HTML & CSS: Style the emails to match your brand’s look and feel.
- Multiple languages: Set up templates in the languages you’ve enabled in your circuly settings.
Search & Organisation
- Use the search bar on the Email Templates page to quickly find a specific template by name or keyword — helpful if you manage many templates across languages and events.
Step-by-Step Guide
1. Navigate to Email Templates
- Log into your circuly Hub.
- Click on Email Templates in the left navigation bar.
- You’ll see template titles arranged in rows and languages in columns.
2. Create a New Email Template
- Find the email and language you want to set up, then click Create Template.
- Decide on the type of template:
- Blank Template:
- Start from scratch using your own HTML & CSS.
- Add any available variables.
- Use the Preview button to check the look.
- circuly Predefined:
- Use a preset template that’s easier to customise.
- Already styled and includes a basic subject and body — you adjust to fit your brand.
- Blank Template:
- Click the save icon to either save progress or finalise the template.
3. Edit or Modify Existing Templates
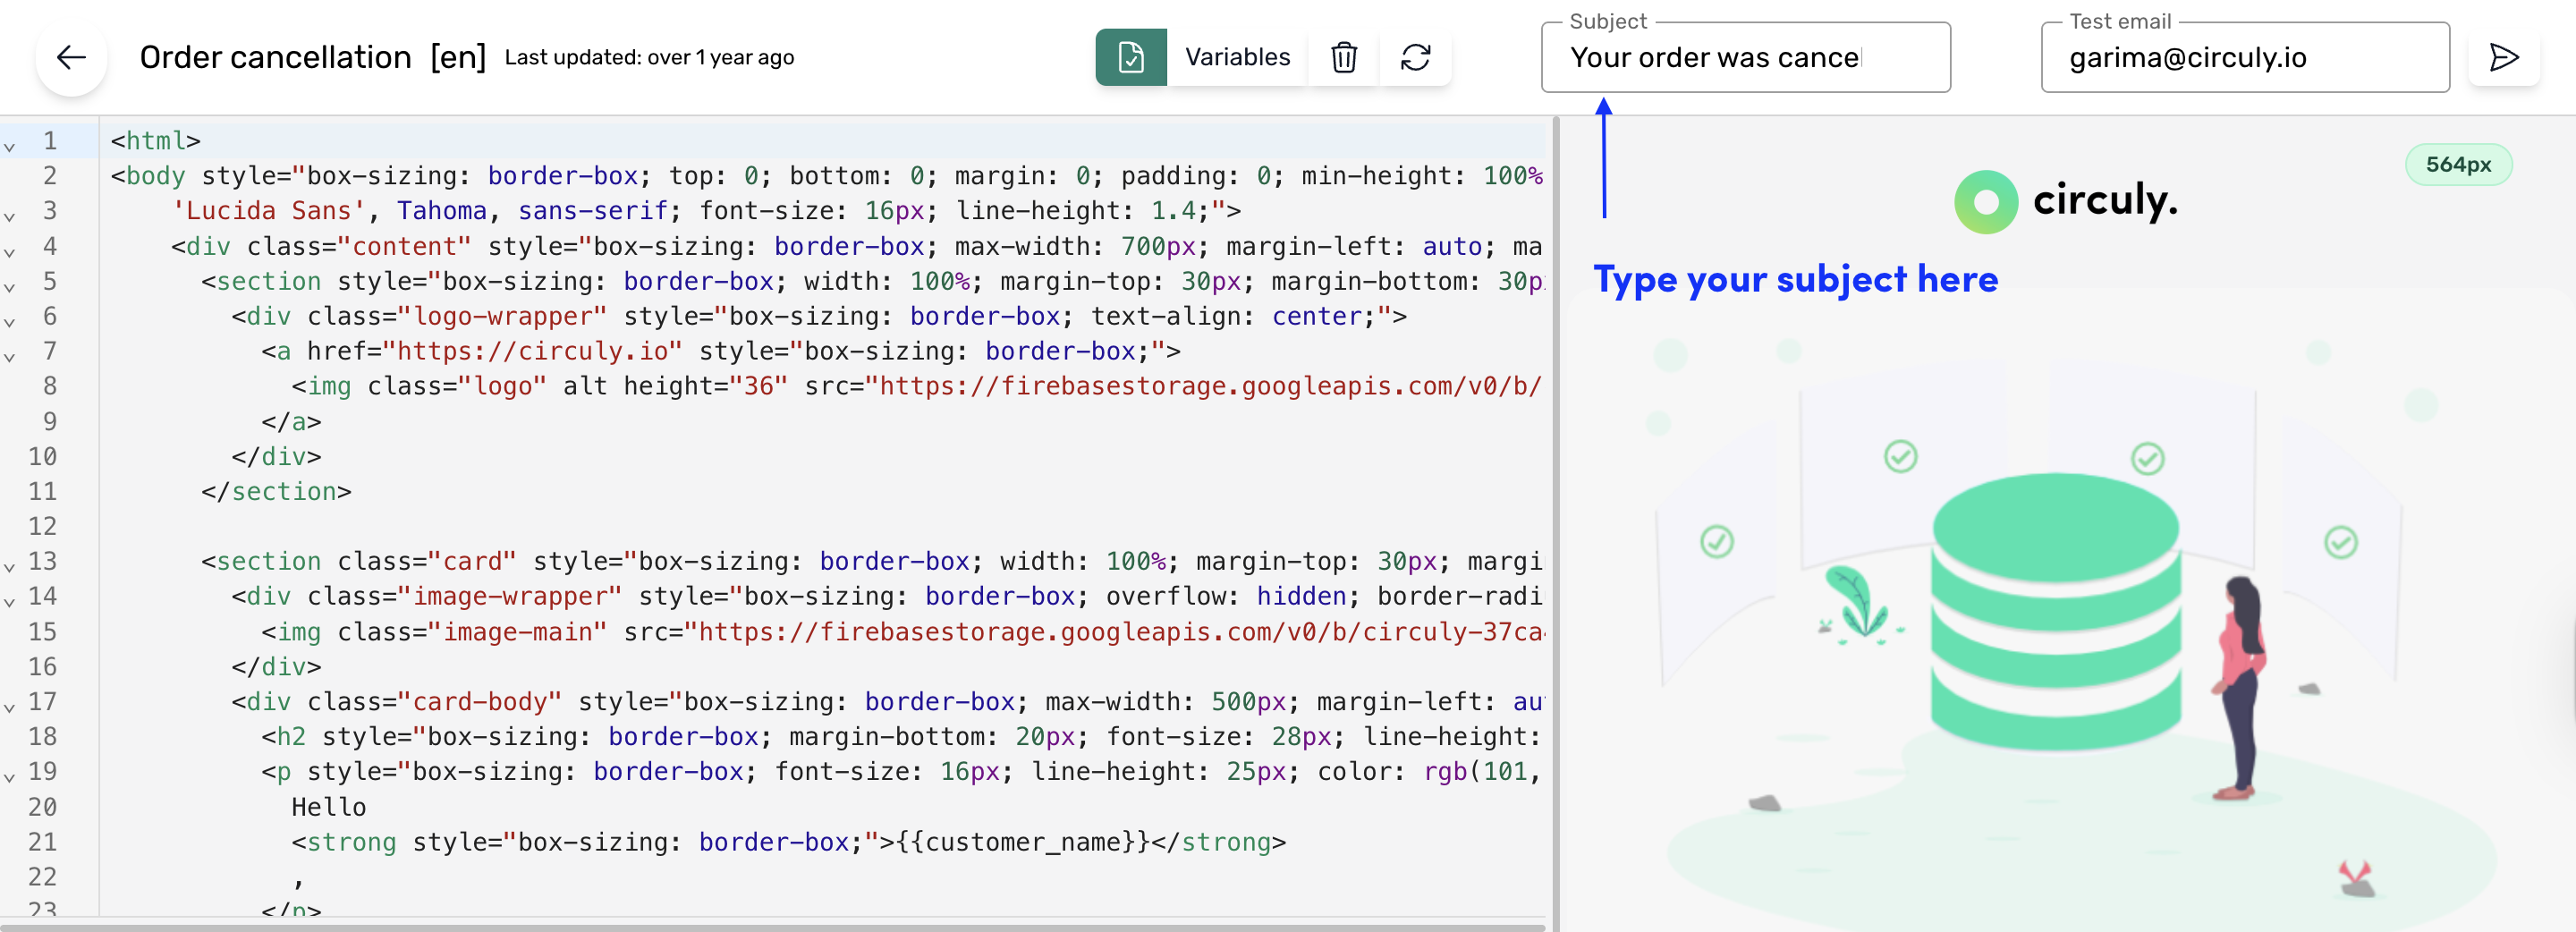
Change the subject line
- Hover over an existing template, click the pencil icon to edit.
- Navigate to the email Subject in the top right.
- Type your new subject and click save.
Add or remove variables
- In the edit view, click the Variables button to see the available variables.
- Click the copy icon next to a variable, then paste it into your HTML wherever you want it displayed.
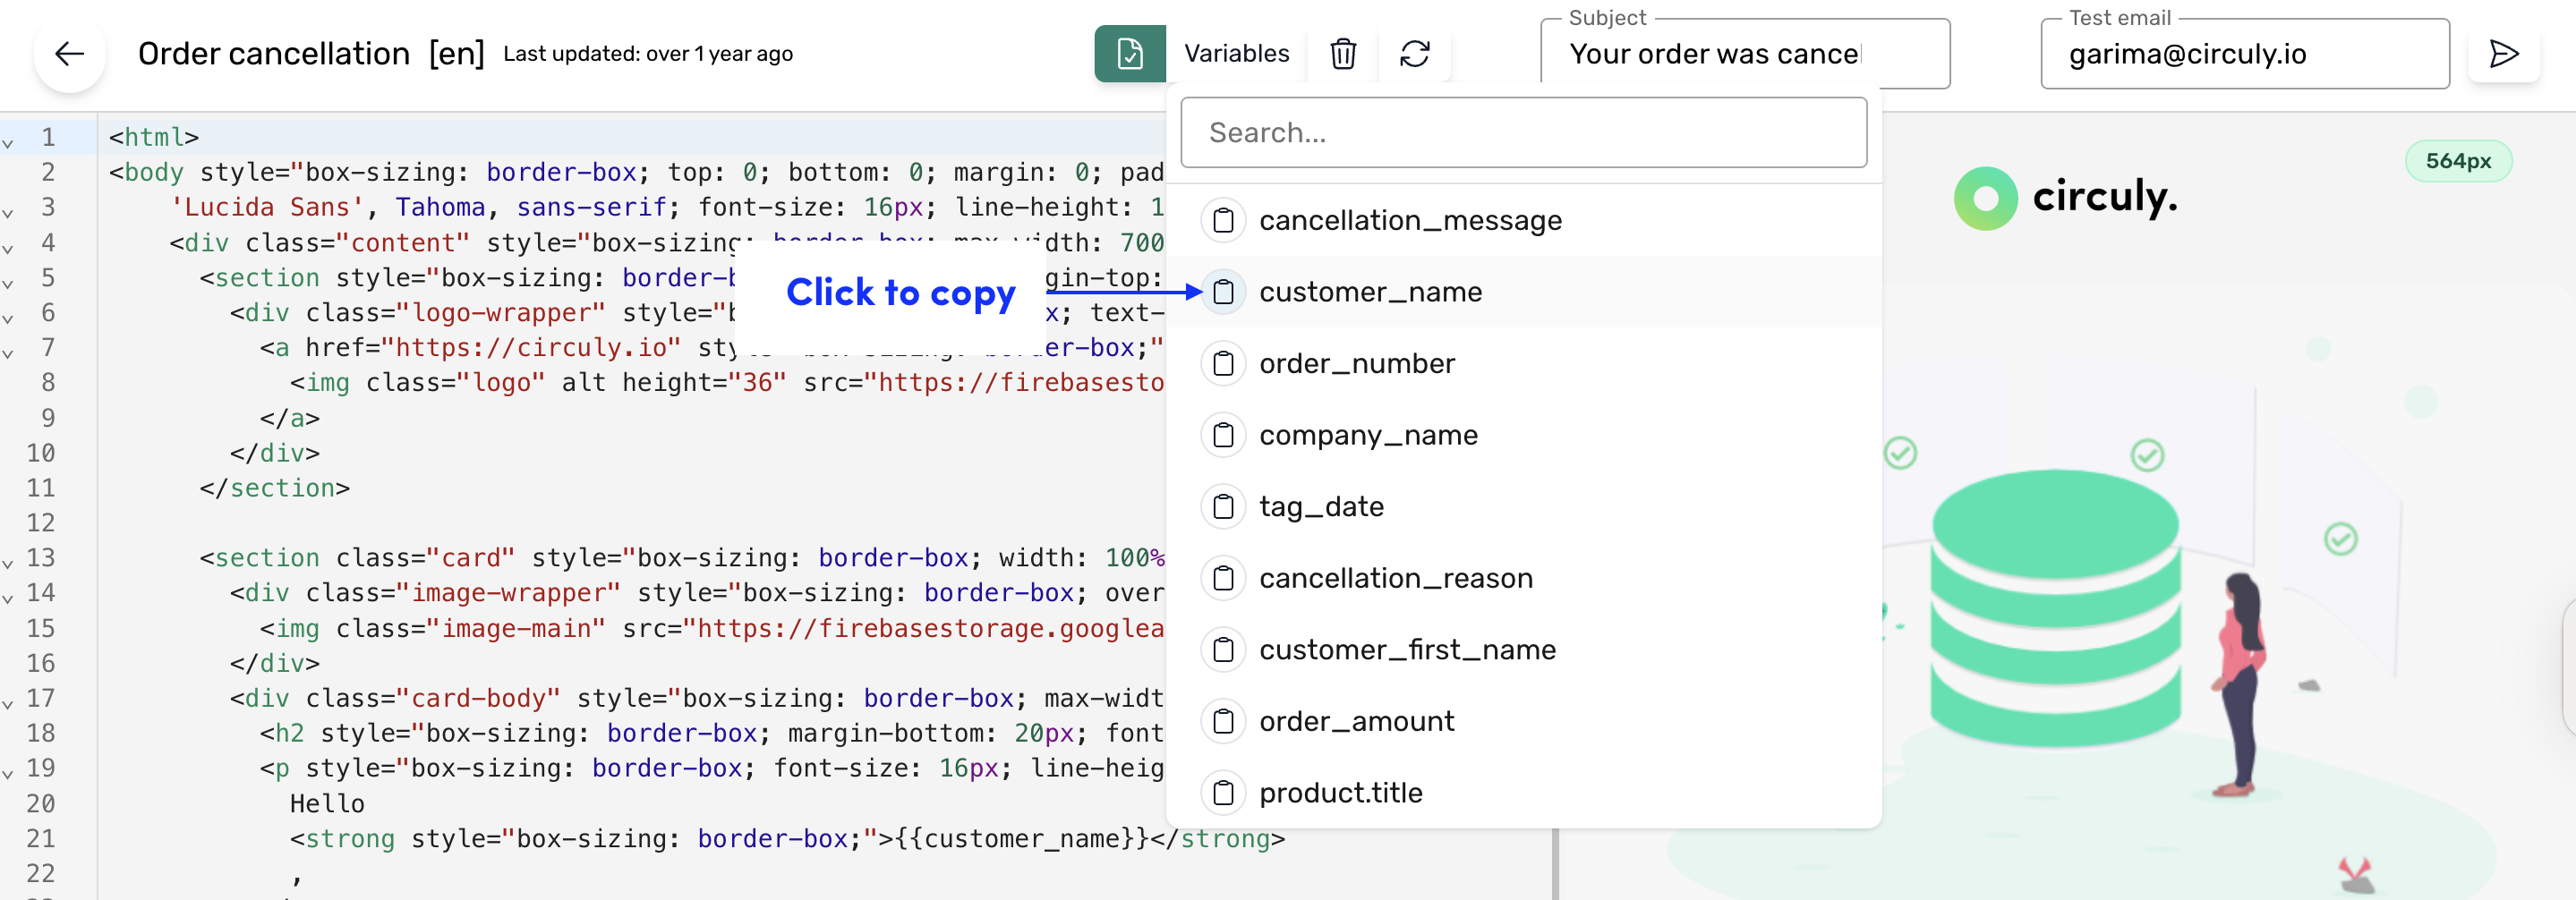
Note: Variables are tied to specific templates, so not every variable is available everywhere.
4. Customise the Design
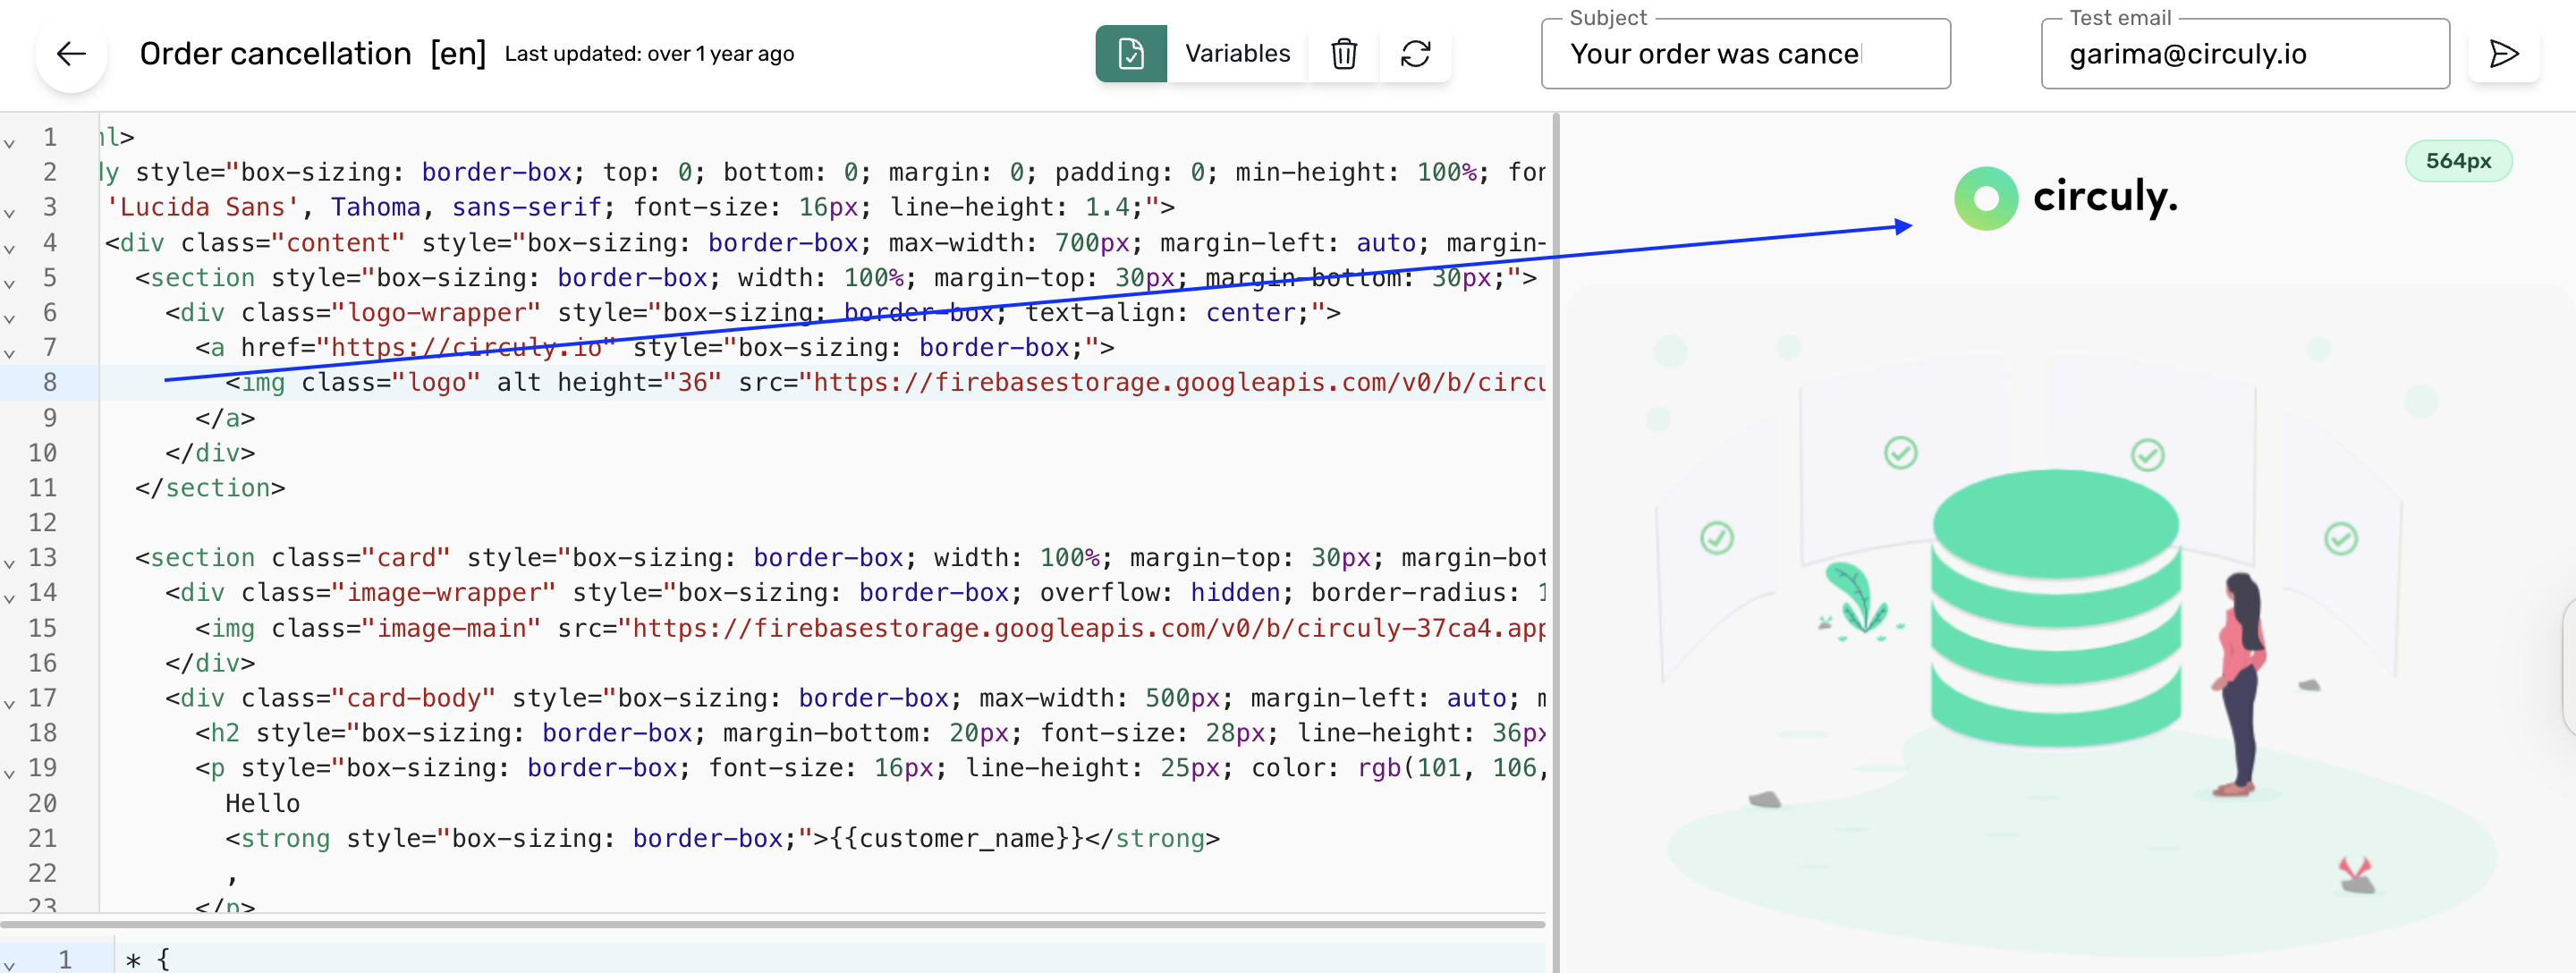
Add your logo
- In circuly’s predefined templates, look for the
<img>tag with theclass="logo". - Replace the
srcwith your logo URL. - Optionally adjust the height (default:
height="36").
Use your custom font
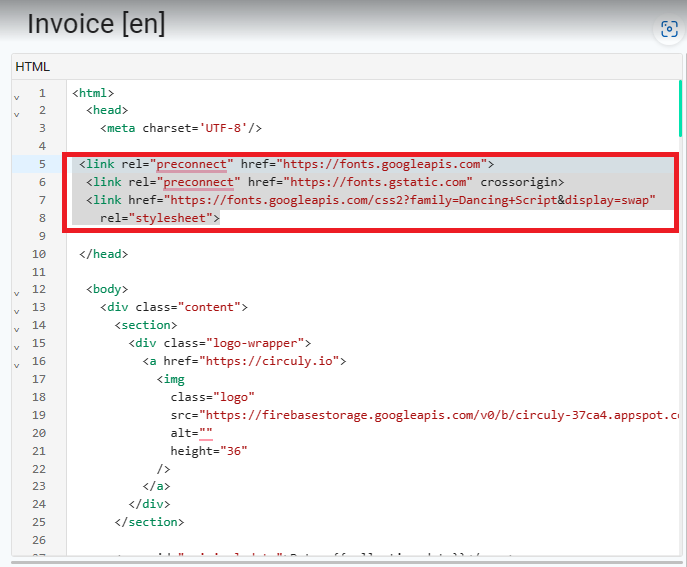
Step 1: Preconnect in the <head>:
The code is used in HTML to include a font from Google Fonts. It helps by establishing a connection to the font server in advance, allowing faster loading. It also ensures cross-origin access for the font resources. The code specifies the font URL and loads the font stylesheet.
Place the following snippet within the <head> section.
- <link rel="preconnect" href="https://fonts.googleapis.com">
<link rel="preconnect" href="https://fonts.gstatic.com" crossorigin>
<link href="https://fonts.googleapis.com/css2?family=Neue+Montreal:wght@400&display=swap" rel="stylesheet">
The third <link> tag specifies the URL of the font file you want to use. Modify this tag to link to your font from Google Fonts. For example, you can change the family attribute value to the desired font and weight.
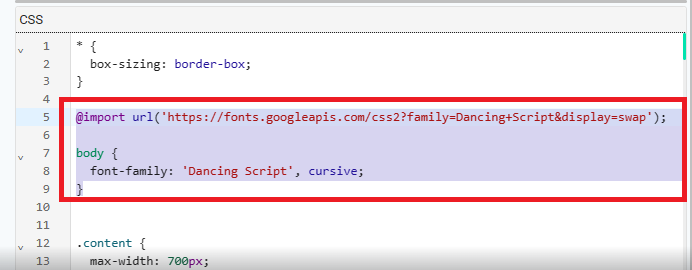
Step 2: Import the font
The CSS code snippet provided in our example is used to define a custom font. It allows you to specify the font family name and the source URL or path where the font file is located.
Import the source url of your chosen font (f.g. from Browse Fonts - Google Fonts )
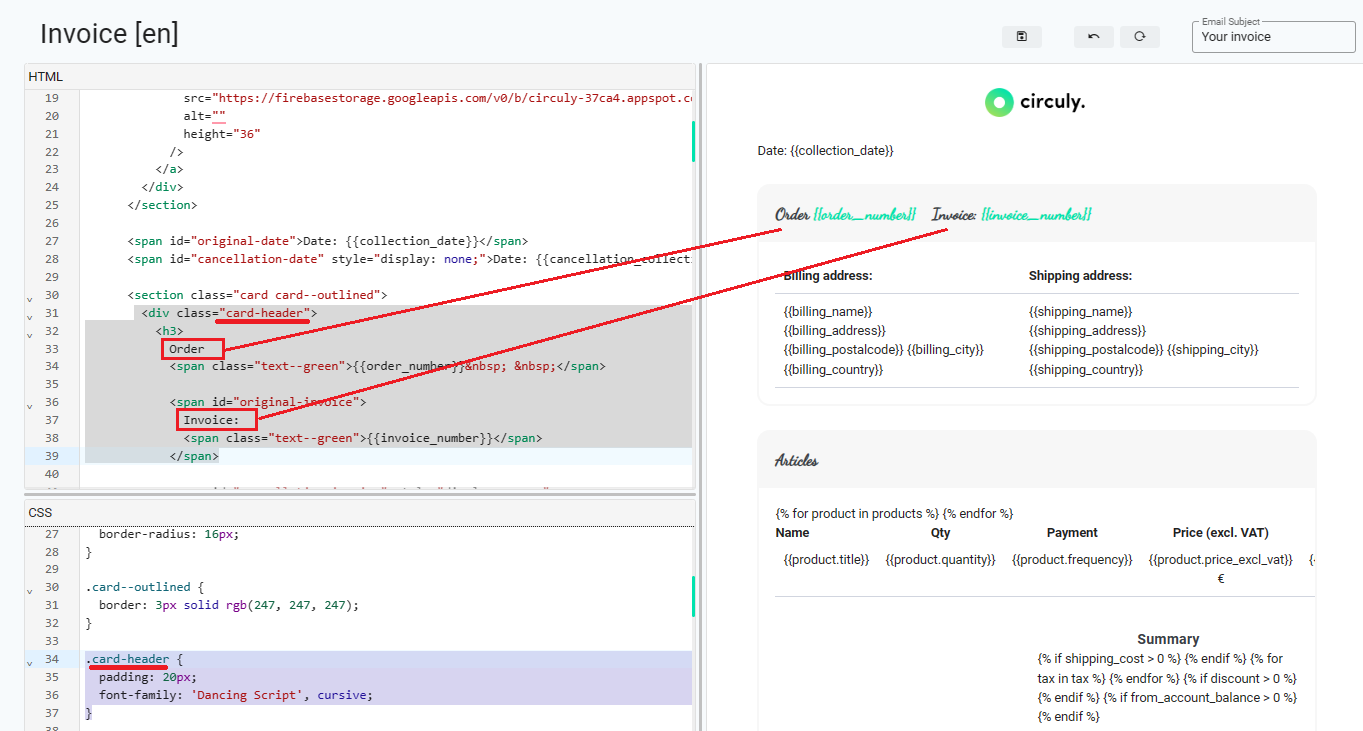
Step 3: Style specific class attributes with your customised font
Styling specific classes allows you to target and apply styles to specific elements within your HTML structure. By using classes, you can selectively style certain elements while leaving others unaffected. This provides more control and flexibility in designing your template. It allows you to create consistent styles across multiple elements that share the same class, without affecting other elements on the page. (In our example we have styled the custom font for the card-header element)
Identify the elements in HTML that you want to style and apply the font rule within the CSS section for this specific class.
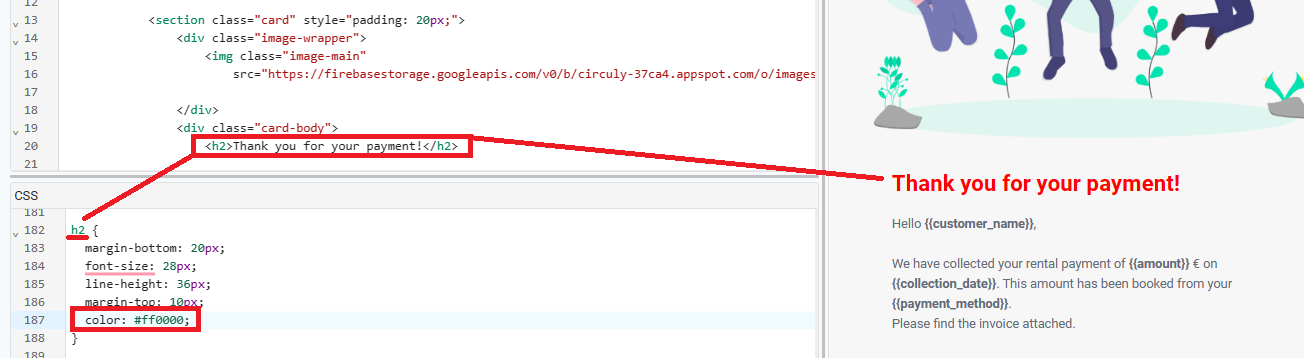
Use colour codes: Styling text colour with CSS
Using colour codes in the hexadecimal format #ff0000or rgb(255, 0, 0) - both serve the purpose of defining colours. However, there are a few reasons why using hexadecimal colour codes is considered more advantageous because of its simplicity, memorability, flexibility, and compatibility with CSS. In our given example, the color of the text inside the <h2> element is styled using CSS. The colour property is set to #ff0000, which represents the hexadecimal value for the colour red.
To Do:
Pick your hexadecimal colour (f.g. HTML Color Picker) and apply the colour code as a rule to your CSS element
Set up links: Create clickable hyperlinks
To use a link in HTML, you need to use the <a> element, which is used to create clickable hyperlinks.In our example, the email address "example@circuly.io" is added as a mailto link within the <a> element. This allows users to click on the link to open their default email client with a pre-filled email to that specific address.
To Do:
Set the <a> element to create the link, specifying the destination URL or relative path in the href attribute and add the desired link text. Use <a href="URL">Link Text</a> as a general link or <a href="mailto:EMAIL">Link Text</a> as a mail link.

Set up images: Integrate your custom images
To add an image to your HTML document, use the <img> tag. Place the tag where you want the image to appear within the HTML structure.
In our example we have the class attribute assigned to the image tag. It specifies a CSS class name ("image-main") that can be used to style the image using CSS later on. The src attribute specifies the source of the image. In this case, the image source is a URL pointing to an image file hosted on the web.
To Do:
Use <img src="URL" alt="Description of the image"> and set the URL of your hosted image.
If desired, delete unwanted default circuly images by removing the <img> tags.

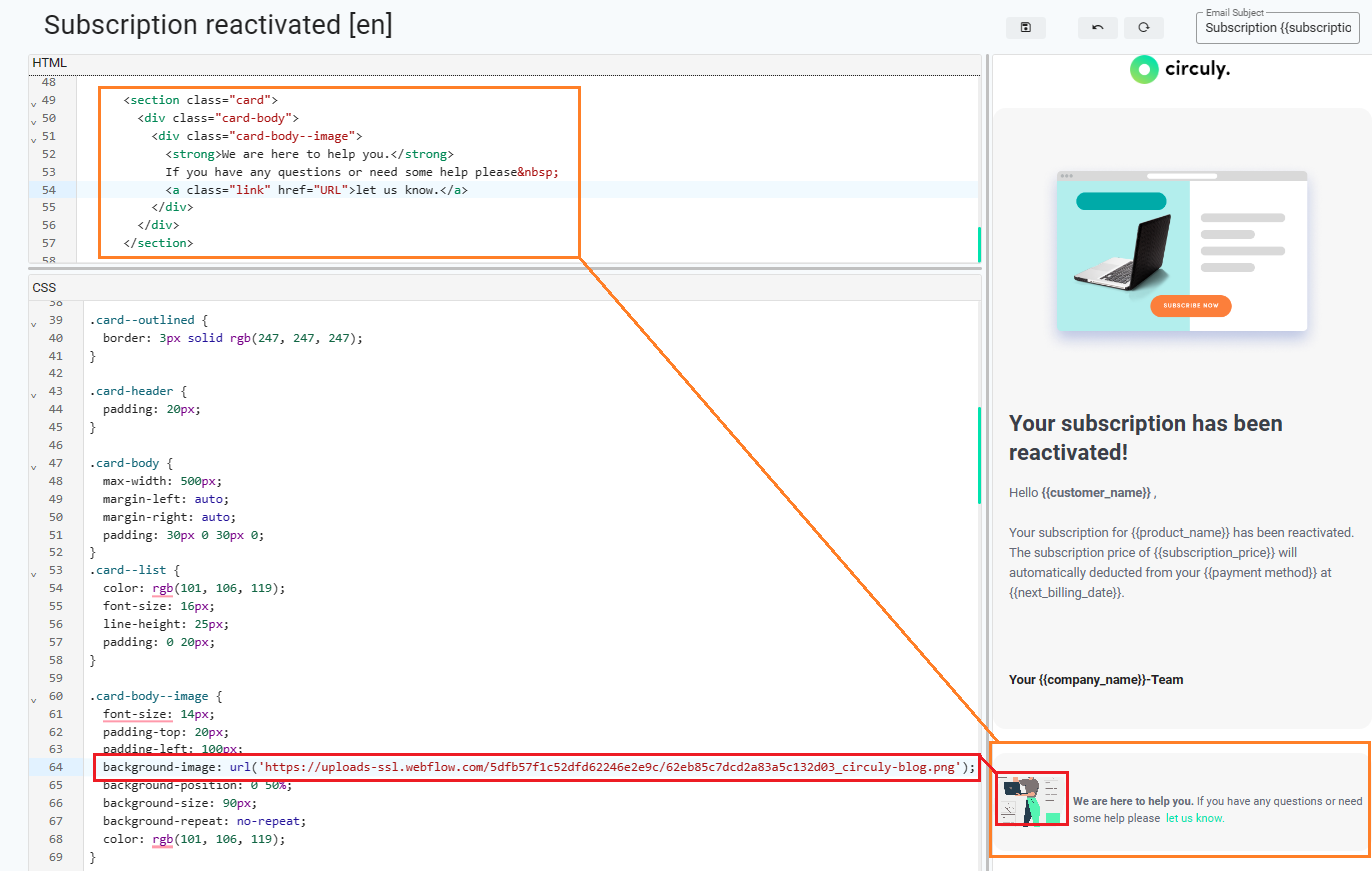
Edit the footer section: Modify the footer section
Our example HTML shows a <section> element with the class attribute class="card", which can serve as a container for your footer content. Within the section, there is a nested structure consisting of <div> elements with various classes for styling purposes. The innermost <div> with the class attribute class="card-body--image" contains the actual content of the footer. It includes a <strong> element for emphasising the text "We are here to help you," followed by plain text and an <a> element for adding a hyperlink. The relevant CSS styling classes for the provided code snippet are .card-body .card--list and .card-body--image
To Do:
If desired, modify the text and hyperlink in HTML or if you want to change the image to a custom picture, you can replace the 'URL' in the background-image CSS property with the URL of your custom image.
Style buttons: Modify clickable buttons
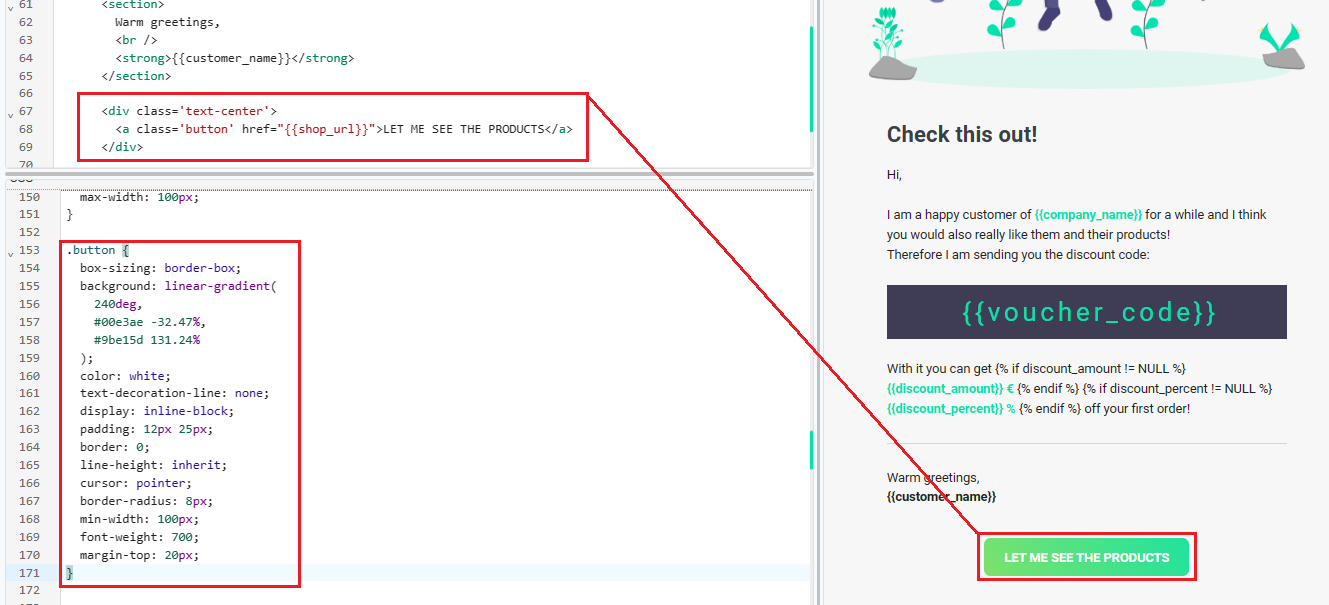
In our HTML example, the button's URL is dynamically populated by a variable called shop_url. This variable is used within the href attribute of the <a> element to determine the destination to your shop when the button is clicked. While the current default implementation uses the shop_url variable to automatically populate the button's URL, it is technically possible to replace this variable with any other URL redirection. Within the CSS below you can easily modify the styling of the button, such as background colour, text colour and shape.
To Do:
If desired, modify the text in HTML and button design in CSS.
Style boxes: Modify text boxes
Within the one-time password and refer a friend template, per default we have set up boxes to highlight the OTP and voucher code.In our example of the OTP template, the default HTML represents a paragraph element (<p>) with the class otp-backdrop. Inside the paragraph, there is a placeholder ({{otp_code}}) that suggests the usage of a variable to dynamically populate the code content.Within the CSS below you can easily modify the styling of the box, such as background color, text color and shape.
To Do:
If desired, modify the box design in CSS. Please do not replace the default variable.
