Release Update June 2022
1. Create cancellation invoices & regenerate wrong invoices
It can happen that an invoice has been created with an error or with wrong information. Not every tying error must be corrected. However, if the error on the invoice is the required information on an invoice in accordance with §14 Paragraph 2 No. 2 of the German Value Added Tax Act, then the error needs to be corrected.
The wrongly generated invoice first needs to be cancelled, and a new invoice must be created for the same with the correct information.

Important Information
Cancelling an invoice does not refund the payment associated with it because cancelling an invoice has another purpose. The purpose is that, as per German law, an invoice that has been created with the wrong information needs to be “cancelled”. The payment associated with the invoice could still be correct and therefore the payment attached to the invoice with the wrong information is not refunded. If you also want to refund the invoice, you need to perform the refund operation.
For a detailed guide check out the detailed article about cancelling and regenerating invoices
2. Email Specific Voucher Codes
In the circuly operations backend you can create vouchers that are valid for specific emails.
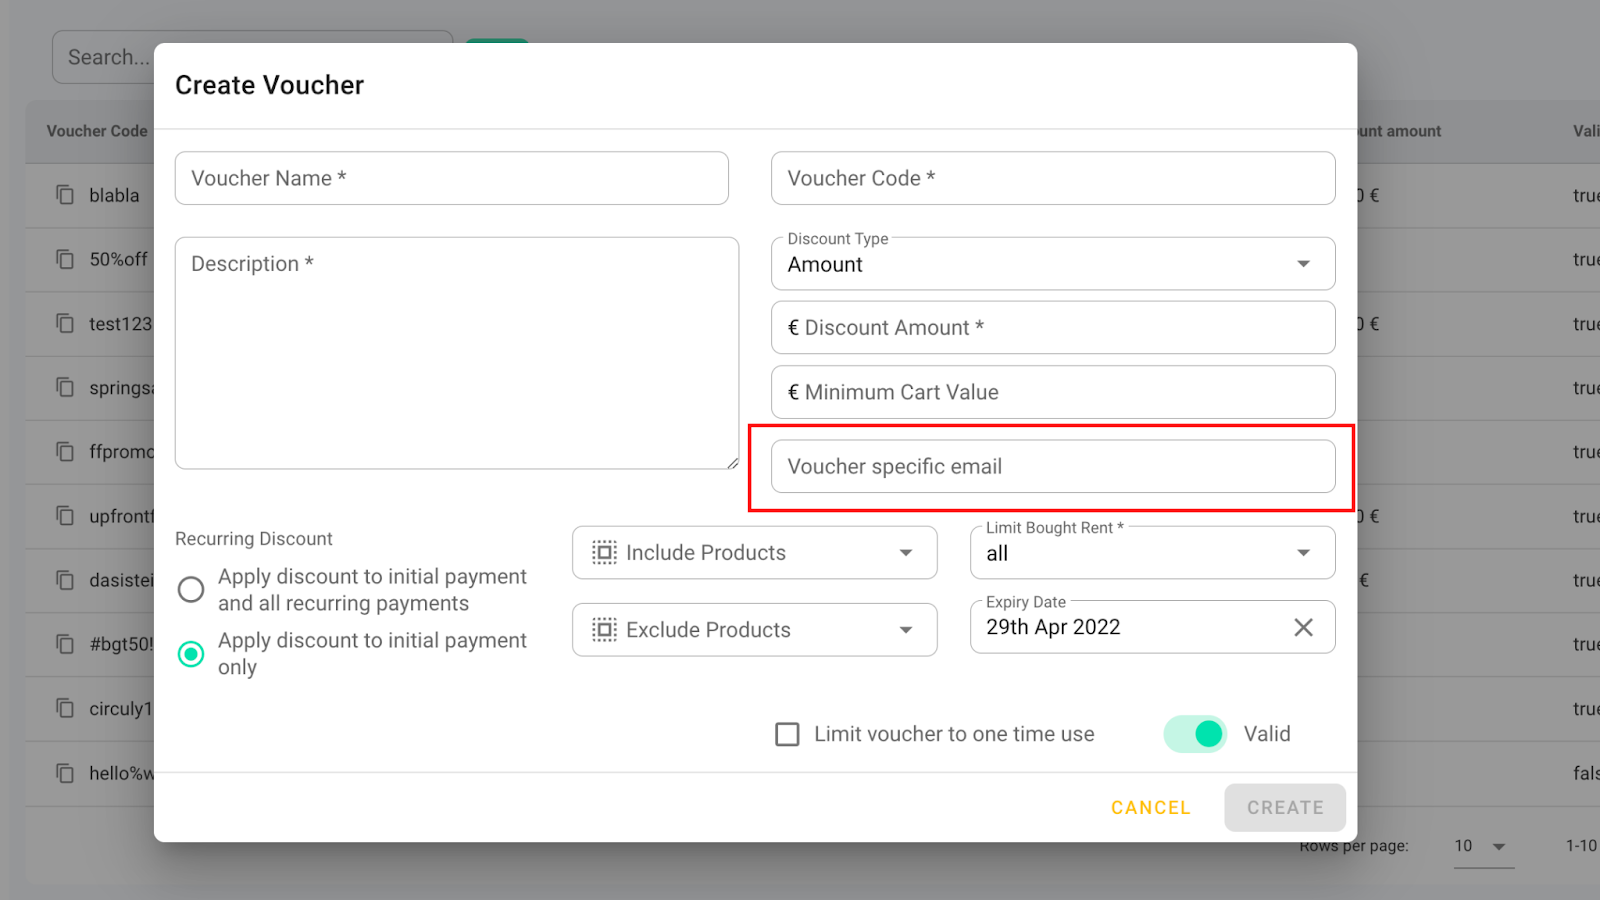
Use case: Customer A requests a discount, and you want to make sure that the discount code is only used by Customer A and not Customer B, C, D or E.
With this new feature, you can easily tie voucher codes to specific email addresses.
Here’s how it works:
To create a voucher code that is valid for a specific email(s) > Log in to your circuly operations backend > Go to Vouchers > Click on + CREATE VOUCHER. > Create a voucher how you normally would > If the voucher is only valid for a specific email address, add the email address in the “Voucher specific email” input field > Click on the CREATE button.

3. Buyout flow for a subscription
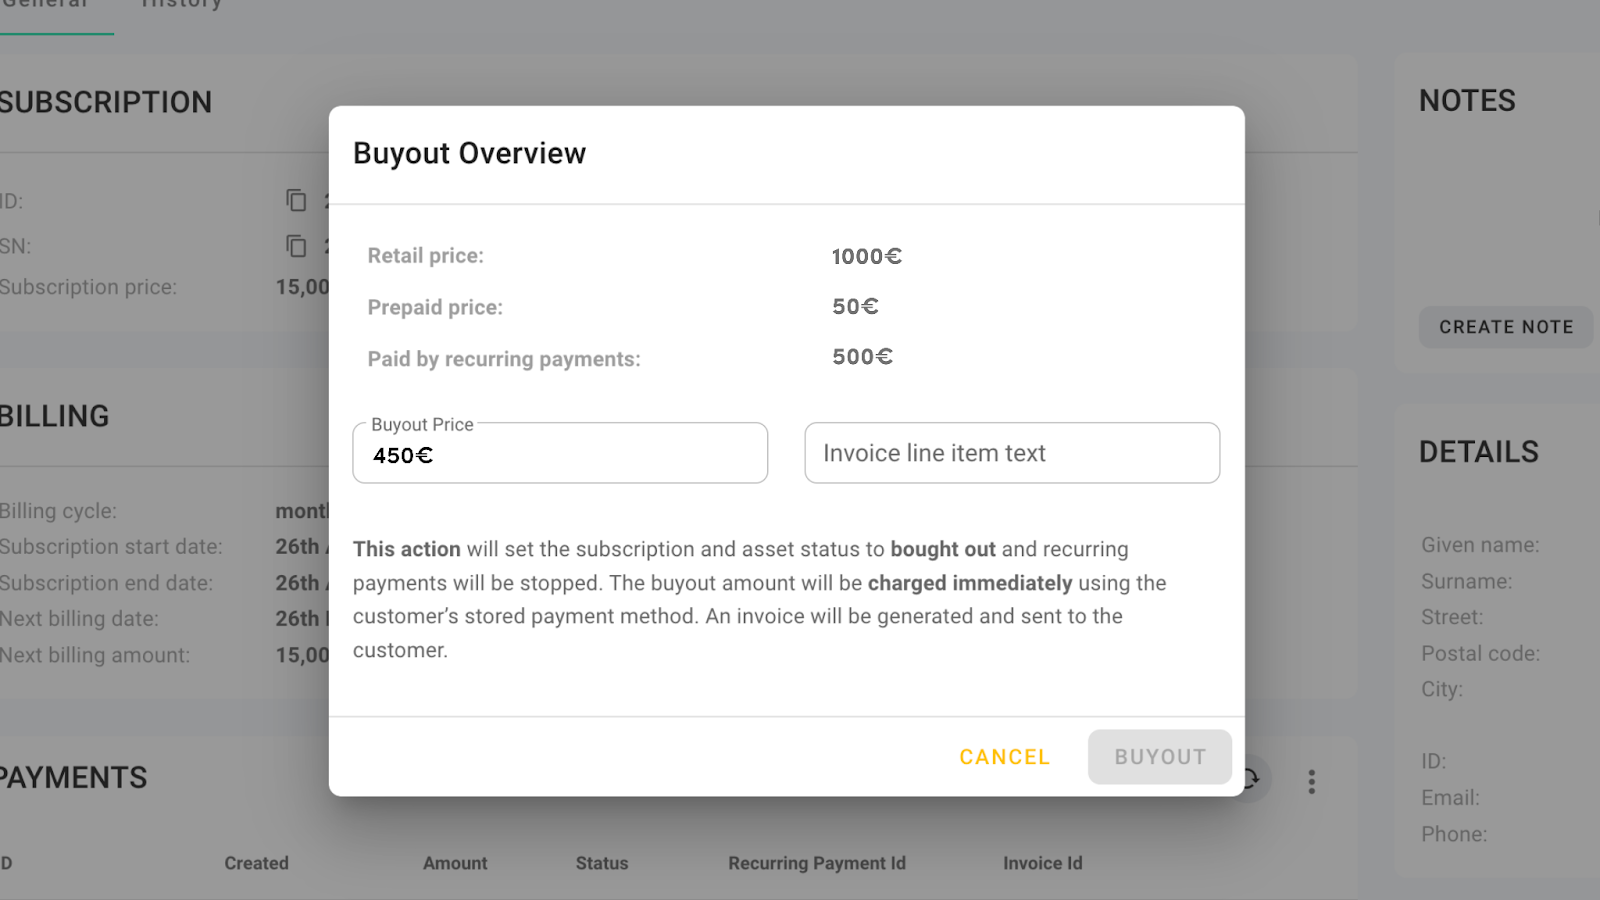
If you have a rental model that allows subscription products to be bought in the middle of the subscription period or at the end of the subscription period, you can tackle the operations associated with subscription product buyouts (such as charging the remaining product amount via a one-time transaction, sending an invoice for the charge, stopping recurring payments etc.) in your circuly operations backend.
Here’s how it works:
To process a subscription product buyout > Login to your circuly operations backend > Go to Subscriptions in the left navigation bar > Select the subscription from the Subscription List and click on it > In the subscription detail window, click on the three dots in the top right corner > Select “Initiate product buyout” from the list > Check the details > Add a text in the “Invoice line item text” input field (what you type here will be included in the invoice sent to the customer) > Click on the BUYOUT button.
Here’s what happens now:
- The subscription status is set to “bought out”.
- The asset status is set to “bought out”.
- The recurring payments are automatically stopped.
- The buyout amount is charged via a one-time transaction automatically.
- An invoice is generated and sent to the customer.
4. Change status of assets to bought out / in stock
You can change the status of assets from “in stock” to “bought out” and vice versa.
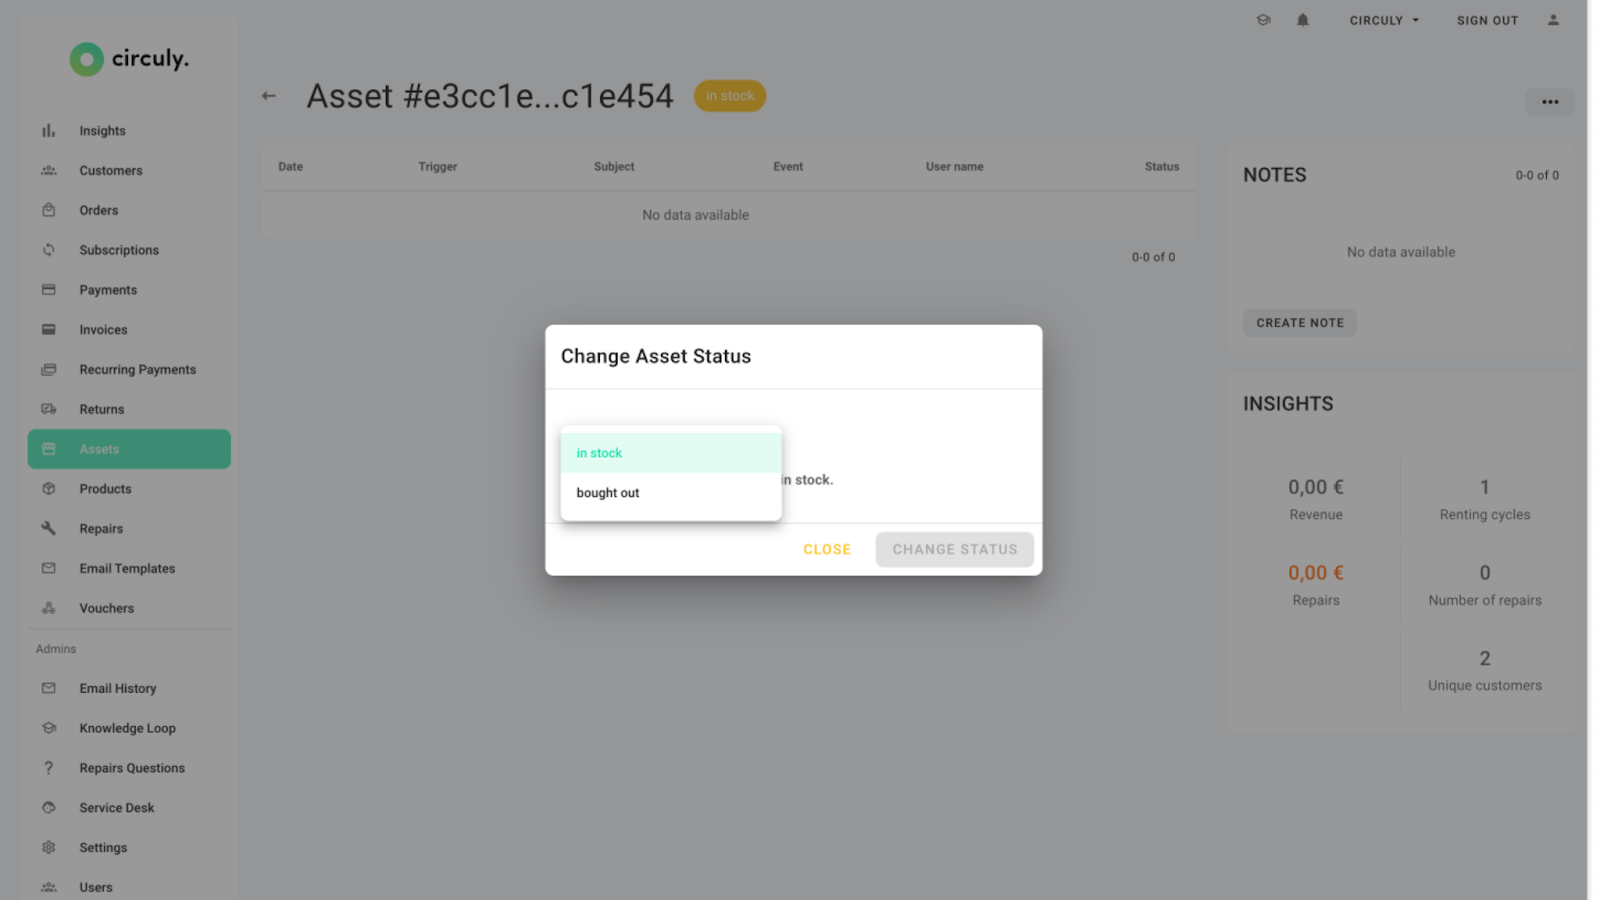
Use case: When you do not want to trigger the buyout flow for subscriptions and only want to mark an asset as bought out or when you want to change the status of a bought-out item to “in stock”.
Here’s how it works:
Login to your circuly operations backend > Go to Assets > Search for the asset in the Asset List whose status you want to update > In the asset detail window click on the three dots in the top right corner > Click on Change Status > in the Change asset status window > Update the status by selecting an option from the dropdown list > once finished click on the CHANGE STATUS button.
5. Send out fulfilled emails based on Shopify status
When an order is marked as complete in circuly two things happen: (1) the order fulfilment completed email is sent to the customer (2) the order status in your shop system is also set to fulfilled. But when the order status is updated in the shop system before it is updated in circuly, the order fulfilment completed email is sent to the customer based on the shop system “fulfilled” status.
Use case: when you’ve connected a shipping tool to your shop system that sends out products to your customer, and when that happens (that is, when the order is in delivery), the status of an order is set to “fulfilled” in the shop system.
6. Show subscription start date in the checkout
If you provide your customers with the possibility to select a subscription start date on the product page on your website, the same will appear on the checkout page for reconfirmation.
7. Split street and street number in 2 fields
On your white label circuly checkout page, the field for street and street numbers have been split in two. If you use Google places to auto-fill the address fields, the street and street numbers will be split into two fields.
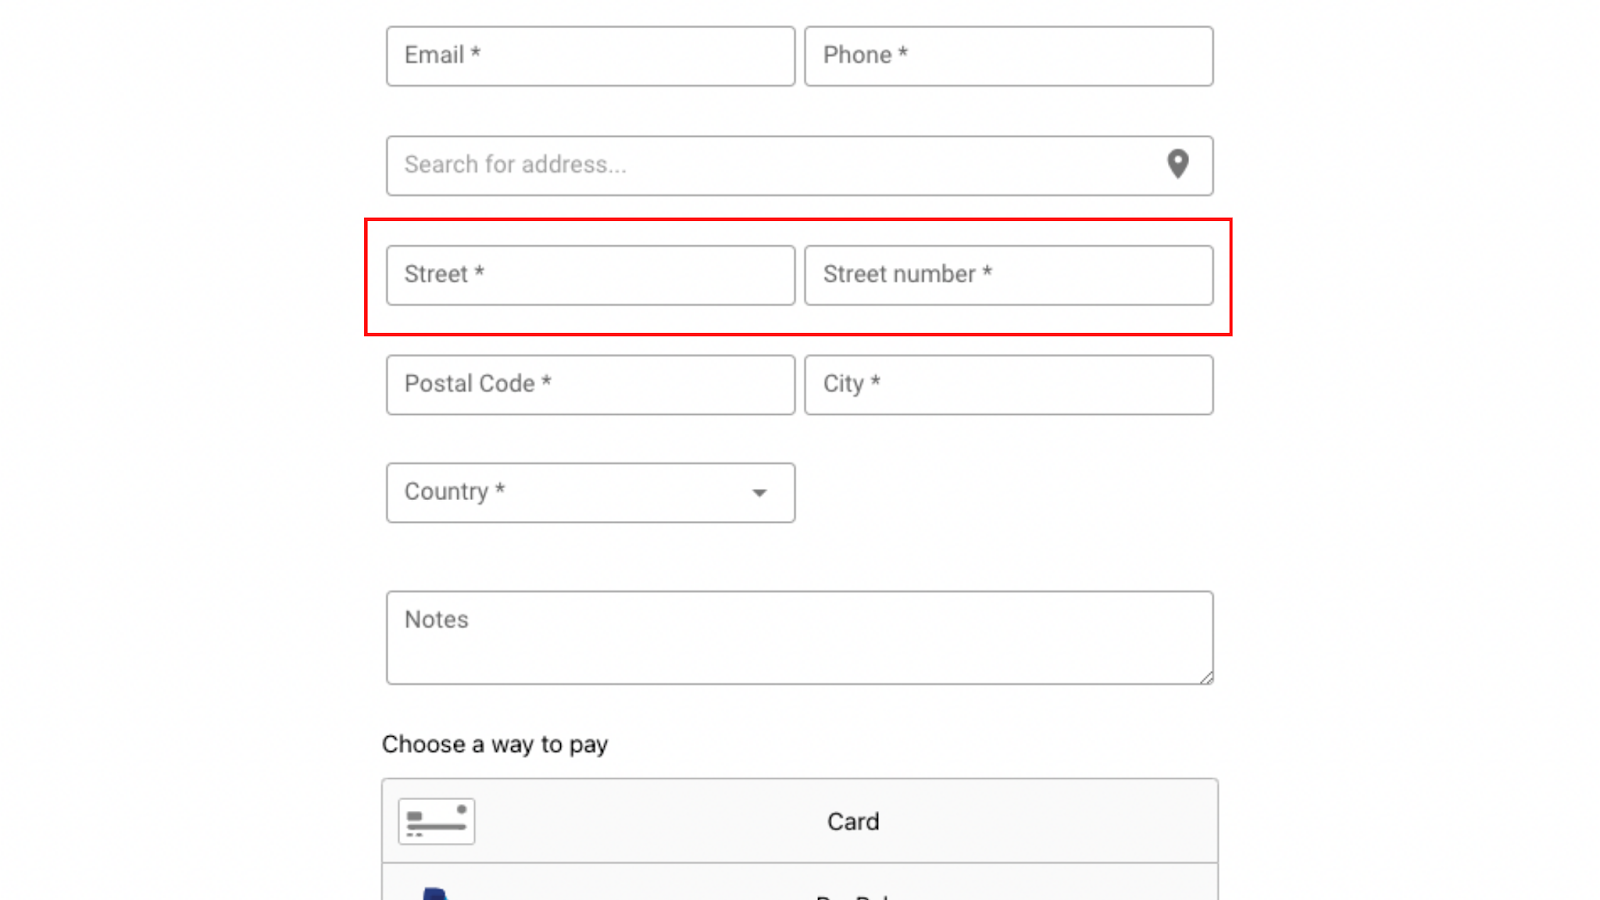
Use case: when customers forget to add a space between the street and street number, creating confusion for fulfilment provider.
8. Show Credit score on the order page
If you’ve enabled CRIF for credit checks, then the information about the customer's creditworthiness is displayed in the Order detail view for the particular order.
9. Editable swap tag
When you swap/replace a product, the order gets a Replacement tag by default. With the new update, you can override the default tag and can define what tag a swap order should get.
Here’s how it works:
Go to Settings > Order > scroll down to the button of the page > Add a new value in the Tag after swap input field > Click on SUBMIT CHANGES.
10. Upgrade/downgrade products
When you get a product upgrade or downgrade request from your customer you can process the request by processing a swap and exchanging the product by adding a different SKU value.
Here’s how it works
Before proceeding to the swap/replacement steps make sure you add the necessary replacement reason in the Settings.
You can do that by going to Settings > Orders > Scroll down to Swap reasons > Click on the plus icon “+” > Add a new Swap reason for upgrading/downgrading products > Click on SUBMIT CHANGES.
Example: Customer wants an upgrade, Customer wants a downgrade, Customer wants to change the product etc.
Then proceed to the swap process
Go to Orders > Select an order from the Order List that should be upgraded/downgraded > In the Order overview scroll down to Subscriptions > Click on the three dots > Select Initiate product swap from the menu > Select a Replacement reason from the dropdown list > Click on the CONTINUE button > Click on EXCHANGE PRODUCT in the top right corner > Edit the product details by editing the product name, Product ID and Price.
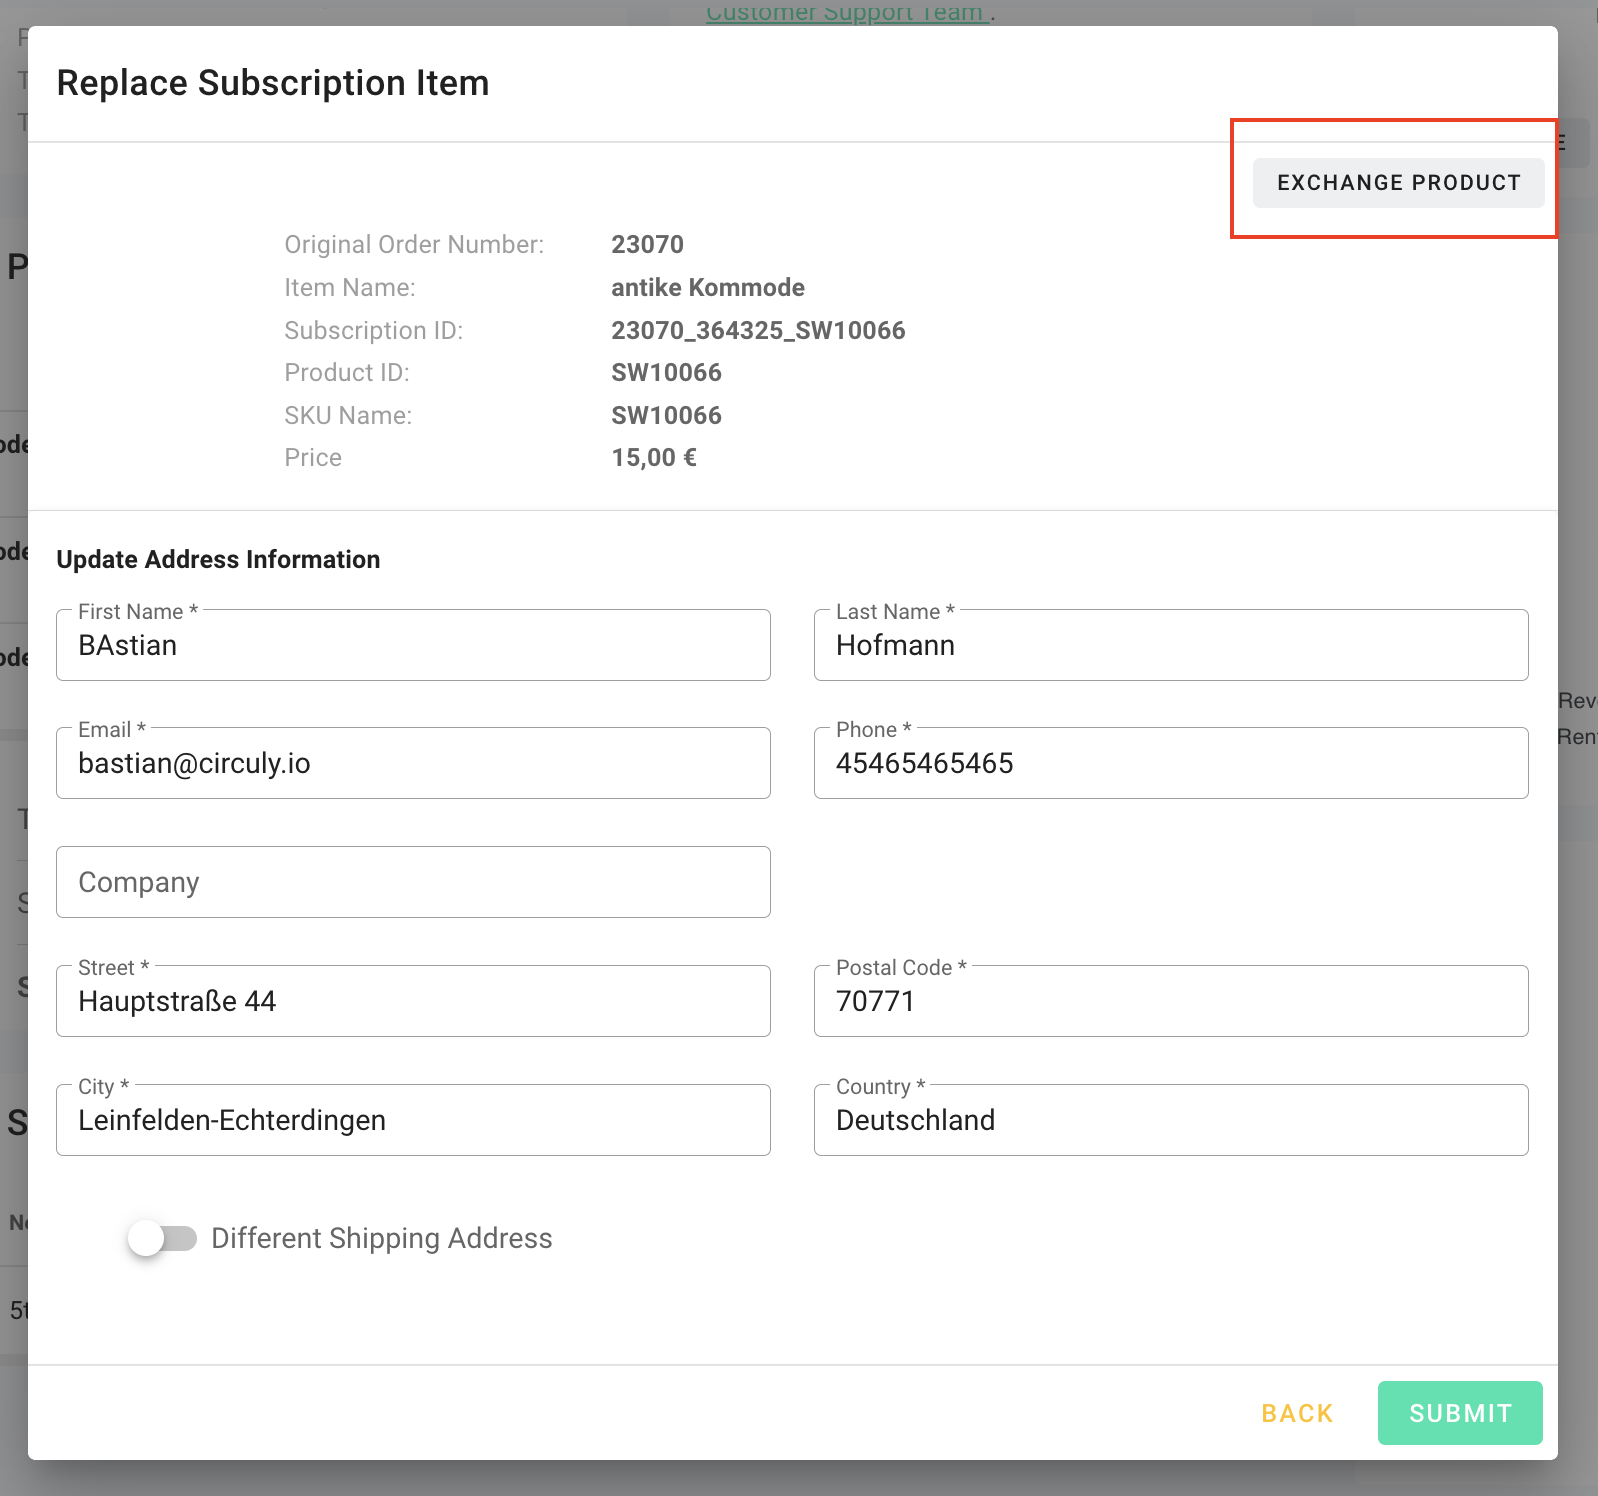
Make sure you enter the correct SKU number so that the right order is shipped to the customer.
11. Automate the process of starting a subscription
When you mark an order as completed or as fulfilled subscriptions will be automatically created for all Order items under the Order that do not have a subscription yet. The subscription start date will be Today plus x - X being the value you define in your settings for enabling this feature.
If you offer your customers the possibility to select a subscription start date on the checkout page then enabling this feature will not override the original date selected by your customer and will only take that date into consideration to start the subscription when the date arrives.
This feature is by default turned off for all circuly users and can be enabled in settings.
Here’s how it works
Go to Settings > Subscription > First turn on the switch for Auto activate subscriptions > Then add a numeric value in the Auto activate offset input field > Click on SUBMIT CHANGES.
Example: If the number in the Auto activate offset input field says 2, then the subscription start date will be “today + 2".
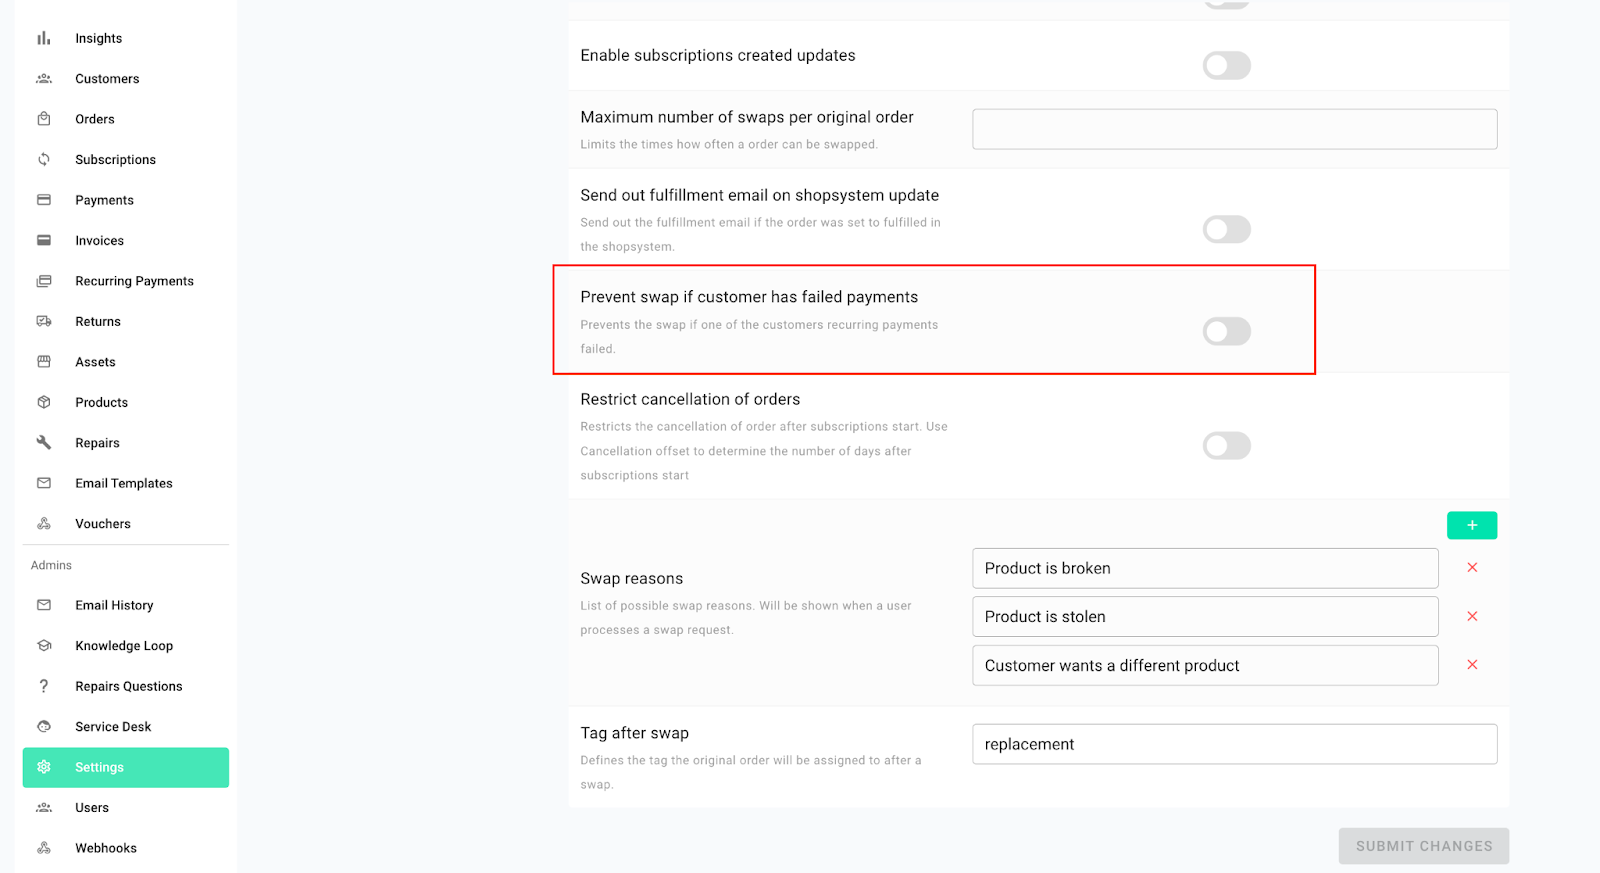
12. Prevent swap when a customer has failed recurring payments
When a customer who has failed recurring payments requests a swap, enabling this feature prevents your customer success team from processing the swap.
This feature is by default turned off for all circuly users and can be enabled in settings.
Here’s how it works
Go to Settings > Orders > Scroll down to the setting that says Prevent swap if customer has failed payments > Turn the switch on > click on SUBMIT CHANGES.
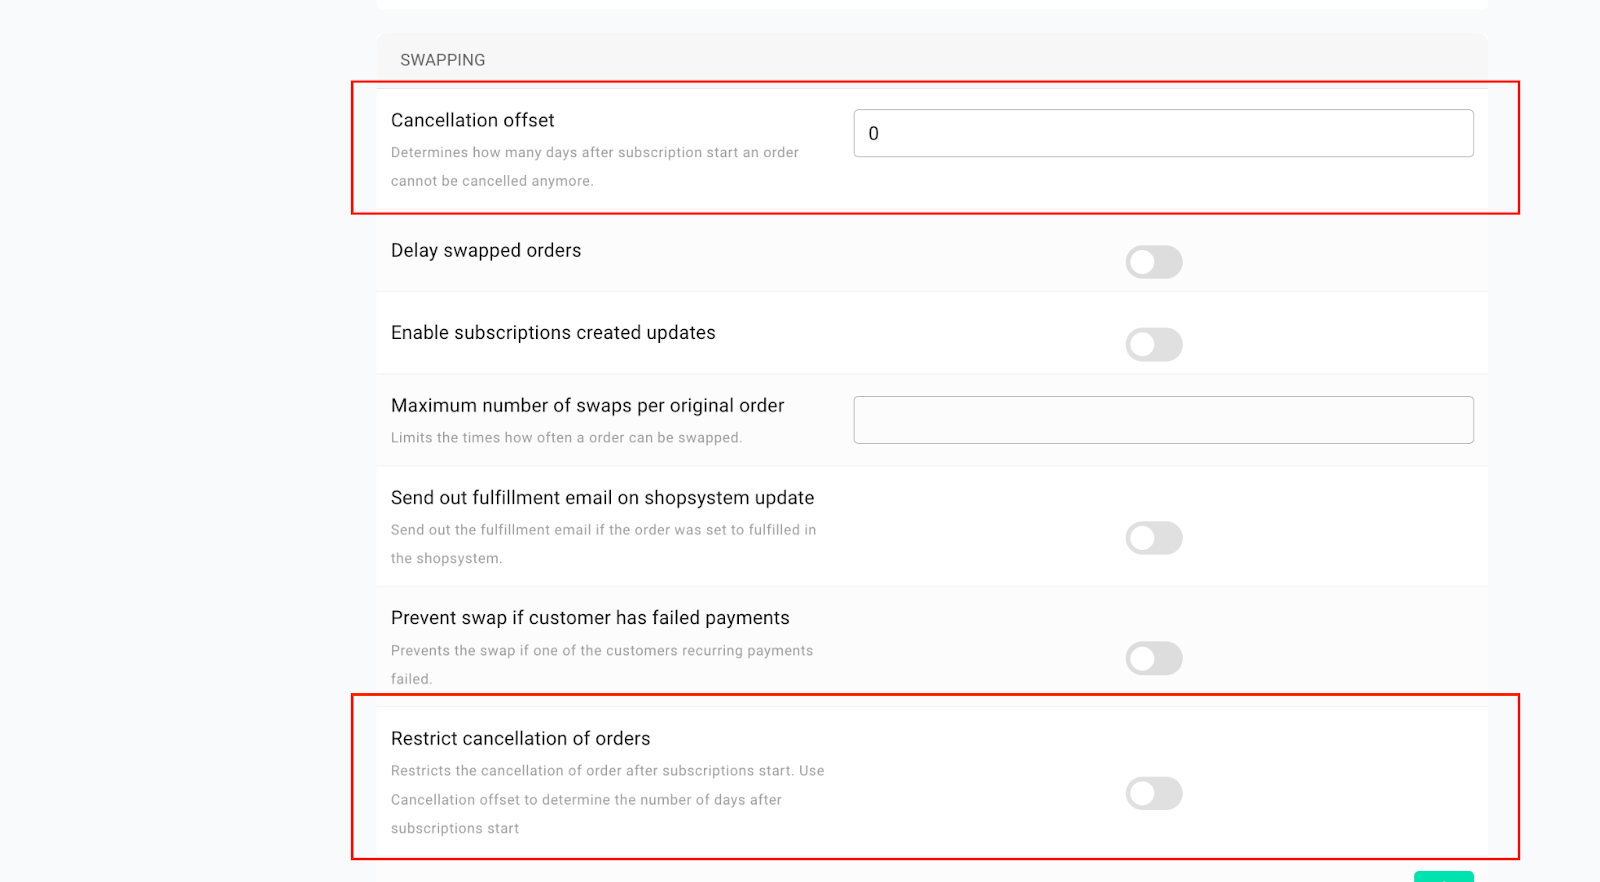
13. Restrict cancellation of orders
Your customers may change their minds about keeping their subscription products after starting their subscription. The logical step in such cases is to cancel the order.
But typically in eCommerce, orders can only be cancelled if the cancellation request is made within a certain time period. Most companies have a cancellation period after which the order can no longer be cancelled and returned to the vendor.
If you have a minimum subscription period for your product then the customer can still return the product after the minimum subscription period is over in case they no longer want to keep their subscription product.
This feature makes subscription operations manageable especially when you have hundreds of orders as it can be hard to keep an overview of whether or not an order can be cancelled.
With the Restrict cancellation feature, you can prevent the cancellation of orders that have passed the cancellation period. You can define a numeric value that will be used to identify whether or not time window for cancelling an order has passed after teh subscription has been created.
This feature is by default turned off and can be enabled in settings.
Here’s how it works:
Go to Settings > Orders > Scroll down to the setting that says Restrict cancellation of orders and turn on the switch for this setting > Then scroll up to the Cancellation offset setting > Insert a numeric value in the input field > Click on SUBMIT CHANGES.
14. Customer details changeable from the customer login
This feature frees some operational weight from your shoulders by making it possible for your customers to change their personal details, shipping address and payment information from the customer login.
Details such as the address can only be changed per order which means that if a customer has multiple orders connected to the same email address, then the customer can change the address only for the order they select and edit.
Changing the address for one order will not change the address for other orders connected to the email address.
15. Export failed payments
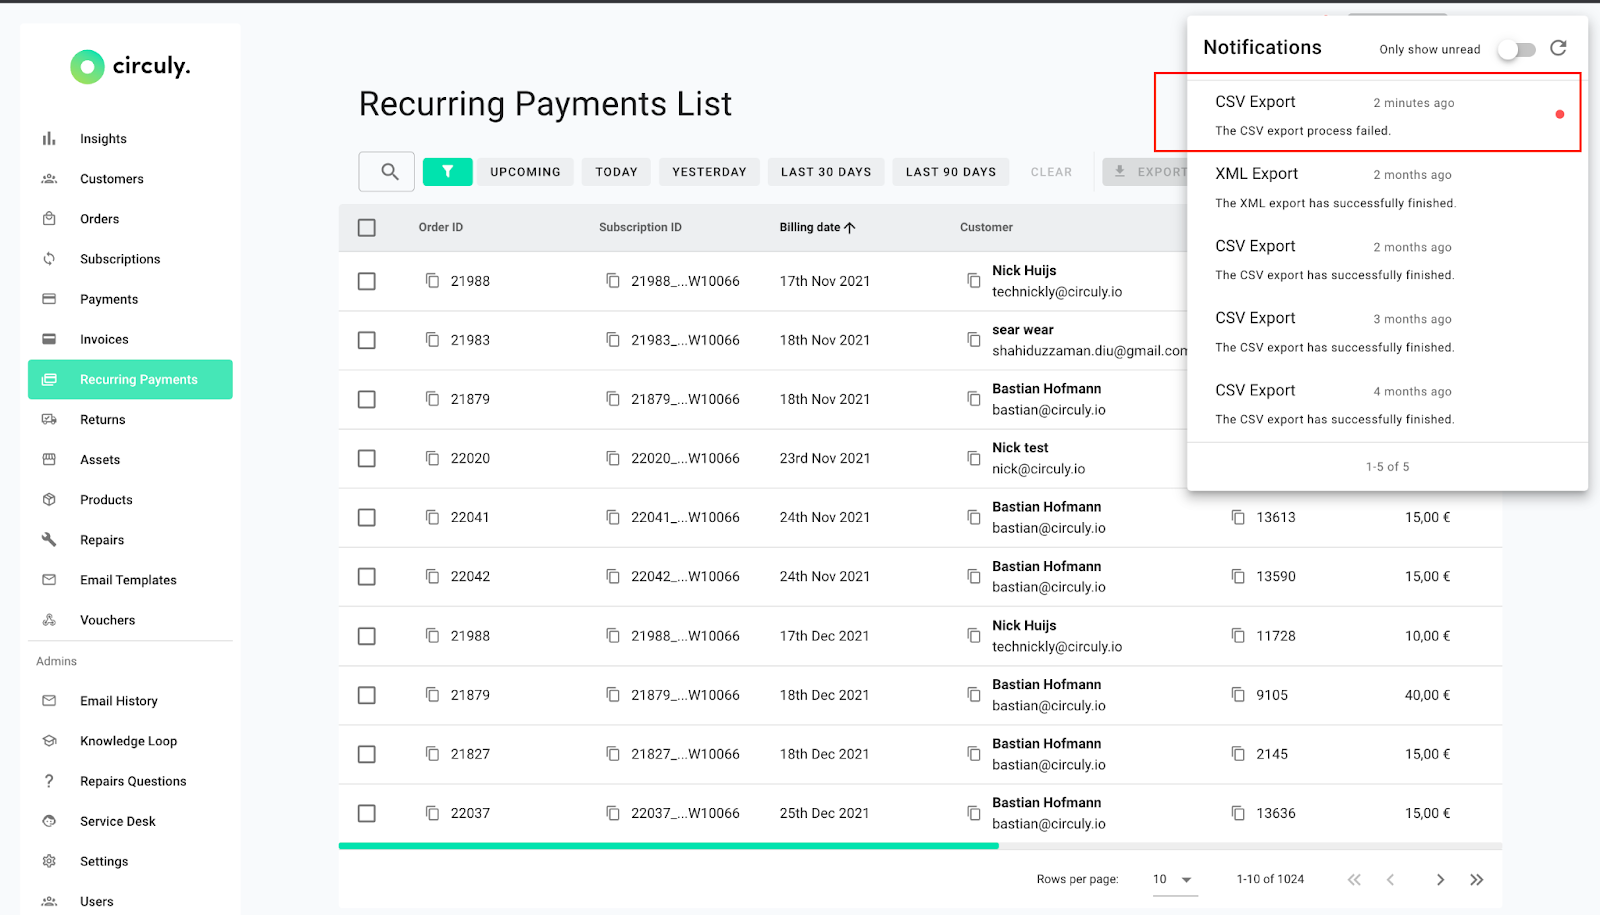
You can now export failed monthly recurring payments from circuly. This feature is useful when you want to see which customer owes you what amount, for which months and to see the failed recurring payment amount for a given month for all customers that failed to settle their recurring payments.
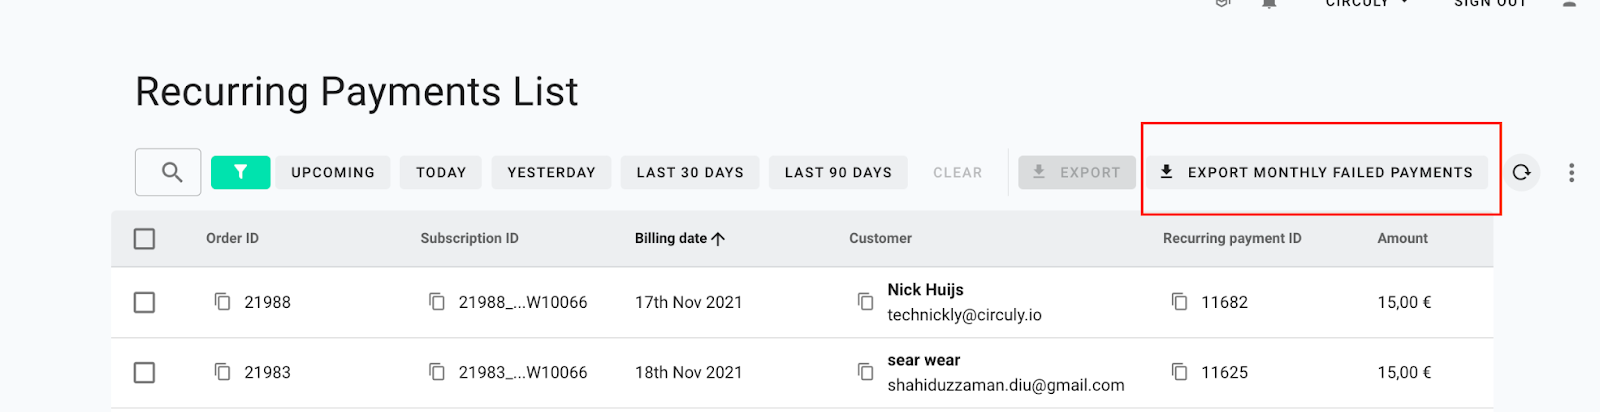
Here’s how it works:
To download failed recurring payments > Go to Recurring Payments > Click on the button that says EXPORT MONTHLY FAILED PAYMENTS > Select the format of the download > When the export is ready you will get a notification in the Notifications panel (the bell icon) > Go to the Notifications (the bell icon) > Click on the export notification > In the Export window click on the DOWNLOAD button.